My Garage
My Account
Cart
Genuine Ford Shift Cable
Transmission Shift Cable- Select Vehicle by Model
- Select Vehicle by VIN
Select Vehicle by Model
orMake
Model
Year
Select Vehicle by VIN
For the most accurate results, select vehicle by your VIN (Vehicle Identification Number).
329 Shift Cables found


Ford Automatic Transmission Shifter Cable
Part Number: 5L3Z-7E395-BA$57.65 MSRP: $75.00You Save: $17.35 (24%)Product Specifications- Other Name: Cable Assy - Selector Lever Control; Shift Control Cable


Ford Automatic Transmission Shift Cable For
Part Number: XC3Z-7E395-CA$55.18 MSRP: $80.67You Save: $25.49 (32%)Product Specifications- Other Name: Cable Assy - Selector Lever Control
- Manufacturer Note: 7.3L/4R100 - without P.T.O.


Ford Selector Lever Control Cable Assembly
Part Number: 4L3Z-7E395-CA$60.42 MSRP: $88.33You Save: $27.91 (32%)Ships in 1-2 Business DaysProduct Specifications- Other Name: Cable Assy - Selector Lever Control


Ford Transmission Shifter Shift Control Cable
Part Number: AL3Z-7E395-A$118.52 MSRP: $176.37You Save: $57.85 (33%)Ships in 1-3 Business DaysProduct Specifications- Other Name: Cable Assy - Selector Lever Control; Shift Control Cable
- Replaces: 9L3Z-7E395-C

Ford Selector Lever Control Cable Assembly
Part Number: XC3Z-7E395-BA$68.29 MSRP: $99.83You Save: $31.54 (32%)Product Specifications- Other Name: Cable Assy - Selector Lever Control
- Manufacturer Note: 5.4L/6.8L/7.3L/4R100 - with P.T.O.


Ford Automatic Transmission Shifter Cable
Part Number: 9L8Z-7E395-A$124.99 MSRP: $162.62You Save: $37.63 (24%)Product Specifications- Other Name: Cable Assy - Selector Lever Control; Cable
- Replaced by: AL8Z-7E395-A


Ford Selector Lever Control Cable Assembly
Part Number: DC3Z-7E395-B$96.93 MSRP: $141.72You Save: $44.79 (32%)Ships in 1-3 Business DaysProduct Specifications- Other Name: Cable Assembly - Selector Lever Control; Shift Control Cable
- Replaces: BC3Z-7E395-B


Ford Selector Lever Control Cable Assembly
Part Number: F85Z-7E395-BA$110.60 MSRP: $161.70You Save: $51.10 (32%)Ships in 1-3 Business DaysProduct Specifications- Other Name: Cable Assy - Selector Lever Control
- Manufacturer Note: 4R70W
- Replaces: F65Z-7E395-AA, XL3Z-7E395-BA


Ford Transmission Gear Shifter Shift Control Cable
Part Number: 6F1Z-7E395-A$111.03 MSRP: $171.67You Save: $60.64 (36%)Ships in 1-3 Business DaysProduct Specifications- Other Name: Cable Assy - Selector Lever Control; Shift Control Cable
- Manufacturer Note: column shift
- Replaces: 1F1Z-7E395-AA


Ford Selector Lever Control Cable Assembly
Part Number: 8L8Z-7E395-B$52.52 MSRP: $68.33You Save: $15.81 (24%)Product Specifications- Other Name: Cable Assy - Selector Lever Control; Cable, Shift Control Cable


 Product Specifications
- Other Name: Cable Assembly - Selector Lever Control; Cable
- Replaced by: DJ5Z-7E395-E


Ford Selector Lever Con Cable Assembly
Part Number: CK4Z-7E395-E$80.76 MSRP: $118.07You Save: $37.31 (32%)Ships in 1-3 Business DaysProduct Specifications- Other Name: Cable Assembly - Selector Lever Con; Cable, Shift Control Cable
- Replaces: CK4Z-7E395-A, CK4Z-7E395-C


Ford Selector Lever Control Cable Assembly
Part Number: DT1Z-7E395-D$94.43 MSRP: $147.77You Save: $53.34 (37%)Ships in 1 Business DayProduct Specifications- Other Name: Cable Assembly - Selector Lever Control; Cable, Shift Control Cable
- Replaces: DT1Z-7E395-A, DT1Z-7E395-C, DT1Z-7E395-B

Ford Selector Lever Control Cable Assembly
Part Number: DG9Z-7E395-AU$80.70 MSRP: $105.00You Save: $24.30 (24%)Ships in 1-2 Business DaysProduct Specifications- Other Name: CABLE ASY - SELECTOR LEVER CON; Cable, Shift Control Cable
- Replaces: DG9Z-7E395-J, DG9Z-7E395-W, DG9Z-7E395-AG, DG9Z-7E395-N, DG9Z-7E395-B, DG9Z-7E395-K, DG9Z-7E395-AP
Ford Selector Lever Control Cable Assembly
Part Number: DP5Z-7E395-H$98.04 MSRP: $143.33You Save: $45.29 (32%)Product Specifications- Other Name: CABLE ASY - SELECTOR LEVER CON; Cable, Shift Control Cable
- Replaces: DP5Z-7E395-F, DP5Z-7E395-E, DP5Z-7E395-G, DP5Z-7E395-B, DP5Z-7E395-C, DP5Z-7E395-D

Ford Selector Lever Con Cable Assembly
Part Number: CK4Z-7E395-D$89.79 MSRP: $131.27You Save: $41.48 (32%)Ships in 1-3 Business DaysProduct Specifications- Other Name: Cable Assembly - Selector Lever Con; Shift Control Cable
- Replaces: CK4Z-7E395-B


Ford Selector Lever Control Cable Assembly
Part Number: DG9Z-7E395-AW$100.91 MSRP: $146.33You Save: $45.42 (32%)Product Specifications- Other Name: CABLE ASY - SELECTOR LEVER CON; Cable, Shift Control Cable
- Replaces: DG9Z-7E395-D, DG9Z-7E395-AQ, DG9Z-7E395-AE, DG9Z-7E395-P

 Product Specifications
- Other Name: Cable Assy - Selector Lever Control; Cable
- Replaces: 9L3Z-7E395-B


Ford Selector Lever Control Cable Assembly
Part Number: 5S4Z-7E395-C$54.87 MSRP: $78.83You Save: $23.96 (31%)Product Specifications- Other Name: Cable Assy - Selector Lever Control
- Replaces: 5S4Z-7E395-BB


Ford Automatic Trans Shifter Cable
Part Number: FL1Z-7E395-B$121.98 MSRP: $178.33You Save: $56.35 (32%)Product Specifications- Other Name: Cable Assembly - Selector Lever Control; Cable, Shift Control Cable
| Page 1 of 17 |Next >
1-20 of 329 Results
Ford Shift Cable Parts Questions & Experts Answers
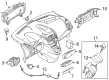
- Q: How to replace and adjust the shift cable in Automatic transaxle on Ford Fusion?A:This procedure is tiresome to home mechanics because it requires dismantling of the instrument panel and HVAC housing to handle the cables. First, take the air conditioning refrigerant to the dealer or the shop, or any other competent person who is well conversant in the matter. In the case where the car has been in use, then wait for a few hours before turning on the engine. Remove both the battery cables and allow 2 min with no connection. Then, pull out the battery and the tray, and the center console and, finally, the heater core/evaporator core housing at the back of the console. Remove the insulation pad and disconnect the airbag module, the clips of the harness should be released. Remove the cable from the shift assembly practically, it is necessary to eliminate it from the car to find out fasteners to which the grommet is fixed on a floor of the car. To remove the shift cable from the transaxle control arm there is a cable end which should be lifted upward so that the pressure from the spring clip can be released followed by a twisting motion. Take care not to pinch the spring clip. Relase the clips to come out of the cable housing end from the transaxle bracket, while make sure the plastic groove is still remained. Remove any retainers that are fitted along the length of the cable and remove the shift cable through the floor with attention to the fact that grommet is an integrated part of the cable. It is simply the opposite of removal consisting on making sure that the new cable is properly tuned after the process and that the cooling system is refilled while recharging the refrigerant. Special for adjustment, release the parking brake and remove the negative terminal of the battery. For the third version of the service to 3.5L models it is necessary to erase the air filter housing. Shift the shifter in the Drive position, take the cable eye off the control arm and pushing on the shift arm at the transaxle place the shift arm in Drive then move it to Park. Move the shift arm for the five-speed or the six-speed transaxles to the right position or the Drive position as it is called. The terminal end of shift cable has an adjuster; pull out two locking tabs and move the lock up from the cable end. Push the end of the cable onto the control arm stud and make sure the adjuster engages on the stud. After recheck of all elements, you need to pull the parking brake and then check the car in each range to ensure that the adjustment is correct.
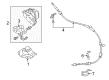
- Q: How to remove, install, and adjust the shift cable in the automatic transmission on Ford Focus?A:To pull the left-hand front wheel, right, it is advised to stake the wheel nuts, apply the parking brake, jack up the front part of the vehicle and support it on axle stands. Subsequently, do away with the front right section of the exhaust pipe, making sure that the flex part is not bent severely. After removing the 'flat nut' fasteners, pull down the exhaust heat shield; then search for the selector cable end fitting and pop it off the transaxle. Pull out the cable casing to break the locking collar by rotating it anticlockwise 90 degrees and follow the cable to remove it from the clips and to also remove the grommet from the floor of the vehicle. With the center console out of the way shift selector to P and snap off the cable inner from the lever and then unclip the cable outer from the floor bracket. Take out the heater air duct and side cover panels, free the clips and screws holding the heater lower case upon which the cover can be taken off. Pop up the carpet to get to the selector cable floor grommet, which screws can be unscrewed to take the grommet off. Grab the mechanic's wire while the cable is being pulled; drive it through the floor of the car and pull it from within the car. As for the installation process, reverse the removal process while using the wire to pull the new cable through: be careful to connect the cable to the selector lever and shift it to position 'O' before reconnecting the cable end fitting at the transaxle lever. Make sure that the cable adjustment is appropriate after fixing it onto the transaxle bracket. Inside the vehicle, place the selector lever to position D, where it is accompanied by the transaxle lever set also to D if required. Ensure that the cable locking collar is released before fitting the cable end fitting to the transaxle lever as well as locking the collar. Last, it is necessary to mount the left-hand front wheel, adjust the height of the car, and having tightly tightening the whats nuts to the given torque indicator, make a road check of the transaxle.
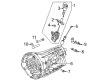
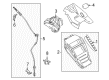
- Q: How to remove and install the shift cable from the steering column and transmission on Ford Ranger?A:Use a screwdriver to pry the end fitting from the steering column lever ball stud, then remove the nuts securing the shill cable bracket to the steering column bracket and take off the bracket. Raise the vehicle and support it securely on jackstands. While working under the vehicle, pull down on the lock tab on the shift cable and remove the fitting from the manual lever ball stud with a screwdriver, disconnecting the shift cable from the transmission manual shift lever, and work the cable through the grommet in the firewall. Bend back the retaining tab to disengage the cable from the transmission bracket, slide the cable down from the transmission bracket, and remove it. For installation, reverse the removal procedure while adjusting the shift linkage, then remove the jackstands and lower the vehicle to the ground.


Related Ford Parts
 Ford Transfer Case
 Ford Flywheel
 Ford Neutral Safety Switch
 Ford Clutch Disc
 Ford Clutch Fork
 Ford Clutch Master Cylinder
 Ford Clutch Slave Cylinder
 Ford Shift Indicator
 Ford Bellhousing
 Ford Valve Body
 Ford Pressure Plate
 Ford Release Bearing
Browse by Model
Aerostar Shift Cable Bronco II Shift Cable Bronco Shift Cable Bronco Sport Shift Cable C-Max Shift Cable Contour Shift Cable Crown Victoria Shift Cable E-150 Shift Cable E-250 Shift Cable E-350/E-350 Super Duty Shift Cable E-450 Super Duty Shift Cable Econoline Super Duty(1996-1999) Shift Cable EcoSport Shift Cable Edge Shift Cable Escape Shift Cable Escort Shift Cable Excursion Shift Cable Expedition Shift Cable Explorer Shift Cable Explorer Sport Shift Cable Explorer Sport Trac Shift Cable F Super Duty Shift Cable F-150 Shift Cable F-250 Shift Cable F-250 Super Duty Shift Cable F-350 Shift Cable F-350 Super Duty Shift Cable F-450 Super Duty Shift Cable F-550 Super Duty Shift Cable F53 Shift Cable F53 Stripped Chassis Shift Cable Fiesta Shift Cable Five Hundred Shift Cable Flex Shift Cable Focus Shift Cable Freestar Shift Cable Freestyle Shift Cable Fusion Shift Cable GT Shift Cable Maverick Shift Cable Mustang Shift Cable Police Interceptor Sedan Shift Cable Police Interceptor Utility Shift Cable Police Responder Hybrid Shift Cable Ranger Shift Cable SSV Plug-In Hybrid Shift Cable Taurus Shift Cable Taurus X Shift Cable Tempo Shift Cable Thunderbird Shift Cable Transit Connect Shift Cable Transit Shift Cable Windstar Shift Cable