My Garage
My Account
Cart
Genuine Ford Ranger Control Arm
Suspension Arm- Select Vehicle by Model
- Select Vehicle by VIN
Select Vehicle by Model
orMake
Model
Year
Select Vehicle by VIN
For the most accurate results, select vehicle by your VIN (Vehicle Identification Number).
37 Control Arms found


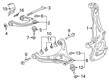
Ford Ranger Front Suspension Arm Assembly
Part Number: 7L5Z-3079-A$116.25 MSRP: $158.85You Save: $42.60 (27%)


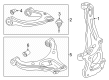
Ford Ranger Front Suspension Arm Assembly
Part Number: KB3Z-3079-A$313.17 MSRP: $538.18You Save: $225.01 (42%)Ships in 1-3 Business Days

Ford Ranger Front Suspension Arm Assembly
Part Number: KB3Z-3078-B$407.43 MSRP: $665.45You Save: $258.02 (39%)Ships in 1-3 Business Days


Ford Ranger Front Suspension Arm Assembly
Part Number: 6L5Z-3079-BA$116.25 MSRP: $158.85You Save: $42.60 (27%)


Ford Ranger Front Suspension Arm Assembly
Part Number: 8L5Z-3084-R$131.95 MSRP: $183.64You Save: $51.69 (29%)Ships in 1-2 Business Days
Ford Ranger Front Suspension Arm Assembly
Part Number: 8L5Z-3085-L$131.95 MSRP: $183.64You Save: $51.69 (29%)Ships in 1-2 Business Days

Ford Ranger Front Suspension Arm Assembly
Part Number: 6L5Z-3084-AA$131.95 MSRP: $183.64You Save: $51.69 (29%)Ships in 1-2 Business Days


Ford Ranger Front Suspension Arm Assembly
Part Number: 6L5Z-3085-AA$131.95 MSRP: $183.64You Save: $51.69 (29%)Ships in 1-2 Business Days


Ford Ranger Front Suspension Arm Assembly
Part Number: KB3Z-3085-A$195.96 MSRP: $272.73You Save: $76.77 (29%)Ships in 1-3 Business Days


Ford Ranger Front Suspension Arm Assembly
Part Number: KB3Z-3084-A$195.96 MSRP: $272.73You Save: $76.77 (29%)Ships in 1-2 Business Days
Ford Ranger Front Suspension Arm Assembly
Part Number: KB3Z-3078-A$401.87 MSRP: $656.36You Save: $254.49 (39%)Ships in 1-2 Business DaysFord Ranger Front Suspension Arm Assembly
Part Number: KB3Z-3079-D$335.74 MSRP: $467.27You Save: $131.53 (29%)Ships in 1-3 Business Days
Ford Ranger Front Suspension Arm Assembly
Part Number: MB3Z-3084-N$219.22 MSRP: $323.33You Save: $104.11 (33%)Ships in 1-2 Business Days
Ford Ranger Front Suspension Arm Assembly
Part Number: MB3Z-3079-R$750.72 MSRP: $1236.36You Save: $485.64 (40%)Ships in 1-2 Business DaysFord Ranger Front Suspension Arm Assembly
Part Number: MB3Z-3078-R$761.60 MSRP: $1133.33You Save: $371.73 (33%)Ships in 1-2 Business DaysFord Ranger Front Suspension Arm Assembly
Part Number: MB3Z-3085-N$219.22 MSRP: $323.33You Save: $104.11 (33%)Ships in 1-2 Business Days


| Page 1 of 2 |Next >
1-20 of 37 Results
Ford Ranger Control Arm
The Control Arm which is found in the Ford Ranger vehicles is a component that connects the front wheel assemblies to the frame of the car to ensure it plays a vital role in the working of the suspension system of the car. In most suspensions, a single wheel is restrained by either one or two control arms, the one end of the control arm is bolted to the chassis while the other end holds the wheel. That design lets the radial position of the wheel be accurately determined but contains extra parts to control movement. Now, different types of control arms have been implemented in the years prior to the Ranger design, the well known A-arm, and another known as the wishbone. The A-arm has a single Pivot while the wish bone has two bearings on the inboard end for enhanced maneuvering. While in macpherson strut front suspensions control arms are positioned vertically with respect to the car's axis with diagonal radius bars to counteract any movement. In all the progression of the Ford Ranger's control arm design reveals that there are constant improvements in the suspension systems, improving its control and safety.
We provide a wide range of Ford Ranger Control Arm at the optimal prices. If you need Ford Ranger Control Arm, you can shop with confidence on our website. All our OEM parts come with a manufacturer's warranty and are delivered to your doorstep with a fast delivery service.
Ford Ranger Control Arm Parts Questions & Experts Answers
- Q: How to remove, inspect, and install the upper control arm and balljoint as a single unit on Ford Ranger?A:The upper control arm and balljoint must be replaced as a single unit. To begin removal, loosen the wheel lug nuts, raise the vehicle, support it securely on jackstands, and remove the wheel. For early 2WD models, remove the brake disc and dust shield. Place a floor jack under the lower control arm and raise it slightly, keeping the jack in position throughout the process. On 2WD models, mark the position of the cams on the upper control arm cam bolts. For 4WD models, support the spindle/steering knuckle to prevent tilting away from the vehicle before separating the upper control arm. Remove the pinch bolt nut and pinch bolt securing the upper balljoint stud to the spindle/steering knuckle, then carefully pry the ballstud out. Use a puller to separate the upper control arm from the spindle/steering knuckle and remove the upper control arm cam bolts to detach the arm from the frame. Inspect the control arm bushings for any cracks or tears; if damaged, take the control arm to an automotive machine shop for new bushings, as this requires specialized tools. If the balljoint is worn, the control arm must be replaced. For installation, reverse the removal steps, ensuring to align the marks made on the upper control arm adjustment cams for 2WD models before tightening the pivot nuts and bolts, which should only be tightened once the vehicle is on the ground. For 4WD models, replace all four alignment plates with new alignment cams and tighten the pivot nuts and bolts to the specified torque. After lowering a 2WD model, tighten the pivot nuts and bolts, starting with the forward bolt and nut, followed by the rear bolt and nut.

Related Ford Ranger Parts
 Ford Ranger Shift Cable
 Ford Ranger Axle Beam
 Ford Ranger Radius Arm
 Ford Ranger Torsion Bar
 Ford Ranger Control Arm Bushing
 Ford Ranger Ball Joint
 Ford Ranger Trailing Arm Bushing
 Ford Ranger Radius Arm Bushing
 Ford Ranger Trailing Arm
 Ford Ranger Control Arm Bracket
Browse by Year
2025 Control Arm 2024 Control Arm 2023 Control Arm 2022 Control Arm 2021 Control Arm 2020 Control Arm 2019 Control Arm 2011 Control Arm 2010 Control Arm 2009 Control Arm 2008 Control Arm 2007 Control Arm 2006 Control Arm 2005 Control Arm 2004 Control Arm 2003 Control Arm 2002 Control Arm 2001 Control Arm 2000 Control Arm 1999 Control Arm 1998 Control Arm