My Garage
My Account
Cart
Genuine Ford Ranger Piston
Engine Pistons- Select Vehicle by Model
- Select Vehicle by VIN
Select Vehicle by Model
orMake
Model
Year
Select Vehicle by VIN
For the most accurate results, select vehicle by your VIN (Vehicle Identification Number).
38 Pistons found

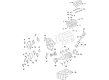
Ford Ranger Piston And Pin Assembly
Part Number: 2F1Z-6108-FA$20.11 MSRP: $27.94You Save: $7.83 (29%)Ships in 1-2 Business Days
Ford Ranger Piston
Part Number: 5M8Z-6108-C$119.70 MSRP: $175.00You Save: $55.30 (32%)Ships in 1-3 Business Days
Ford Ranger Piston
Part Number: 4U7Z-6108-A$61.21 MSRP: $85.03You Save: $23.82 (29%)Ships in 1-2 Business DaysFord Ranger Piston
Part Number: 5M8Z-6108-B$132.24 MSRP: $193.33You Save: $61.09 (32%)Ships in 1-3 Business Days
Ford Ranger Piston
Part Number: 5M8Z-6108-A$145.46 MSRP: $212.67You Save: $67.21 (32%)Ships in 1-3 Business DaysFord Ranger Piston And Pin Assembly
Part Number: 2F1Z-6108-CA$37.82 MSRP: $52.54You Save: $14.72 (29%)Ships in 1-2 Business Days
Ford Ranger Piston
Part Number: ML3Z-6108-E$164.16 MSRP: $240.00You Save: $75.84 (32%)Ships in 1-2 Business Days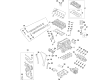
Ford Ranger Piston
Part Number: LB5Z-6108-A$433.81 MSRP: $639.83You Save: $206.02 (33%)Ships in 1-3 Business DaysFord Ranger PISTON AND PIN ASY
Part Number: ML3Z-6108-D$164.16 MSRP: $240.00You Save: $75.84 (32%)Ships in 1-2 Business Days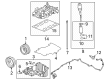
Ford Ranger Piston
Part Number: N2DZ-6108-B$429.40 MSRP: $633.33You Save: $203.93 (33%)Ships in 1-2 Business DaysFord Ranger PISTON AND PIN ASY
Part Number: N2DZ-6108-A$429.40 MSRP: $633.33You Save: $203.93 (33%)Ships in 1-2 Business Days


| Page 1 of 2 |Next >
1-20 of 38 Results
Ford Ranger Piston
Piston in Ford Ranger vehicles is the internal combustion engine part that transforms combustion power to the energy needed in the movement of the car. To achieve this it translates pressures created from a gases expansion process to the crankshaft to ensure optimum engine performance. When it comes to the Ford Ranger pistons, they are customarily made of alloy materials for their light weight and high rigidity, high-performance pistons may even use forged or billet pistons. Many kinds of pistons have been used over the years for Ford Ranger models including trunk pistions for both petrol and diesel engines, the latter of which takes side forces and has oil rings for its lubrication use. Also, racing pistons are different in their great lightweight and their strong material, which is ideal for high RPM used in racing engine.
We provide a wide range of Ford Ranger Piston at the optimal prices. If you need Ford Ranger Piston, you can shop with confidence on our website. All our OEM parts come with a manufacturer's warranty and are delivered to your doorstep with a fast delivery service.
Ford Ranger Piston Parts Questions & Experts Answers
- Q: How to remove piston/connecting rod assemblies on Ford Ranger?A:Before removing the piston/connecting rod assemblies, it is necessary to remove the cylinder head(s), oil pan, and oil pump from the engine. First, run your fingernail along the cylinder wall to feel or look for any ridge around the uppermost limit of ring travel, about 1/4 inch from the top of each cylinder. If the ridges are due to carbon deposits or cylinder wear, they should be machined off with a ridge reamer before attempting to remove the pistons, as leaving the ridges can cause the pistons to break.Once the ridges are removed, position the engine so the ridged area is at the top with the crankshaft positioned appropriately. Use feeler gauges to examine the end-play of the connecting rods; if beyond the service limit, consider replacing them. Components like connecting rods and caps should have identifiable markings; if not, use a hammer and punch to mark them for reassembly. Loosen the connecting rod cap nuts until they can be removed by hand, then carefully remove the number one connecting rod cap and the bearing insert without dropping the insert.When removing the pistons, cover the rod bolts with small pieces of plastic or rubber hose to prevent damage to the crankshaft journal and cylinder wall. Take out the bearing insert, and if necessary, push the connecting rod/piston assembly out from the top of the engine. Repeat this process for the other cylinders, ensuring there is no remaining ridge material. After detachment, replace the connecting rod caps and bearing inserts in their respective rods and tighten the cap nuts slightly to prevent marring the bearing surfaces. It's important not to remove the pistons from the rods to avoid misalignment.

Related Ford Ranger Parts
 Ford Ranger Power Steering Pump
 Ford Ranger Power Steering Hose
 Ford Ranger PCV Hose
 Ford Ranger PCV Valve
 Ford Ranger Pilot Bearing
 Ford Ranger Piston Ring Set
 Ford Ranger PCV Valve Elbow
 Ford Ranger PCV Valve Hose
 Ford Ranger Pinion Washer
 Ford Ranger Pushrod
 Ford Ranger Pressure Plate
 Ford Ranger Pinion Bearing
Browse by Year
2025 Piston 2024 Piston 2023 Piston 2022 Piston 2021 Piston 2020 Piston 2019 Piston 2011 Piston 2010 Piston 2009 Piston 2008 Piston 2007 Piston 2006 Piston 2005 Piston 2004 Piston 2003 Piston 2002 Piston 2001 Piston 2000 Piston 1999 Piston 1998 Piston 1997 Piston 1996 Piston 1995 Piston 1994 Piston 1993 Piston 1992 Piston 1991 Piston 1990 Piston 1989 Piston 1988 Piston 1986 Piston 1985 Piston 1984 Piston 1983 Piston