My Garage
My Account
Cart
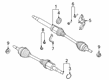
Genuine Ford Axle Shaft
Car Axle Shaft- Select Vehicle by Model
- Select Vehicle by VIN
Select Vehicle by Model
orMake
Model
Year
Select Vehicle by VIN
For the most accurate results, select vehicle by your VIN (Vehicle Identification Number).
989 Axle Shafts found


 Product Specifications
- Other Name: Shaft - Front Axle; Axle Assembly, Axle Shaft
- Position: Passenger Side
- Replaces: BC3Z-3219-A, 8C3Z-3219-A, EC3Z-3219-A, FC3Z-3219-A, AC3Z-3219-A

 Product Specifications
- Other Name: Shaft - Front Axle; Axle Assembly, Axle Shaft
- Position: Driver Side
- Replaces: 5C3Z-3220-AB, AC3Z-3220-A, BC3Z-3220-A, EC3Z-3220-A, FC3Z-3220-A


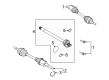
Ford Joint And Stub Shaft Assembly
Part Number: AL1Z-3B436-A$150.17 MSRP: $256.36You Save: $106.19 (42%)Ships in 1-2 Business DaysProduct Specifications- Other Name: Joint And Stub Shaft Assy
- Position: Passenger Side/Driver Side
- Replaces: 7L1Z-3B436-B, TX-475


 Product Specifications
- Other Name: Shaft - Front Axle; Axle Assembly
- Position: Driver Side
- Replaces: BB5Z-3B437-E, BB5Z-3B437-B, BB5Z-3B437-G, DB5Z-3B437-A, DB5Z-3B437-B, FB5Z-3B437-A, TX-628, TX-733, TX-737, TX-572, TX-606, TX-777

 Product Specifications
- Other Name: Shaft - Front Axle; Axle Assembly
- Position: Passenger Side
- Replaces: BB5Z-3B436-Q, TX-671

 Product Specifications
- Other Name: Shaft - Front Axle; Axle Assembly
- Position: Driver Side
- Replaces: BV6Z-3B437-B, CV6Z-3B437-D, TX-642


 Product Specifications
- Other Name: Shaft - Front Axle; Axle Assembly
- Position: Passenger Side
- Replaces: 5L8Z-3A428-DA, YL8Z-3A428-DA, YL8Z-3A428-CA, TX-318


 Product Specifications
- Other Name: Shaft - Front Axle; Axle Assembly
- Position: Driver Side
- Replaces: DG1Z-3B437-E, DG1Z-3B437-A, AA5Z-3B437-A, TX-532, TX-595, TX-749


Ford Rear Axle Shaft Assembly
Part Number: HL3Z-4234-A$340.58 MSRP: $502.33You Save: $161.75 (33%)Ships in 1-3 Business DaysProduct Specifications- Other Name: Shaft Assy - Rear Axle; Axle Shaft, Axle Shafts
- Position: Passenger Side


Ford Rear Axle Shaft Assembly
Part Number: KK4Z-4234-B$318.88 MSRP: $502.33You Save: $183.45 (37%)Ships in 1-3 Business DaysProduct Specifications- Other Name: SHAFT ASY - REAR AXLE; Axle Shaft, Axle Shafts
- Position: Rear
- Replaces: CK4Z-4234-C, KK4Z-4234-A

Ford Rear Axle Shaft Assembly
Part Number: HC3Z-4234-A$269.45 MSRP: $421.67You Save: $152.22 (37%)Ships in 1-2 Business DaysProduct Specifications- Other Name: Shaft Assembly - Rear Axle; Axle Shaft, Axle Shafts
- Manufacturer Note: Dana M275
- Position: Passenger Side

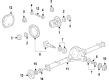
Ford Rear Axle Shaft Assembly
Part Number: ML3Z-4234-A$291.54 MSRP: $430.00You Save: $138.46 (33%)Ships in 1-2 Business DaysProduct Specifications- Other Name: SHAFT ASY - REAR AXLE; Axle Shaft, Axle Shafts
- Position: Passenger Side

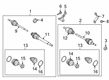
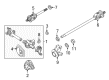
Ford Front Axle Shaft
Part Number: FV6Z-3B437-W$182.12 MSRP: $310.91You Save: $128.79 (42%)Ships in 1-2 Business DaysProduct Specifications- Other Name: SHAFT - FRONT AXLE; Axle Assembly
- Position: Driver Side
- Replaces: FV6Z-3B437-V, FV6Z-3B437-F

Ford Front Axle Shaft
Part Number: D1BZ-3B436-B$180.56 MSRP: $269.09You Save: $88.53 (33%)Ships in 1-2 Business DaysProduct Specifications- Other Name: Shaft - Front Axle; Axle Assembly
- Position: Passenger Side
- Replaces: AE8Z-3B436-C, AE8Z-3B436-B, D1BZ-3B436-A, TX-719, TX-556, TX-626

 Product Specifications
- Other Name: SHAFT - FRONT AXLE; Axle Assembly
- Position: Passenger Side
- Replaces: NZ6Z-3B436-B, NZ6Z-3B436-D

Ford Front Axle Shaft
Part Number: FV6Z-3B436-BA$218.33 MSRP: $372.73You Save: $154.40 (42%)Ships in 1-3 Business DaysProduct Specifications- Other Name: SHAFT - FRONT AXLE; Axle Assembly
- Position: Passenger Side
- Replaces: FV6Z-3B436-AX, FV6Z-3B436-M, FV6Z-3B436-AV

Ford Front Axle Shaft
Part Number: LX6Z-3B436-L$308.36 MSRP: $503.64You Save: $195.28 (39%)Ships in 1-2 Business DaysProduct Specifications- Other Name: SHAFT - FRONT AXLE; Axle Assembly
- Position: Passenger Side

Ford Front Axle Shaft
Part Number: GN1Z-3B436-AP$203.42 MSRP: $347.27You Save: $143.85 (42%)Ships in 1-3 Business DaysProduct Specifications- Other Name: Shaft - Front Axle; Axle Assembly
- Position: Passenger Side

Ford Shaft Assembly
Part Number: PX6Z-4K138-C$274.13 MSRP: $429.00You Save: $154.87 (37%)Ships in 1-2 Business DaysProduct Specifications- Other Name: SHAFT ASY; Axle Assembly, Axle Shafts
- Position: Passenger Side
- Replaces: LX6Z-4K138-A

 Product Specifications
- Other Name: Shaft Assembly - Rear Axle; Axle Shaft, Axle Shafts
- Position: Driver Side
| Page 1 of 50 |Next >
1-20 of 989 Results
Ford Axle Shaft Parts Questions & Experts Answers
- Q: How to remove and install semi foating type rear axle shaft on Ford Bronco?A:To remove the Ford 10.25 inch, 8.8 inch, and Dana (ball bearing type) axle, first raise the rear of the vehicle and secure it on jackstands, then remove the wheel(s). Release the parking brake and take off the brake drum(s), followed by draining the rear axle lubricant into a suitable container by removing the rear axle housing cover and discarding the gasket if still in place. Next, remove the differential pinion shaft lockpin, ensuring to use a large screwdriver to prevent the differential case from turning. Be aware that some Dana semi-floating axles may have lockpins treated with Loctite or with torque-prevailing threads; the former cannot be reused, while the latter can be reused up to four times. Lift out the differential pinion shaft to access the axleshaft C-locks, then push the flanged end of the axleshaft toward the center of the vehicle to remove the C-lock, taking care not to lose or damage the rubber O-ring. Pull the axleshaft from the housing without damaging the oil seals. For installation, reverse the removal procedure, ensuring not to damage the axle seal during the axleshaft reinstallation. Apply a thread locking compound to a new pinion shaft lockpin and tighten it to the specified torque. Most axle housing covers use RTV sealant instead of a gasket; clean the machined surfaces before applying a continuous bead of sealant and install the cover within 15 minutes, tightening the bolts in a criss-cross pattern to the specified torque. After reinstalling the brake drum(s) and wheel(s), fill the rear axle with lubricant, remove the jackstands, lower the vehicle, and check for leaks during a test drive. For the early model Ford 9.0 inch axle assembly (tapered bearing type), follow the initial steps to remove the wheel(s) and loosen the axleshaft retaining nuts using a socket and extension through the outer axle flange. Remove the axleshaft by pulling on the flange, using the wheel assembly for leverage if necessary, while ensuring not to damage the seal, which should be replaced whenever an axle is removed. Secure the brake backing plate to the housing with one nut during the process. For installation, reverse the removal steps, using a new gasket between the brake backing plate and axle housing flange, and tighten the axleshaft retaining nuts to the specified torque. Finally, install the wheel(s), check the differential lubricant level, fill if necessary, lower the vehicle, and test drive while checking for fluid leaks.
- Q: How to remove and install the front axle shaft on a Ford F-150?A:Loosen the wheel lug nuts, raise the front of the vehicle and support it securely on jackstands placed under the frame. Block the rear wheels to keep the vehicle from rolling off the stands. Remove the front wheels. If equipped, remove the front skid plate. Remove the front driveshaft. Disconnect the front driveaxles from the axleshalt flanges. Support the driveaxles with wire or rope - don't let them hang by the outer CV joints. Remove the front crossmember. Support the front axle with a pair of floor jacks, then remove the upper, lower and axle tube mounting bolts. Lower the axle assembly and remove it from under the vehicle. Installation is the reverse of removal. Be sure to tighten all fasteners securely.
- Q: How to remove and install the axle shaft on the 4WD Ford Ranger?A:When removing the axle shaft, it is important to ensure that for reassembly you have a special retainer ring/seal installer. First of all, remove the wheel lug nuts, then jack up the car and well settle it on the jackstands then unbolt the wheel concerned. If so remove the hub lock noting that; many later model 4WD cars do not have front locking hubs. Third, unlock the brake caliper and pull it off and disconnect the ABS sensor and set it along with the cables away. On 2000 models with pulse vacuum hubs: 1) Place the snap-ring pliers in the groove which has the plastic retainer ring and remove and discard this ring from the end of the axle shaft. This ring is best removed and replaced whenever it is damaged for it to hold its efficiency and effectiveness to the user. For the 2000 models which are not equipped with pulse vacuum hubs and all the 2001 and later models, first remove and then dispose of the axle shaft/hub nut, and make sure that while reinstalling a new nut is used. Place a floor jack under the lower control arm and unbolt the upper control arm balljoint-to-steering knuckle nut and pinch bolt in order to disconnect the upper arm from the knuckle. In order to remove the axle shaft assembly that attach on the steering knuckle to swing out the knuckle till the outer CV joint is compressed to be pulled out. If the splines of the axle shaft are stuck it swinging freely then use a brass hammer or a two jaw puller. After loose, slowly steer the outer CV joint out of the hub. Acceptable tools: prybar, slide hammer with CV joint adapter to remove the inner CV joint assembly from the front differential; do not damage it and suspend the axle with wire to prevent its hanging. Last but not the least, this involves taking out the axle shaft from the vehicle in question. For installation simply work in the reverse order as removal; before that, it will be necessary to replace the retainer ring for 2000 models with Pulse Vacuum Hubs using the special tool to inset the retainer as far as possible until an audible click is heard. Ensure the retainer ring is properly placed in order to avoid leakage and contamination. For 2000 models without Pulse Vacuum Hubs or any 2001 and later model, replace with a new axle shaft/hub nut and tighten to the recommended torque thus ending the installation process.


Related Ford Parts
 Ford Torque Converter
 Ford Transmission Assembly
 Ford Transmission Pan
 Ford Slip Yoke
 Ford Wheel Bearing
 Ford Pinion Washer
 Ford Transmission Gasket
 Ford Side Cover Gasket
 Ford Input Shaft Bearing
 Ford Output Shaft Bearing
Browse by Model
Aerostar Axle Shaft Aspire Axle Shaft Bronco Axle Shaft Bronco II Axle Shaft Bronco Sport Axle Shaft C-Max Axle Shaft Contour Axle Shaft Crown Victoria Axle Shaft E-150 Axle Shaft E-250 Axle Shaft E-350/E-350 Super Duty Axle Shaft E-450 Super Duty Axle Shaft E-Transit Axle Shaft EcoSport Axle Shaft Edge Axle Shaft Escape Axle Shaft Escort Axle Shaft Expedition Axle Shaft Explorer Axle Shaft Explorer Sport Axle Shaft Explorer Sport Trac Axle Shaft F Super Duty Axle Shaft F-150 Axle Shaft F-150 Lightning Axle Shaft F-250 Axle Shaft F-250 Super Duty Axle Shaft F-350 Axle Shaft F-350 Super Duty Axle Shaft F-450 Super Duty Axle Shaft F-550 Super Duty Axle Shaft F53 Stripped Chassis Axle Shaft F59 Axle Shaft Fiesta Axle Shaft Five Hundred Axle Shaft Flex Axle Shaft Focus Axle Shaft Freestar Axle Shaft Freestyle Axle Shaft Fusion Axle Shaft GT Axle Shaft Maverick Axle Shaft Mustang Axle Shaft Mustang Mach-E Axle Shaft Police Interceptor Sedan Axle Shaft Police Interceptor Utility Axle Shaft Police Responder Hybrid Axle Shaft Probe Axle Shaft Ranger Axle Shaft SSV Plug-In Hybrid Axle Shaft Taurus Axle Shaft Taurus X Axle Shaft Tempo Axle Shaft Thunderbird Axle Shaft Transit Axle Shaft Transit Connect Axle Shaft Windstar Axle Shaft