
Why choose FordPartsGiant
- Optimal Shopping Experience
Want to buy parts for your vehicle? Look no further than FordPartsGiant.com, the best place for Ford F-150 genuine parts. For years, all of our Ford F-150 parts and accessories have been expedited directly from dedicated dealers and backed by the manufacturer's warranty, so buying from FordPartsGiant.com is always risk-free.
- Dedicated Customer Service
Our first-class customer service team is committed to providing you with the best assistance possible. Dedicated representatives are standing by to assist you by email, live chat, or phone. Every effort is made to ensure your order for OEM Ford F-150 parts arrives fast no matter your location in the nation, so your vehicle is up and running and back on the road.
- Unbeatable Prices
What makes us the best online source for Ford F-150 parts and truck parts? Our goal is to offer the lowest prices. You get giant savings shopping with FordPartsGiant.com. With a complete parts catalog, we cover a full selection of affordable OEM Ford F-150 parts and pickup parts with a huge inventory.
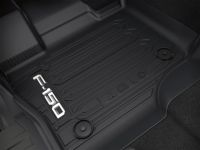
Popular Genuine Ford F-150 Parts
- Engine Parts View More >
- Chassis Parts View More >
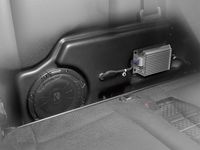
- Electrical Parts View More >
- Body And Paint Parts View More >
- Lamps & Wiring Parts View More >
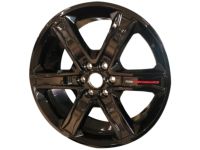
- Wheels & Brakes Parts View More >
- Fuel System & Manifolds Parts View More >
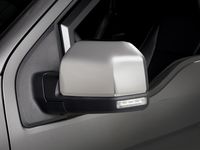
- Speedometer, Bumpers, Mirrors & Wipers Parts View More >
- Automatic Transmission Parts View More >
- Transmission Parts View More >
- Front Axle & Steering Parts View More >
- Frame, Exhaust System & Springs Parts View More >


Shop Genuine Ford F-150 Parts with FordPartsGiant.com
The Ford F-150, a globally renowned full-size pickup truck, has held a prominent place in America's automotive history for over 70 years. Launched in 1948, the F-150 is part of Ford's F-Series line and is currently in its 14th generation. The F-Series was introduced as the Ford Bonus-Built, replacing the passenger car-based pickup line of 1942. Available in eight weight classes, the F-Series brought major changes to the truck market. Between 1953 and 1956, the F-100 and F-250 models shared the same cabs, doors, engine hoods, and interior wings. The fourth-generation, introduced in 1961, was larger and shorter, featuring a new range of engines and transmissions. It offered an optional integrated cab and bed, an experiment that was discontinued in 1963 due to poor reception. By 1965, the F-Series had undergone a significant mid-cycle redesign, growing in size and engine options. The fifth-generation Ford Bronco became an F-Series pickup in 1978, and 1979 marked the final year of the 460 engine in half-ton trucks. Fuel injection was introduced for the V8 model in 1986 and the 4.9-liter I6 engine in 1987. The F-Series was the first American platform vehicle to be sold without a carbureted engine. Significant modifications over the years included a name change to the Ford Ranger Compact Pickup and a rebranding in 1982 when the Ford Blue Oval emblem replaced the FORD logo on the grille. As a tribute to the first factory truck, Ford offered a 75th Anniversary Package with special features for the 1992 F-Series. Today, the Ford F-150 remains an icon of strength and reliability.
Like most pickup trucks, the Ford F-150 endures heavy-duty tasks such as transporting and loading, leading to inevitable problems over time. Notably, engine problems such as misfiring, rough idling, no-start conditions, decreased power, acceleration, and fuel economy, often caused by spark plug failure. There can also be ticking or clunking noises from the cylinder head, or overheating due to coolant leaks. These issues might point to the ignition coil failure and require checking the rocker arm and intake manifold gasket. Furthermore, the braking system, crucial in emergencies, often experiences brake fluid leaks and corrosion. Parts like brake backing plate, brake dust shields, brake line, brake pads, brake disc, brake pedal, parking brake cable, and brake booster are prone to wear and require extra attention during inspection. Lastly, don't overlook parts like the door handle, headlight, and window switch, as they're vital to the F-150's longevity.
Choosing OEM parts guarantees top-tier quality and durability. They are carefully designed to adhere to the strict specifications of the official factory and undergo thorough quality control inspections during production, ensuring long-lasting resilience and an impeccable fit. We welcome you to purchase brand-new Ford F-150 parts, like Manual Transmission from our website. We offer a huge selection of genuine parts at the best prices possible. Do you want to have greater assurance of quality, reliability, durability, and affordability? You're at the right place, all our OEM F-150 parts come backed with the manufacturer's warranty.
Ford F-150 Parts Questions & Answers
- Q: How to remove and install the rear axle shaft on a Ford F-150?A: Raise the rear of the vehicle, support it securely on jackstands and block the front wheels. Remove the wheel and brake disc. Remove the cover from the differential carrier and drain the lubricant. Remove the lock bolt from the differential pinion shaft. Slide the notched end of the pinion shaft out of the differential case. Use a screwdriver to prevent the differential case from turning. Rotate the differential case 180-degrees and slide the pinion shaft out until it contacts the ring gear. Push the outer end of the axleshaft in and remove the C-lock from the inner end. Withdraw the axleshaft, being careful not to damage the oil seal. Installation is the reverse of removal. Use a new pinion shaft lock bolt if available, otherwise use thread locking compound. Install the differential cover. Install the brake disc/caliper. Refill the axle with the correct lubricant. Tighten the wheel lug nuts.
- Q: How to remove and install the exhaust manifold in V8 engine on Ford F-150?A: The first step in removing the exhaust manifold, is to reduce the pressure in the fuel system for 6.2L or, discharge the A/C system on the 5.0L. Remove the negative battery terminal, properly support the car on jack stands and then remove the inner splash shield of the fenderwell. Pour penetrating oil on the studs and nuts of the exhaust pipe to manifold, and on the 4.6L engines, put penetrating oil also on EGA pipe fitting. Pull the EGR pipe out of its positions on the EGR valve and exhaust manifold and unbolt the exhaust Y-pipe or dual-catalyst Y-pipe nuts. In the case of car models containing engines using 3-valves, one has to unscrew the heat shield bolts in addition to the heat shield, and the eight kulak breathe nuts on the exhaust manifold. Move on to the next step, which is to take of the exhaust manifold and also the old gasket. They are the starter, nuts of the Y-pipe, and at times the drive belt for the right exhaust manifold where you have to reverse the above process. On the 5.4L engine, it is necessary to remove the heated oxygen sensors, the Y-pipe support bracket and the air intake duct if it is to be removed and the nuts and heat shield from the catalytic converter. For the 6.2L engine, support the engine from above, remove the nuts from the catalytic converter bracket, loosen the transmission-to-crossmember nuts, then, remove the nuts from the engine mount. This is done by first removing all old exhaust manifold studs and then ascertaining that the exhaust manifolds are free from cracks; clean the mating surfaces, put a new gasket and finally tightening the mounting nuts in an orderly manner. Last but not the least; connect back the EGR pipe using anti-seize compound and check whether there is any exhaust leak after starting the engine and charge the AC if necessary.
- Q: How to remove and reinstall the oil pump in 3.5L and 3.7L V6 engine on Ford F-150?A: Drain the oil and remove the oil filter, then take off the engine front cover and the oil pan. Next, remove the primary timing chain and slide the crankshaft sprocket from the crankshaft. After that, remove the three fasteners along with the oil pump pickup and screen assembly, followed by the three oil pump mounting bolts to take out the oil pump. Installation is the reverse of removal; after bolting the oil pump in place, reinstall the oil pump pickup tube and screen with a new O-ring.
- Q: How to replace the Crankshaft seals in 4.2L V6 engine on Ford F-150?A: Disconnect the cable from the negative battery terminal, then remove the engine cooling fan and the drivebelt. Unbolt and remove the crankshaft pulley, taking care to use a puller that applies force to the damper hub only, and clean the crankshaft nose and seal contact surface on the pulley. Lock the crankshaft pulley in place with a special strap wrench. Carefully remove the seal from the timing chain cover using a screwdriver or seal removal tool, ensuring not to damage the cover or crankshaft. If the engine has high mileage, apply penetrating oil to the seal-to-cover joint before removal. Check the seal bore and crankshaft for nicks and burrs, position the new seal with the open end facing inward, and apply a small amount of oil to ease installation. Drive the seal into the bore until fully seated, using a seal driver or a large socket and hammer, ensuring it is not damaged in the process. Apply moly-base grease or clean engine oil to the seal contact surface of the crankshaft pulley and coat the keyway with RTV sealant before installing the pulley, aligning it with the Woodruff key. If necessary, tap it into place with a soft-face hammer or use a large washer to press it into position, then tighten the bolt to the specified torque. Reinstall any parts removed for access to the seal and start the engine to check for leaks. For the front seal, remove the timing chain cover and drive the seal out from the back side, supporting the cover to avoid distortion. Clean the bore, position the new seal with the open end facing inward, and drive it into place until fully seated. For the rear main seal, remove the transmission, flywheel or driveplate, and rear cover plate, then carefully pry out the old seal or use a slide-hammer puller, noting the seal's recessed position. Clean the crankshaft and seal bore, checking for damage, and apply a thin coat of engine oil to the new seal's outer edge and moly-based grease to the lips before pressing it squarely into the bore. Reinstall the engine rear cover plate, flywheel or driveplate, and transmission.


