Make sure this part fits

Ford F6TZ-7052-A Oil Seal Assembly

1980-2005 Ford F6TZ7052A

Customer Questions & Expert Answers (11)
F6TZ-7052-A Ford Oil Seal Assembly Product Photo 1 of 2
  • Part Description
    Seal Assy - Oil
  • Base No.
    7052
  • Replaces
    D5AZ-7052-A
  • Manufacturer
    Ford
Make sure this part fits
$18.24 MSRP: $26.67
You Save: $8.43 (32%)
Ships in 1-2 Business Days
1
ADD TO CART
  • Related Parts
  • Product Specifications
  • Vehicle Fitment
  • Customer Questions & Expert Answers
  • Product Specifications

    BrandGenuine Ford
    Base No.7052
    Manufacturer Part NumberF6TZ-7052-A, F6TZ7052A
    Part DescriptionSeal Assy - Oil
    Other NamesExtension Housing Seal, Rear Seal
    Item Dimensions4.2 x 4.1 x 4.1 inches
    Item Weight0.40 Pounds
    ConditionNew
    Fitment TypeDirect Replacement
    ReplacesD5AZ-7052-A
    ManufacturerFord
    SKUF6TZ-7052-A
    WarrantyThis genuine Ford part is guaranteed by Ford's factory warranty.
    Shipping & ReturnShipping Policy Return Policy
    Warning: California's Proposition 65
  • Vehicle Fitment

    Year Make Model Engine Important vehicle option details
    1990-1996 Ford Aerostar6 Cyl 3.0L, 6 Cyl 4.0L4AT 4R44E, 4AT A4LD, 5MT
    1990-1996 Ford Bronco6 Cyl 4.9L, 8 Cyl 5.0L, 8 Cyl 5.8L3AT C6, 4AT A4LD, 4AT AOD, 4AT E4OD, 4MT, 5MT
    1990 Ford Bronco II6 Cyl 2.9L4AT A4LD, 5MT
    1990-1998 Ford E-1506 Cyl 4.2L, 6 Cyl 4.9L, 8 Cyl 4.6L, 8 Cyl 5.0L, 8 Cyl 5.4L, 8 Cyl 5.8L3AT C6, 4AT 4R70W, 4AT 4R75W, 4AT AOD, 4AT E4OD
    1990-2004 Ford E-2506 Cyl 4.2L, 6 Cyl 4.9L, 8 Cyl 4.6L, 8 Cyl 5.0L, 8 Cyl 5.4L, 8 Cyl 5.8L, 8 Cyl 7.3L Diesel, 8 Cyl 7.5L3AT C6, 4AT 4R100, 4AT 4R70W, 4AT AOD, 4AT E4OD
    1990-2004 Ford E-350/E-350 Super Duty10 Cyl 6.8L, 6 Cyl 4.9L, 8 Cyl 5.4L, 8 Cyl 5.8L, 8 Cyl 6.0L Diesel Turbocharged, 8 Cyl 7.3L Diesel, 8 Cyl 7.3L Diesel Turbocharged, 8 Cyl 7.5L3AT C6, 4AT 4R100, 4AT 4R70W, 4AT 4R75W, 4AT AOD, 4AT E4OD, 5AT
    2002-2004 Ford E-450 Super Duty10 Cyl 6.8L, 8 Cyl 5.4L4AT 4R100
    1999 Ford Econoline Super Duty(1996-1999)10 Cyl 6.8L, 8 Cyl 5.4L, 8 Cyl 7.3L Diesel Turbocharged4AT 4R100
    2000-2005 Ford Excursion10 Cyl 6.8L, 8 Cyl 5.4L, 8 Cyl 6.0L, 8 Cyl 7.3L4AT 4R100, 5AT
    1998-2002 Ford Expedition8 Cyl 4.6L, 8 Cyl 5.4L4AT 4R100, 4AT 4R70W, 4AT E4OD
    View More
  • Customer Questions & Expert Answers

    Q:
    Is the the correct part for the attached VIN? Posted by FordPartsGiant Specialist
    A:
    You can Select Your Vehicle to check if F6TZ-7052-A fits your vehicle.
    Posted by FordPartsGiant Specialist
    Q:
    How to replace the Transfer Case Seal on the extension house of a Ford Excursion? Posted by Customer
    A:
    This procedure applies to automatic transmission equipped models, with the exception of specific steps. Oil leaks frequently occur due to wear of the extension housing seal, which can be replaced relatively easily without removing the transmission from the vehicle. If a leak is suspected at the extension housing seal, raise the vehicle and support it securely on jackstands. The seal is located at the rear end of the transmission, where the driveshaft is attached; signs of a leak include transmission lubricant on the front of the driveshaft and possible dripping from the rear of the transmission. To begin, remove the driveshaft. For 2WD models, remove the transmission flange lock nut using a flange holding tool or chain wrench, then remove the transmission flange, which may require a small puller. For all models, carefully pry out the seal using a screwdriver, pry bar, or seal removal tool, and inspect the extension housing bore for burrs, removing any found with emery cloth or medium grit wet-and-dry sandpaper. Clean the bore with a cloth dipped in solvent to remove any oil or sanding residue. Apply a small amount of silicone sealant to the outside diameter of the new oil seal and grease the seal lip. Install the new oil seal using a seal driver, large socket, or section of pipe, ensuring it is driven into the bore squarely and completely seated. For 2WD models, install the flange and locknut, tightening the locknut to the specified torque, and then connect the driveshaft.
    Posted by FordPartsGiant Specialist
    Q:
    How to remove and install the Transfer Case Seal on the Ford Explorer? Posted by Customer
    A:
    To eliminate the component, one ought to lift the vehicle and stabilize it clamps, if the vehicle is fitted with Automatic Ride Control, make sure that the air suspension switch is off. Empty the transfer case of its oil, then pull out either the front or rear driveshaft in order to gain access to the yoke and seal that have to be replaced. On early models, remove the output shaft nut, washer, rubber seal, the front yoke if you're servicing the rear flange, or simply the rear flange itself if it has to be removed but maintain the indexing marks on the flange and shaft so that they can be easily aligned when you are replacing them. In later models, a snap-ring holds the front driveshaft yoke in place; replacing this seal requires disassembly of the transfer case and some degree of dismantling to get to the snap ring. If you intend to replace the yoke, then take off the dust seal around the opening and apply a seal remover to gouge out the oil seal. For installation, one needs to check the oil seal contact surface for scoring or burrs and if any need to be eliminated. Spread multipurpose grease on the oil seal lip and fit it into the output shaft housing bore in such a manner that the broad side or the side which was not previously lubricated should not be installed on the flat surface of the shaft Put it into place using a seal driver or hammer with a large socket. , before installing the splined shaft on the end of the driveshaft make sure the transfer case output female splines are cleam and that you grease them. Some machines have a front yoke or rear flange that snugs onto these splines; then, there is a rubber seal, steel washer, and a new nut is put in and tightened to the specified torque. After that the driveshaft should be connected to the axle input yoke, it is recommended although to use new bolts or thread locking sealant on the old bolts then refill the transfer case lubricant, and finally remove the jack stands from under the vehicle.
    Posted by FordPartsGiant Specialist
    Q:
    How to replace a Transfer Case Seal on the extension housing of a Ford F-250? Posted by Customer
    A:
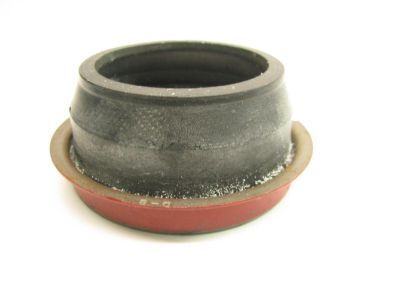
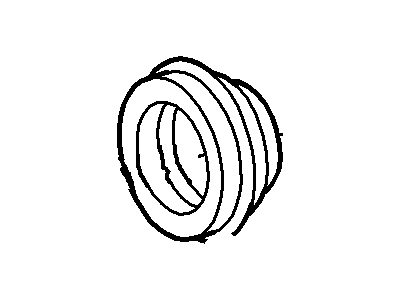
    It only applies to two-wheel-drive models and the first step to follow involved hoisting the car up and putting it firmly on jackstands, with the extension housing oil seal being found at the very rear of the transmission where the driveshaft is connected, and evidence of a leaking seal is typically a layer of lubricant on the front of the driveshaft, or dripping out on the back of the transmission. Disassemble the driveshaft, on circular flange or yoke type rear output shafts disassemble the retaining nut and washer on the flange or the yoke and push the flange or the yoke aside. Tap the dust shield with a soft-faced hammer, carefully, back, in case it has one, and remove it without distortion. The rear of the transmission a screwdriver or pry bar heightens the likelihood of breaking the oil seal and bushing (where present) and the splines of the output shaft, so care is required to not damage it, and in any case, this is very difficult, and a special tool to remove the oil seal should be used. To install the new oil seal, cut a large section of pipe or a large deep socket as a drift, and beat the cultivated section into the bore, taking full care to ensure that it is firmly seated, and then the dust shield is once again installed by beating it into place. Wipe the yoke splines with multi-purpose grease and, pushing the flange or yoke over the output shaft past the new seal, use thread locking compound on the retaining nut, install the washer and nut, and tighten to the required torque. Lightly lubricate the splines of the transmission output shaft with lightweight grease and carefully replace the driveshaft so as to not damage the new seal and then install the yoke, washer and retaining nut (where necessary). Install the rear driveshaft back, replace and fill the transmission lubricant where needed, take out jackstands, and lower vehicle.
    Posted by FordPartsGiant Specialist
    Q:
    How to remove and install the rear output shaft Transfer Case Seal on Ford Ranger? Posted by Customer
    A:
    To do this, you have to lift the vehicle with the hydraulic jack and place it on secure stands; then unbolt the driveshaft from the transfer case's output shaft yoke, and set it aside. After that, remove the nut which holds the flange and separate the steel washer, the rubber seal and finally the flange. Remove the transfer case's serviceable oil seal by gently prying and pulling it up on the outer curved lip. For installation the contact surface between the housing and the new oil seal must be free from scores and burrs, if present they can be removed with emery cloth or wet-and-dry sandpaper of a medium grit After that you have to clean the surface using a piece of cloth in solvent. Use multi-purpose grease to the new oil seal and then insert this oil seal into the front output shah housing bore but make sure that you do not put it cock. To install it use a special tool or a hammer with a large socket or piece of pipe to drive the seal into the bore. Clean transfer case rear output female splines and to them lubricate with multi-purpose grease before the installation of output flange on the output shaft splines. Last, replace the new rubber seal, the steel washer, and the nut and tighten the nut to the torque setting and reattach the front driveshaft on the axle output flange and final remove the jackstands and lower the vehicle.
    Posted by FordPartsGiant Specialist
    Q:
    How to replace the Transfer Case Seal in the extension housing on 2WD Ford Ranger? Posted by Customer
    A:
    Raise the vehicle and support it securely on jackstands. Remove the driveshaft, noting that some transmission lubricant may drain out when the driveshaft slip joint is withdrawn from the extension housing. To remove the oil seal from the end of the extension housing, use a special tool available at most auto parts stores, or if access allows, use a thin blade screwdriver or chisel to pry the oil seal out. Inspect the sealing surface on the driveshaft slip joint for scoring or burrs that may damage the new oil seal, and replace the yoke if it is damaged. Check the extension housing counterbore for burrs and remove them with emery cloth or medium grit wet-and-dry sandpaper, then clean any sanding residue with a cloth dipped in solvent. Apply silicone sealant to the inside diameter of the oil seal and grease to the end of the rubber boot portion. Using a seal driver, large socket, or section of pipe, install a new oil seal, ensuring it is completely seated in the counterbore. Finally, install the driveshaft, lower the vehicle, and check the transmission lubricant level, topping up if necessary.
    Posted by FordPartsGiant Specialist
    Q:
    What is the first step in the process for the 1995 Ford Bronco? Posted by Customer
    A:
    Raise the vehicle and support it securely on jackstands.
    Posted by FordPartsGiant Specialist
    See expert answers on similar Transfer Case Seal
    Q:
    What are the final steps after replacing the oil seal for the 1994 Ford Bronco? Posted by Customer
    A:
    The final steps after replacing the oil seal are to install the front driveshaft, refill the transfer case lubricant, and lower the vehicle. If necessary, shift out of 4WD mode before returning the vehicle to normal service.
    Posted by FordPartsGiant Specialist
    See expert answers on similar Transfer Case Seal
    Q:
    What should you do after installing the new extension housing seal for the 1999 Ford Expedition? Posted by Customer
    A:
    Lubricate the splines of the transmission output shaft and the outside of the driveshaft sleeve yoke with light-weight grease, then install the driveshaft. Be careful not to damage the lip of the new seal, and then lower the vehicle. If applicable, turn on the switch for the air suspension system.
    Posted by FordPartsGiant Specialist
    See expert answers on similar Transfer Case Seal
    Q:
    What is the final step in the procedure for the 1994 Ford Ranger? Posted by Customer
    A:
    Lower the vehicle and check the transmission fluid level. Top up if necessary.
    Posted by FordPartsGiant Specialist
    See expert answers on similar Transfer Case Seal
    Q:
    What should you do after installing the new extension housing seal for the 2000 Lincoln Navigator? Posted by Customer
    A:
    Lubricate the splines of the transmission output shaft and the outside of the driveshaft sleeve yoke with light-weight grease, then install the driveshaft. Be careful not to damage the lip of the new seal, and then lower the vehicle. If applicable, turn on the switch for the air suspension system.
    Posted by FordPartsGiant Specialist
    See expert answers on similar Transfer Case Seal
    If you have any questions about this product, please don't hesitate to ask us. We will be happy to help you!

Genuine Ford Part F6TZ-7052-A, the Right Choice

To ensure reliability, purchase part # F6TZ-7052-A Oil Seal Assembly. It is also called Transfer Case Seal, Automatic Transmission Seal. OEM parts are of high quality and known for their longevity. This is because they are built to the Ford standards which are relatively high and undergo rigorous quality control testing. This part fits specific Ford Bronco, F-150, Ranger models. It fits Lincoln Blackwood, Navigator. It also fits Mercury Grand Marquis.

FordPartsGiant.com is a leading supplier of genuine components and accessories such as F6TZ7052A Oil Seal Assembly. Looking to purchase quality low-cost OEM Ford parts? You have just found the right place. For detailed Ford parts information, click here.

Why choose Ford Parts Giant

  • Dedicated Service

    Your complete satisfaction is our #1 goal

  • Lowest Prices

    Best deals on genuine OE parts from dealerships

  • Fast Delivery

    Orders are processed and delivered promptly