My Garage
My Account
Cart
Genuine Ford Edge Shock Absorber
Suspension Shock Absorber- Select Vehicle by Model
- Select Vehicle by VIN
Select Vehicle by Model
orMake
Model
Year
Select Vehicle by VIN
For the most accurate results, select vehicle by your VIN (Vehicle Identification Number).
65 Shock Absorbers found


Ford Edge Front Shock Absorber Assembly
Part Number: BT4Z-18124-C$117.15 MSRP: $216.36You Save: $99.21 (46%)Ships in 1-2 Business Days

Ford Edge Shock Absorber Assembly
Part Number: F2GZ-18124-AA$159.38 MSRP: $258.18You Save: $98.80 (39%)Ships in 1-2 Business Days

Ford Edge Shock Absorber Kit
Part Number: 8T4Z-18125-A$64.53 MSRP: $108.84You Save: $44.31 (41%)Ships in 1-2 Business Days
Ford Edge Front Shock Absorber Assembly
Part Number: F2GZ-18124-AD$151.23 MSRP: $284.56You Save: $133.33 (47%)Ships in 1-2 Business Days
Ford Edge Shock Absorber Assembly
Part Number: F2GZ-18124-Y$193.35 MSRP: $269.09You Save: $75.74 (29%)Ships in 1-2 Business Days


Ford Edge Shock Absorber Assembly
Part Number: F2GZ-18124-AB$185.51 MSRP: $258.18You Save: $72.67 (29%)Ships in 1-2 Business Days
Ford Edge Shock Absorber Assembly
Part Number: F2GZ-18124-Z$185.51 MSRP: $258.18You Save: $72.67 (29%)Ships in 1-2 Business Days
Ford Edge Front Shock Absorber Assembly
Part Number: F2GZ-18124-AC$151.23 MSRP: $284.56You Save: $133.33 (47%)Ships in 1-2 Business Days


Ford Edge Front Shock Absorber Assembly
Part Number: F2GZ-18124-AE$151.23 MSRP: $284.56You Save: $133.33 (47%)Ships in 1-2 Business Days


Ford Edge Shock Absorber Assembly
Part Number: K2GZ-18125-AA$75.79 MSRP: $105.47You Save: $29.68 (29%)Ships in 1-3 Business Days


Ford Edge Front Shock Absorber Assembly
Part Number: F2GZ-18124-D$151.23 MSRP: $284.56You Save: $133.33 (47%)Ships in 1-2 Business Days


Ford Edge Shock Absorber Assembly
Part Number: F2GZ-18124-K$185.51 MSRP: $258.18You Save: $72.67 (29%)Ships in 1-2 Business Days
Ford Edge Front Shock Absorber Assembly
Part Number: BT4Z-18124-EC$117.15 MSRP: $186.07You Save: $68.92 (38%)Ships in 1-2 Business Days
Ford Edge Shock Absorber Kit
Part Number: 8T4Z-18125-B$64.53 MSRP: $108.84You Save: $44.31 (41%)Ships in 1-2 Business DaysFord Edge Shock Absorber Assembly
Part Number: K2GZ-18125-X$75.93 MSRP: $105.67You Save: $29.74 (29%)Ships in 1 Business DayFord Edge Shock Absorber Assembly
Part Number: F2GZ-18124-L$166.12 MSRP: $269.09You Save: $102.97 (39%)Ships in 1-3 Business DaysFord Edge Shock Absorber Assembly
Part Number: CT4Z-18124-B$108.63 MSRP: $219.91You Save: $111.28 (51%)Ships in 1-2 Business Days
Ford Edge Shock Absorber Assembly
Part Number: J2GZ-18125-A$112.02 MSRP: $181.45You Save: $69.43 (39%)Ships in 1-2 Business Days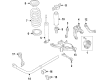
Ford Edge Shock Absorber Assembly
Part Number: K2GZ-18125-Z$105.74 MSRP: $170.44You Save: $64.70 (38%)Ships in 1-3 Business DaysFord Edge Front Shock Absorber Assembly
Part Number: CT4Z-18124-A$117.15 MSRP: $216.36You Save: $99.21 (46%)Ships in 1-2 Business Days
| Page 1 of 4 |Next >
1-20 of 65 Results
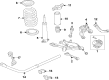
Ford Edge Shock Absorber
The Shock Absorber found in Ford Edge automobiles is an important part of the suspended system since in collaboration with the struts; it offers support and stability. This conversion of several kinetic energies to heat coming from the interaction of the car and the ground is effectively handled by the Shock Absorber thus improving the quality of the ride and handling. In the past years, ford has used shock absorbers that include twin tube and newly improved mono tube, where each of the consists of different ways of regulating the hydraulic fluid and improving its capability as per the driving styles and conditions. Subsequently, special types of designs as PSD and ASD go further in making the Shock Absorber to control responses to each drive structure and Semi Active & Active Suspensions by using Electrorheological or Magnetorheological fluid further behind the adaptive nature of comfort and control.
We provide a wide range of Ford Edge Shock Absorber at the optimal prices. If you need Ford Edge Shock Absorber, you can shop with confidence on our website. All our OEM parts come with a manufacturer's warranty and are delivered to your doorstep with a fast delivery service.
Ford Edge Shock Absorber Parts Questions & Experts Answers
- Q: How to remove and install a rear shock absorber on a Ford Edge?A:From inside the rear cargo area, remove the interior quarter trim panel. Remove the upper shock absorber mounting nuts. Loosen the wheel lug nuts, raise the vehicle and support it securely on jackstands. Block the front wheels to prevent the vehicle from rolling and remove the rear wheel. Support the rear lower control arm with a floor jack, then remove the lower shock absorber nut and bolt. Maneuver the shock out of the vehicle. On 2015 and later models, if the shock absorber is going to be replaced, remove the piston rod nut and separate the upper mounting bracket. On 2015 and later models, if the shock absorber was replaced, install the upper mounting bracket to the shock absorber and tighten the piston rod nut to the torque. New shock absorbers are gas-filled and come compressed and retained with a fiberglass strap. Do NOT remove the strap until the shock is installed. When installing the shock absorber on 2014 and earlier models, install the upper and lower shock mounting fasteners but leave them loose until after the vehicle has been lowered or the suspension raised with a floor jack to simulate normal ride height. Tighten the lower bolt and nut to the specified torque with the full weight of the vehicle on the ground, then tighten the upper mounting nuts to the specified torque.

Related Ford Edge Parts
 Ford Edge Coil Springs
 Ford Edge Tie Rod End
 Ford Edge Tie Rod
 Ford Edge Steering Knuckle
 Ford Edge Fender
 Ford Edge Wheelhouse
Browse by Year
2024 Shock Absorber 2023 Shock Absorber 2022 Shock Absorber 2021 Shock Absorber 2020 Shock Absorber 2019 Shock Absorber 2018 Shock Absorber 2017 Shock Absorber 2016 Shock Absorber 2015 Shock Absorber 2014 Shock Absorber 2013 Shock Absorber 2012 Shock Absorber 2011 Shock Absorber 2010 Shock Absorber 2009 Shock Absorber 2008 Shock Absorber 2007 Shock Absorber