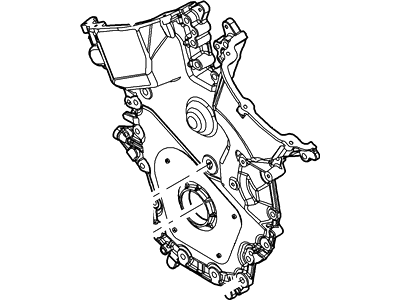
On 3.0L engines, the timing cover can be removed with the engine in the vehicle, while on 3.5L engines, the engine must be removed to perform this procedure. For a 3.5L engine, have the air conditioning system discharged before proceeding. On 2.7L and 3.0L engines, if the engine is not being removed, the air conditioning compressor can be unbolted and moved without discharging the system, but on 3.5L, the system must be discharged and the compressor removed. Relieve the fuel system pressure, then disconnect the cable from the negative battery terminal. Loosen the right front wheel lug nuts, raise the front of the vehicle, and support it securely on jackstands before removing the wheel. Remove the drivebelt, drivebelt tensioner, and two idler pulleys from the front cover, followed by the valve covers. For the 2.7L engine, remove the Powertrain Control Module, drain the engine oil, and remove the oil filter. Remove the oil pressure control solenoid from the front of the timing cover, then remove the air conditioning compressor and support it out of the way, keeping track of the different sized bolts. Remove the oil pan, noting that the front subframe and suspension must be lowered and supported before continuing. Remove the water pump, alternator, and mounting bracket. For all models, remove the crankshaft pulley and, on models equipped with hydraulic power steering, remove the power steering pump. Disconnect the crankshaft position sensor and remove the camshaft position sensors in front of each cylinder head. Support the engine from above with a hoist or engine support fixture, using chains fastened to the engine lift brackets. Disconnect the electrical connectors at the air conditioning compressor, loosen the compressor mounting bolts, and move the compressor aside for access to the engine cover. Remove the compressor bracket from the front cover, ensuring not to disconnect the hoses from the compressor. For the 3.0L engine, loosen the timing cover fasteners gradually and evenly, then remove them, starting with the oil pan-to-cover bolts. For the 3.5L engine, remove the cover bolts and install six of them into the threaded holes in the cover to push it from the engine without damage. Remove and discard the cover-to-cylinder block gaskets. For the 2.7L engine, disconnect the Powertrain Control Module electrical connector and move the harness out of the way, then remove the right engine mount. Gradually and evenly loosen the timing cover bolts and remove the cover, using prying spots along the sides. Remove and discard the cover-to-cylinder head gaskets. Inspect and clean all sealing surfaces of the timing cover and the block, being careful when scraping on aluminum engine parts. Replace the crankshaft seal in the front cover, apply a bead of RTV sealant, and install new front cover gaskets into the grooves on the cover. For 3.5L engines, install two dowel pins into specific holes in the engine block. Install the timing cover and cover fasteners, ensuring they are in their original locations, and tighten them by hand until the cover contacts the block and cylinder heads. For 2.7L and 3.0L engines, tighten the bolts in the correct sequence, while for the 3.5L engine, install specific bolts and remove the locating pins before tightening the rest in sequence. Install the engine mount, drivebelt, and tensioner, then tighten the tensioner pulley. Install the crankshaft pulley, connect the wiring harness connectors to the camshaft and crankshaft position sensors, and reinstall the power steering pump and hoses. Reinstall the remaining parts in the reverse order of removal, reconnect the battery, and start the engine to check for leaks.