My Garage
My Account
Cart
Genuine Ford Edge Timing Cover
Engine Timing Cover- Select Vehicle by Model
- Select Vehicle by VIN
Select Vehicle by Model
orMake
Model
Year
Select Vehicle by VIN
For the most accurate results, select vehicle by your VIN (Vehicle Identification Number).
11 Timing Covers found


Ford Edge Front Cylinder Cover
Part Number: 7T4Z-6019-GD$126.54 MSRP: $185.00You Save: $58.46 (32%)Ships in 1-3 Business Days
Ford Edge Front Cylinder Cover
Part Number: K2GZ-6019-J$144.27 MSRP: $223.67You Save: $79.40 (36%)Ships in 1-3 Business DaysFord Edge Cylinder Front Cover
Part Number: K2GZ-6019-A$144.27 MSRP: $223.67You Save: $79.40 (36%)Ships in 1-3 Business Days
Ford Edge Front Cylinder Cover
Part Number: BB5Z-6019-C$111.72 MSRP: $163.33You Save: $51.61 (32%)Ships in 1-3 Business DaysFord Edge Front Cylinder Cover
Part Number: BB5Z-6019-A$111.72 MSRP: $163.33You Save: $51.61 (32%)Ships in 1-3 Business Days
Ford Edge Cover Assembly - Cylinder Head Front
Part Number: K2GZ-6019-B$32.16 MSRP: $75.50You Save: $43.34 (58%)Ships in 1-3 Business Days
Ford Edge Front Cylinder Cover
Part Number: FT4Z-6019-H$213.57 MSRP: $315.00You Save: $101.43 (33%)Ships in 1-3 Business Days
Ford Edge Front Cylinder Cover
Part Number: FT4Z-6019-B$45.47 MSRP: $65.33You Save: $19.86 (31%)Ships in 1-3 Business Days
Ford Edge Front Cylinder Cover
Part Number: FT4Z-6019-F$213.57 MSRP: $315.00You Save: $101.43 (33%)Ships in 1-3 Business Days

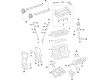
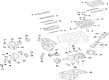
Ford Edge Timing Cover
The Timing Cover used in Ford Edge vehicles plays an essential part in engine protection particular for its timing assembly that may require a timing belt, timing chain or cam belt. The Timing Cover is made of durable materials like aluminum, plastic or steel and thus protects the other parts from damages from the debris. Among the aspects of the Ford Edge Timing Covers, it is possible to point out that most of them have gaskets that increase the level of protection of the timing belt. However, Timing Covers are known to have a very long life span, this does not make it safe for you to drive your car with a faulty Timing Cover since failure is always inevitable. For years, different types of the Timing Covers have been used in Ford Edge models but all of them serve the same purpose of covering the timing chain while some of the cases may be made from different material or may have some additional features. It also is important for the Ford Edge that the Timing Cover is maintained often and any problems are attended to immediately.
We provide a wide range of Ford Edge Timing Cover at the optimal prices. If you need Ford Edge Timing Cover, you can shop with confidence on our website. All our OEM parts come with a manufacturer's warranty and are delivered to your doorstep with a fast delivery service.
Ford Edge Timing Cover Parts Questions & Experts Answers
- Q: How can the timing cover be removed from the V6 engine on the Ford Edge?A:The timing cover can be removed with the engine in the vehicle, but it is very difficult, so it is recommended to remove the engine for this procedure. Begin by having the air conditioning system discharged by a professional. For 2.7L engines, the air conditioning compressor can be unbolted and moved aside without discharging the system, while for 3.5L and 3.7L engines, the system must be discharged and the compressor removed. Relieve the fuel system pressure, disconnect the negative battery terminal, loosen the right front wheel lug nuts, raise the vehicle securely on jackstands, and remove the wheel. Remove the engine cover pushpins and the cover if equipped, then take off the drivebelt and the drivebelt tensioner along with two idler pulleys from the timing cover. For 2.7L engines, drain the engine oil and remove the oil filter, then remove the coolant expansion tank. Next, remove the oil pressure control solenoid and the air conditioning compressor along with its mounting bracket, keeping track of the bolts. Remove the alternator and the crankshaft pulley, then for 2015 and later models, remove the radiator guide pins and support the cooling module with plastic cable ties. For 2.7L models, remove the oil pan, ensuring the front subframe and suspension are lowered and supported before reinstalling the subframe. Remove the water pump for 2.7L models and the power steering pump and reservoir for 2014 and earlier models, followed by the roll restrictor heat shield fasteners and shield. Disconnect any remaining wires, hoses, clamps, or brackets that may interfere with the timing cover removal, and for 2.7L models, remove the insulator mounting bolts and insulator from the timing cover. Gradually and evenly loosen the 21 timing cover bolts and remove the cover, using prying spots along the sides. Disconnect the Powertrain Control Module electrical connector and move the harness aside, then disconnect the Crankshaft Position sensor and remove the Camshaft Position sensors from the front of each cylinder head. Support the engine from above with a hoist or engine support fixture. For 3.5L and 3.7L models, place a floor jack with a block of wood under the oil pan and raise it slightly to support the engine. Remove the transaxle mount through bolt, the mount support brace, and the front engine mount. With the floor jack supporting the engine, lower it until the lower timing cover bolt above the crankshaft seal can be removed, then raise the engine approximately 4 inches to remove the two upper timing cover bolts. Loosen the remaining timing cover bolts gradually and evenly, starting with the oil pan-to-cover bolts, and remove the cover. Inspect and clean all sealing surfaces of the timing cover and the block, being careful not to gouge aluminum parts. Replace the crankshaft oil seal and any other necessary seals and O-rings before applying RTV sealant to the mating surfaces. Install the timing cover, ensuring it is positioned correctly, and reinstall the fasteners in their original locations, tightening them until the cover contacts the block and cylinder heads. Install the remaining bolts and tighten them in sequence to the specified torque, then reinstall the drivebelt and tensioner, followed by the crankshaft pulley. Connect the wiring harness connectors to the CMP and CKP sensors, reinstall the power steering pump and hoses, and finally, reinstall all remaining parts in reverse order of removal. Have the air conditioning system evacuated, recharged, and leak tested by the shop that discharged it.

Related Ford Edge Parts
 Ford Edge Spool Valve
 Ford Edge Cylinder Head Bolts
 Ford Edge Exhaust Valve
 Ford Edge Camshaft
 Ford Edge Intake Valve
 Ford Edge Cylinder Head
 Ford Edge Cylinder Head Gasket
 Ford Edge Rocker Arm
Browse by Year
2024 Timing Cover 2023 Timing Cover 2022 Timing Cover 2021 Timing Cover 2020 Timing Cover 2019 Timing Cover 2018 Timing Cover 2017 Timing Cover 2016 Timing Cover 2015 Timing Cover 2014 Timing Cover 2013 Timing Cover 2012 Timing Cover 2011 Timing Cover 2010 Timing Cover 2009 Timing Cover 2008 Timing Cover 2007 Timing Cover