My Garage
My Account
Cart
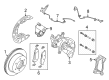
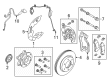
Genuine Ford Ranger Brake Disc
Disc Rotor- Select Vehicle by Model
- Select Vehicle by VIN
Select Vehicle by Model
orMake
Model
Year
Select Vehicle by VIN
For the most accurate results, select vehicle by your VIN (Vehicle Identification Number).
23 Brake Discs found


Ford Ranger Hub And Disc Assembly
Part Number: YL5Z-1V102-EA$75.45 MSRP: $116.65You Save: $41.20 (36%)

Ford Ranger Hub Assembly - Wheel
Part Number: 4L5Z-1102-BA$85.39 MSRP: $116.65You Save: $31.26 (27%)

Ford Ranger Rotor Assembly
Part Number: 3L5Z-1125-AA$86.23 MSRP: $133.32You Save: $47.09 (36%)Ships in 1 Business Day


Ford Ranger Rotor Assembly
Part Number: 2U2Z-1V125-FA$74.54 MSRP: $116.65You Save: $42.11 (37%)Ships in 1 Business Day

Ford Ranger Hub And Disc Assembly
Part Number: YL5Z-1V102-FA$75.45 MSRP: $116.65You Save: $41.20 (36%)

Ford Ranger Brake Rotor Assembly
Part Number: AL5Z-2C026-A$86.23 MSRP: $133.32You Save: $47.09 (36%)Ships in 1 Business Day


Ford Ranger Brake Rotor Assembly
Part Number: KB3Z-1125-A$126.59 MSRP: $161.50You Save: $34.91 (22%)Ships in 1-3 Business Days
Ford Ranger Brake Rotor Assembly
Part Number: MB3Z-2C026-B$200.38 MSRP: $300.00You Save: $99.62 (34%)Ships in 1-2 Business Days
Ford Ranger Brake Rotor Assembly
Part Number: MB3Z-1125-A$195.30 MSRP: $290.00You Save: $94.70 (33%)Ships in 1-2 Business Days
Ford Ranger Hub And Disc Assembly
Part Number: YL2Z-1V102-CA$78.56 MSRP: $116.65You Save: $38.09 (33%)


| Page 1 of 2 |Next >
1-20 of 23 Results
Ford Ranger Brake Disc
The Brake Disc is an integral part of the disc brake system in Ford Ranger Trucks where it gets to exert the required friction on the disc to enable the stopping power of the truck when the brake pedal is pressed. These rotors are usually created from gray iron although they can be made from other types of metals, some of them have features like fins or vanes that help in cooling since cooling is vital in sustaining the efficiency of the brake system. Different models of Brake Disc have been used in Ford Ranger for years now, and such types include the drilled and the slotted types that provide proper space for heat clearance and Brake Disc noise. Such weight and thermal optimized features are the use of two-piece rotors the includes a separable center section and a friction ring. It is also important to have periodic checks on the Brake Disc because it may sometimes warp, crack or rust which will affect its capability to provide the needed braking force. Regular check-ups on the brake system and replacement of pads to exactly the right time can enable customers to keep on trusting Ford Ranger.
We provide a wide range of Ford Ranger Brake Disc at the optimal prices. If you need Ford Ranger Brake Disc, you can shop with confidence on our website. All our OEM parts come with a manufacturer's warranty and are delivered to your doorstep with a fast delivery service.
Ford Ranger Brake Disc Parts Questions & Experts Answers
- Q: How to inspect brake disc assemblies on Ford Ranger?A:The types of inspections for the front and rear disc brake assemblies are as follows. First, carefully operate the wheel lug nuts, then lift the car and place it on the jackstands and only then remove the wheel. After that, unbolt the Brake Caliper, but do not disconnect the brake hose, then fasten the brake caliper with wire so that there will be no pressure on the hose. Search the disc surface for score marks and scratches; minor and slight scratches or grooves are acceptable; deep score marks with thickness more than 0.015 inch requires disc removal and resurfacing. Look on both sides of the disc and if pulsation happens during braking then you can assume that disc runout is the problem. Runout is checked by placing a dial indicator approximately 1/2-inch from the outside edge of the disc, spinning the disc while the needle should not exceed the allowable runout amount. The resurfacing of brake discs may also be necessary to provide brake pedal free from pulsation due to a rough or uneven surface of the brake disc. The disc should not be machined to less then the min refinish thickness that is indicated inside the disc; thickness at several points should be tested with a micrometer. For removal, if on 2-wheel-drive model then inspect, re-pack and get the front wheel bearing in order. For 1998 and later 4WD models, the brake disc slides off the hub assembly, 1997 and earlier models use the front hub lock, spindle bearing and wheel bearing. The process of installation is the complete opposite of the removal procedures, the next step is installing the calipers, followed by the wheels and lug nuts then lowering of the vehicle and finally the lug nuts are tighten to the required torque. Press and release the brake pedal several times in order to prevent the brake pads to stick to the brake disc and then inspect the brake thoroughly before putting the vehicle back to active use.

Related Ford Ranger Parts
 Ford Ranger Brake Dust Shields
 Ford Ranger ABS Control Module
 Ford Ranger Brake Booster
 Ford Ranger Brake Line
 Ford Ranger Brake Caliper
 Ford Ranger Parking Brake Cable
 Ford Ranger Brake Master Cylinder
 Ford Ranger Brake Drum
 Ford Ranger Brake Bleeder Screw
 Ford Ranger Wheel Cylinder
Browse by Year
2025 Brake Disc 2024 Brake Disc 2023 Brake Disc 2022 Brake Disc 2021 Brake Disc 2020 Brake Disc 2019 Brake Disc 2011 Brake Disc 2010 Brake Disc 2009 Brake Disc 2008 Brake Disc 2007 Brake Disc 2006 Brake Disc 2005 Brake Disc 2004 Brake Disc 2003 Brake Disc 2002 Brake Disc 2001 Brake Disc 2000 Brake Disc 1999 Brake Disc 1998 Brake Disc 1997 Brake Disc 1996 Brake Disc 1995 Brake Disc 1994 Brake Disc 1993 Brake Disc 1992 Brake Disc 1991 Brake Disc 1990 Brake Disc