My Garage
My Account
Cart
Genuine Ford Escape Cylinder Head
Head- Select Vehicle by Model
- Select Vehicle by VIN
Select Vehicle by Model
orMake
Model
Year
Select Vehicle by VIN
For the most accurate results, select vehicle by your VIN (Vehicle Identification Number).
26 Cylinder Heads found


Ford Escape Cylinder Head Assembly
Part Number: 2S7Z-6049-AALH$735.38 MSRP: $1078.00You Save: $342.62 (32%)Ships in 1-2 Business Days


Ford Escape Cylinder Head Assembly
Part Number: CJ5Z-6049-C$770.21 MSRP: $1050.77You Save: $280.56 (27%)Ships in 1-3 Business Days


Ford Escape Cylinder Head Assembly
Part Number: EJ7Z-6049-B$947.73 MSRP: $1294.62You Save: $346.89 (27%)Ships in 1-3 Business Days


Ford Escape Cylinder Head Assembly
Part Number: CJ5Z-6049-B$770.21 MSRP: $1050.77You Save: $280.56 (27%)Ships in 1-3 Business Days
Ford Escape Cylinder Head Assembly
Part Number: AL8Z-6049-A$321.97 MSRP: $436.34You Save: $114.37 (27%)Ships in 1-2 Business Days
Ford Escape Cylinder Head Assembly
Part Number: DS7Z-6049-D$683.13 MSRP: $827.69You Save: $144.56 (18%)
Ford Escape Cylinder Head Assembly
Part Number: 9L8Z-6049-A$321.97 MSRP: $436.34You Save: $114.37 (27%)Ships in 1-2 Business DaysFord Escape Cylinder Head Assembly
Part Number: 2S7Z-6049-AA$769.45 MSRP: $1052.62You Save: $283.17 (27%)Ships in 1-3 Business Days
Ford Escape Cylinder Head Assembly
Part Number: 4M5Z-6049-SA$682.85 MSRP: $930.77You Save: $247.92 (27%)Ships in 1-3 Business Days
Ford Escape Cylinder Head Assembly
Part Number: CV6Z-6049-B$488.89 MSRP: $658.46You Save: $169.57 (26%)Ships in 1-2 Business Days
Ford Escape Cylinder Head Assembly
Part Number: YS4Z-6049-AA$1104.58 MSRP: $1534.44You Save: $429.86 (29%)Ships in 1-2 Business Days
Ford Escape Cylinder Head Assembly
Part Number: K2GZ-6049-A$544.42 MSRP: $736.92You Save: $192.50 (27%)Ships in 1-2 Business Days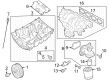
Ford Escape Cylinder Head Assembly
Part Number: PV4Z-6049-A$462.31 MSRP: $664.62You Save: $202.31 (31%)Ships in 1-2 Business DaysFord Escape Cylinder Head Assembly
Part Number: LX6Z-6049-B$848.61 MSRP: $1158.46You Save: $309.85 (27%)Ships in 1-2 Business DaysFord Escape Cylinder Head Assembly
Part Number: GV6Z-6049-A$825.09 MSRP: $1126.15You Save: $301.06 (27%)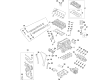
Ford Escape Cylinder Head Assembly
Part Number: P2GZ-6049-B$807.17 MSRP: $1101.54You Save: $294.37 (27%)Ships in 1-2 Business Days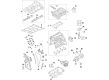
Ford Escape Cylinder Head Assembly
Part Number: HX7Z-6049-A$619.01 MSRP: $843.08You Save: $224.07 (27%)Ships in 1-3 Business Days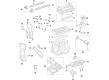
Ford Escape Cylinder Head Assembly
Part Number: LX6Z-6049-A$897.22 MSRP: $1225.23You Save: $328.01 (27%)Ships in 1-2 Business DaysFord Escape Cylinder Head Assembly
Part Number: 9U7Z-6049-A$3539.86 MSRP: $4855.23You Save: $1315.37 (28%)
| Page 1 of 2 |Next >
1-20 of 26 Results
Ford Escape Cylinder Head
The Cylinder Head in Ford Escape cars is a very important engine system which regulates the transport of air and fuel into the engine while exhaust gases exit. It contains important valves and spark plugs but forms the upper part of the combustion chamber. The design on the Cylinder Head has developed with nearly all models involving the use of light weight aluminum to provide optimal power/weight ratio and better heat rejection with some options having cast iron. Common Cylinder Head problems are such defects as worn guides and valves, which may lead to poor performance or leaks. Torque-to-yield (TTY) head bolts positively verify a seal for the head gasket preventing possible leaking of this resulting in overheating or oil contamination. On the whole, the design and nature of materials employed in the Ford Escape Cylinder Head product play a crucial role in achieving maximum airflow and boosting engine efficiency for the Ford Escape products.
We provide a wide range of Ford Escape Cylinder Head at the optimal prices. If you need Ford Escape Cylinder Head, you can shop with confidence on our website. All our OEM parts come with a manufacturer's warranty and are delivered to your doorstep with a fast delivery service.
Ford Escape Cylinder Head Parts Questions & Experts Answers
- Q: What are the steps necessary to remove both cylinder heads on Ford Escape?A:The following are the steps that should be followed to remove both cylinder heads while the notes given below apply to cases whereby one cylinder head alone will need to be removed. Again for the rear cylinder head the Timing Chain, camshafts and the rocker arms can only be taken off while the front head can be left in place. On the other hand, if front head has to be removed then the rear timing has to be brought out so as to remove the front chain; this will enable camshaft and the rocker arm of rear to remain in position. First, depresurize the fuel system and remove the negative terminal from the battery next drain the cooling system and remove upper and lower intake manifolds. Suction out the engine oil and see that the oil pan and the engine front cover are removed. Go on and take off the timing chains, camshafts, rocker arms, and lash adjusters inasmuch as needed, exhaust manifold(s), and water pump with its housing. For models from 2009 and further, you have to take away the upper radiator support brackets, and for all versions, you have to do the same with the oil dipstick and its tube. Exhaust the EGA valve pipe and take out the hoses and connectors attached to the coolant bypass tube and also extract the fasteners holding the tube to prevent it from lodging elsewhere. The cylinder head bolts should now be slackened in the reverse order that was used when tightening, they should then be removed and discarded and replaced with new Torque-to-yield bolts. It is recommended that the cylinder head is withdrawn from the engine block with great precaution so as to avoid scratching the mating surfaces of the head and the block; the old gasket should then be thrown away. When you are about to fit in the new cylinder head make sure that the mating surface is clean and also check for signs of damage. If needed, use shop towel and solvent required to clean the surface areas and make sure that locating dowels are installed, and there are no deposits or rather contamination of bolt holes. Place new gaskets over the dowels and using the previous torque settings fit the cylinder heads in their corresponding places and fit new bolts just enough that they do not go fully tight. Torque level is to be set by leveraging a torque wrench along with an angle gauge and the old bolts are to be discarded because it is a type of torque-to-yield bolt. As for the remaining parts return to the sequence by which they were removed tightening the fasteners to the torque specifications, add fresh oil in the engine and coolant in the cooling system. Connect the battery, turn the engine and bay watch for some time for any signs of leaks, and this way giving the Powertrain Control Module an opportunity to relearn its idle and fuel trim for better performance.

Related Ford Escape Parts
 Ford Escape Camshaft
 Ford Escape Intake Valve
 Ford Escape Timing Cover
 Ford Escape Exhaust Valve
 Ford Escape Spool Valve
 Ford Escape Cylinder Head Gasket
 Ford Escape Cylinder Head Bolts
 Ford Escape Rocker Arm
Browse by Year
2025 Cylinder Head 2024 Cylinder Head 2023 Cylinder Head 2022 Cylinder Head 2021 Cylinder Head 2020 Cylinder Head 2019 Cylinder Head 2018 Cylinder Head 2017 Cylinder Head 2016 Cylinder Head 2015 Cylinder Head 2014 Cylinder Head 2013 Cylinder Head 2012 Cylinder Head 2011 Cylinder Head 2010 Cylinder Head 2009 Cylinder Head 2008 Cylinder Head 2007 Cylinder Head 2006 Cylinder Head 2005 Cylinder Head 2004 Cylinder Head 2003 Cylinder Head 2002 Cylinder Head 2001 Cylinder Head