Make sure this part fits

Ford 1L5Z-6675-AA Frame Assembly

1997-2011 Ford 1L5Z6675AA

Customer Questions & Expert Answers (7)
1L5Z-6675-AA Ford Frame Assembly Product Photo 1 of 1
  • Part Description
    Frame Assy
  • Base No.
    6675
  • Position
    Upper
  • Replaces
    F77Z-6675-BD
  • Manufacturer
    Ford
Make sure this part fits
$145.46 MSRP: $212.67
You Save: $67.21 (32%)
Ships in 1-3 Business Days
1
ADD TO CART
  • Related Parts
  • Product Specifications
  • Vehicle Fitment
  • Customer Questions & Expert Answers
  • Product Specifications

    BrandGenuine Ford
    Base No.6675
    Manufacturer Part Number1L5Z-6675-AA, 1L5Z6675AA
    Part DescriptionFrame Assy
    Other NamesOil Pan, Upper Oil Pan
    Item Weight13.70 Pounds
    PositionUpper
    ConditionNew
    Fitment TypeDirect Replacement
    ReplacesF77Z-6675-BD
    ManufacturerFord
    SKU1L5Z-6675-AA
    WarrantyThis genuine Ford part is guaranteed by Ford's factory warranty.
    Shipping & ReturnShipping Policy Return Policy
    Warning: California's Proposition 65
  • Vehicle Fitment

    Year Make Model Engine Important vehicle option details
    1997-2010 Ford Explorer6 Cyl 4.0L, 6 Cyl 4.0L SOHC EFI4AT 4R70W, 5-Speed Automatic Transmission 5R55S, 5-Speed Automatic Transmission 5R55W, 5-Speed Manual Transmission (M5R4), 5AT 5R55E, 5MT, 6-Speed Automatic Transmission (6R80), 6-Speed Automatic Transmission 6R60, Four-Wheel Drive (Full Time) (Left Hand Drive), Four-Wheel Drive (Part Time) (Left Hand Drive), Four-Wheel Drive (Part Time) (Right Hand Drive), Left Hand Drive, Rear-Wheel Drive (Left Hand Drive)
    2001-2003 Ford Explorer Sport6 Cyl 4.0L SOHC EFI5-Speed Automatic Transmission - 5R44E/5R55E, 5-Speed Manual Transmission - R1HD, Four-Wheel Drive (Part Time) (Left Hand Drive), Left Hand Drive, Rear-Wheel Drive (Left Hand Drive)
    2007-2010, 2001-2005 Ford Explorer Sport Trac6 Cyl 4.0L SOHC EFI5-Speed Automatic Transmission - 5R44E/5R55E, 5-Speed Automatic Transmission 5R55S, 5-Speed Manual Transmission - R1HD, 6-Speed Automatic Transmission (6R80), 6-Speed Automatic Transmission 6R60, Four-Wheel Drive, Four-Wheel Drive (Full Time) (Left Hand Drive), Four-Wheel Drive (Part Time) (Left Hand Drive), Left Hand Drive, Rear-Wheel Drive (Left Hand Drive), Two-Wheel Drive
    2005-2010 Ford Mustang6 Cyl 4.0L SOHC EFI5-Speed Automatic Transmission 5R55S, 5-Speed Manual Transmission T5OD, 5-Speed Manual Transmission TR3650, 6-Speed Manual Transmission (T56), Left Hand Drive, Rear-Wheel Drive (Left Hand Drive)
    2001-2011 Ford Ranger6 Cyl 4.0L, 6 Cyl 4.0L SOHC EFI4AT 4R44E, 5AT 5R44E, 5AT 5R55E, 5MT, 5-Speed Automatic Transmission - 5R44E/5R55E, 5-Speed Manual Transmission - R1HD, 5-Speed Manual Transmission M5R1, Four-Wheel Drive (Part Time) (Left Hand Drive), Left Hand Drive, Rear-Wheel Drive (Left Hand Drive)
    1998-2010 Mercury Mountaineer6 Cyl 4.0L, 6 Cyl 4.0L SOHC EFI4AT 4R70W, 5-Speed Automatic Transmission 5R55S, 5-Speed Automatic Transmission 5R55W, 5-Speed Manual Transmission (M5R4), 5AT 5R55E, 6-Speed Automatic Transmission (6R80), 6-Speed Automatic Transmission 6R60, Four-Wheel Drive (Full Time) (Left Hand Drive), Four-Wheel Drive (Part Time) (Left Hand Drive), Four-Wheel Drive (Part Time) (Right Hand Drive), Left Hand Drive, Rear-Wheel Drive (Left Hand Drive)
  • Customer Questions & Expert Answers

    Q:
    Does the PN fit my vehicle? Posted by FordPartsGiant Specialist
    A:
    You can Select Your Vehicle to check if 1L5Z-6675-AA fits your vehicle.
    Posted by FordPartsGiant Specialist
    Q:
    How to remove and install the oil pan and Oil Pan Baffle in 4.0L pushrod V6 engine on Ford Explorer? Posted by Customer
    A:
    To remove the engine from the vehicle, first take out the oil pan fasteners and detach the oil pan from the engine, using a Tor bit for the bolts on each side of the crankshaft rear oil seal and a Tone driver for the two adjacent bolts. If needed, remove the baffle fasteners to take out the baffle, which is secured to the main bearing caps. For installation, be cautious as two oil pan bolts are attached to the transmission, requiring the correct selection of spacers to prevent damage or leaks. Clean all old gasket material from the oil pan and its mounting surface with a gasket scraper, and remove any residue with a solvent. Position the oil pan on the engine block, then use a straightedge across the transmission mounting surface and one of the oil pan-to-transmission bolt mounting pads to measure the gap with a feeler gauge. Repeat this for the other mounting pad and select spacers to compensate for the gap, available in three thicknesses. Apply a thin bead of ATV sealant to the outside edge of the gasket surface and around the crankshaft rear oil seal at the rear of the engine, as well as to the seams and corners of the front seal cover and engine block-to-timing-chain cover. Install a new oil pan gasket, secure the oil pan fasteners evenly to the specified torque, and ensure the long screw next to the crankshaft rear oil seal is properly positioned. Finally, install the spacers on the mounting pads before bolting the engine to the transmission.
    Posted by FordPartsGiant Specialist
    Q:
    How to remove and install the oil pan assembly and crankcase reinforcement section in 4.0L SOHC V6 engine on Ford Explorer Sport Trac? Posted by Customer
    A:
    Starting with cars from 2001 and later, both pieces of the engine's oil pan system consist of a lower metal pan for collecting oil and an upper aluminum part for strengthening the engine block. You can remove both the lower oil pan and oil pump screen while the engine stays inside the car, but removing the engine reinforcement needs either pulling out the motor or lifting it at least one inch. First, drain the engine oil and remove the lower oil pan attachments, then loosen the oil pump's pickup/screen. You can take apart the reinforcing section by undoing the eight center bolts first, then the back corner bolts and outside bolts, and remove it carefully with care not to touch the gasket surfaces. When putting everything back together, be sure to use spacers to give your oil pan and transmission enough space to stay put and keep from breaking or leaking. Spray RTV sealant on known spots while cleaning gasket areas. Remove threaded anchors within the reinforcement part's body. Replace all gaskets, put the reinforcement piece in, and make sure the gasket surfaces line up with the mounting pads exactly. Start by tightening all bolts the right amount, put back the oil pump suction tube, apply a fresh oil pan gasket, and then put the oil pan back on.
    Posted by FordPartsGiant Specialist
    Q:
    How to remove and install oil pan in V6 engine on Ford Mustang? Posted by Customer
    A:
    To pull the 3.7L engine out, the vehicle has to be lifted, and supported properly on two jackstands. Remove the engine oil, of which an example is shown in Fig. 7-3, clean the drain plug, and remove the oil filter. Following this, refer to that you have to set up the lower engine splash shield, and then remove the crossmember brace together with the mounting bolts and the strut tower cross brace. Dash out the battery and the battery tray, the oil dip stick, the ground strap, and harness retainers throughout the back of the engine. Loosen the four bolts of oil pan-to-timing chain cover and the two nuts at the engine mount. Remove radiator upper cover and support brackets and support the engine from above by fixing a fixture to the cylinder head with legs set correctly so as not cause body damage. Rmve the transnssion-to-oil pan bolts, disconnect the connectors from the power electronic assist steering and unbolt the steering shaft from steering gear. Place to floor jacks under the subframe, take off the subframe bolts, and drop the subframe. Remove the upper transmission-to-engine bolts and commence to turn them clockwise, while using a screwdriver to prise the engine and the transmission apart at the bell housing. The oil pan fasteners have to be detached, along with the oil pan, and this is best done with notches to help you push them out. Scrub the oil pan in order and get ready for it to be fitted by applying RTV sealant at certain points after and then fit the oil pan while tightening the bolts in a certain manner. The backward involves refastening of the fasteners with tightens nuts to standard torque values, replacing of self-locking nuts, refilling of the engine oil and the addition of new oil filter before restarting the engine in order to detect leaks. In the 4.0L engine the oil pan assembly has the lower sheet metal pan as well as the upper aluminum one. To remove the oil pan, the engine must be pulled out and the lower oil pan fasteners and the oil pump screen cover must be removed. Remove the reinforcement section by the needed bolts while being cautious not to apply pressure on the gasket surfaces. For installation, first clean all the surface then apply RTV sealant if requires and then place new gaskets and put the reinforcement section of the drive and ensure that there must be proper clearance to avoid any kind of damage. Lastly, all the bolts should again be tightened up to the required torque and then the oil pump pickup tube and the oil pan should also be fitted efficiently on to the places that they belong to.
    Posted by FordPartsGiant Specialist
    Q:
    How to remove and install the oil pan in SOHC four cylinder engine on Ford Ranger? Posted by Customer
    A:
    In hopes of taking out the oil pan, it is necessary to lift the engine of the car. Start by wiping out the oil and also taking out the oil filer. Next, also, you should disengage the engine and place it upon an appropriate engine stand, with the right side up. Then remove the oil pan mounting bolts ,then drop the pan. Installation begins with cleaning of the oil pan and assessing wether or not the has been any damage and the removal of spacers from the mounting pad transmission. Cleaning the gasket surfaces on the cylinder block and oil pan flange will prevent oil leaks and one should clean also the oil pump pick-up tube screen. Apply RTV sealant at six points: at the joints of the front cover and engine block and rear main bearing cap and engine block, then fit the gasket into the oil pan channel. Position the oil pan on the engine and loosely fasten the mounting bolts so that when gaging the engine and the transmission to form an accurate alignment, the final torque adjustments will be done. Place back the engine and finally fasten the two oil pan to transmission bolts to the right torque then loosening them a half turn. After that, use a wrench to further tighten the oil pan to the engine block bolts to the required torque upsetting each bolt in succession around the periphery of the pan. Tighten the oil pan to transmission bolts to the required torque. Last, perform the reversal procedure of the installation and add the required amount and type of oil into the engine.
    Posted by FordPartsGiant Specialist
    Q:
    How to remove and reinstall the oil pan in 3.0L V6 engine on Ford Ranger? Posted by Customer
    A:
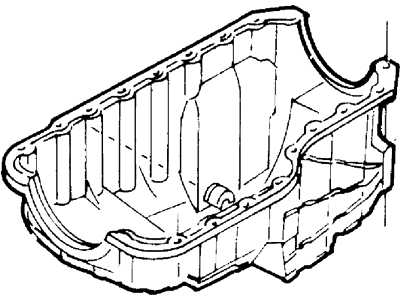
    To execute it for 2WD models, first remove the negative cable of the battery and take out the oil dipstick. Remove the screws to the fan shroud and place it over the fan and the final step is the removal of the engine, which is mounted on the frame using special mounts. Lift the car and effect proper jack-staning to do the work on the car area very easily. If so fitted remove the retainer clip and separate the connector from low oil level sensor. Discard the oil and put in a fresh oil filter. The mechanical starter motor must be eradicated, as well as front transmission shroud which has the appearance of a cover. Take off the nuts on the engine mounts and lift the engine by 2 inches using the three-bar engine support fixture, and pull off the transmission, and the engine flywheel or drive plate. Take out the passenger side axle beams, it is advised to take of the brake caliper then fasten it somewhere out of the way. Remove the bolts that fix the oil pan into position and then, with the help of a hoist, lift the engine to about two inches so that enough space will be created to allow the oil pan to be freed and taken out-using a little force, if need be. Before fitting, degrease the sealing surfaces of the block and pan, then fit a new gasket to the oil pan in contact adhesive way. Wipe the majority of the 4 to 5 mm thick RTV sealer off the junction of the rear main bearing cap and engine block and the timing chain cover-to-block surface, and put it around the edges of the bearing cap and to the mating area of the cover to the block, making sure that the sealant does not dry up before fitting the pan. Place the pan on the engine, fasten the oil pan bolts, and apply only the recommended amounts of force in order to tighten them. Any parts removed should be reinstalled and the engine oil topped up before engaging the engine to look for any signs of leakage. On the 4WD models, the engine has to be dismantled to get at the oil pan. Next, supporting the engine on a suitable engine stand, have the oil pan bolted, and if required, eased off slightly. Scrub the gasket surfaces nicely and insert a new one that you'll be using contact adhesive; apply a 4 to 5 mm thick of RTV sealer on the relevant joints but make sure the sealant has not cured before you fit the pan. Place the pan in the position of the engine, screw the bolts of the oil pan, and fasten it accordingly. Last but not the least, place back the engine, other components that were unclipped, add the engine oil, and start the engine for leakage test.
    Posted by FordPartsGiant Specialist
    Q:
    How should the oil pan be separated from the block for the 2001 Ford Explorer? Posted by Customer
    A:
    Carefully separate the pan from the block without prying between the block and pan to avoid damaging the sealing surfaces. Use a large rubber mallet or a block of wood and a hammer to dislodge the pan.
    Posted by FordPartsGiant Specialist
    See expert answers on similar Oil Pan
    If you have any questions about this product, please don't hesitate to ask us. We will be happy to help you!

Genuine Ford Part 1L5Z-6675-AA, the Right Choice

To ensure reliability, purchase part # 1L5Z-6675-AA Frame Assembly. It is also called Oil Pan. OEM parts are of high quality and known for their longevity. This is because they are built to the Ford standards which are relatively high and undergo rigorous quality control testing. This part fits specific Ford Explorer, Mustang, Ranger models. It fits Mercury Mountaineer.

FordPartsGiant.com is a leading supplier of genuine components and accessories such as 1L5Z6675AA Frame Assembly. Looking to purchase quality low-cost OEM Ford parts? You have just found the right place. For detailed Ford parts information, click here.

Why choose Ford Parts Giant

  • Dedicated Service

    Your complete satisfaction is our #1 goal

  • Lowest Prices

    Best deals on genuine OE parts from dealerships

  • Fast Delivery

    Orders are processed and delivered promptly