My Garage
My Account
Cart
Genuine Ford Mustang Oil Pan
Oil Drain Pan- Select Vehicle by Model
- Select Vehicle by VIN
Select Vehicle by Model
orMake
Model
Year
Select Vehicle by VIN
For the most accurate results, select vehicle by your VIN (Vehicle Identification Number).
37 Oil Pans found


Ford Mustang Engine Oil Pan Assembly
Part Number: BR3Z-6675-P$147.32 MSRP: $191.67You Save: $44.35 (24%)
Ford Mustang Engine Oil Pan Assembly
Part Number: BR3Z-6675-B$147.32 MSRP: $191.67You Save: $44.35 (24%)


Ford Mustang Engine Oil Pan Assembly
Part Number: BR3Z-6675-A$81.62 MSRP: $119.33You Save: $37.71 (32%)Ships in 1-2 Business Days

Ford Mustang Frame Assembly
Part Number: 1L5Z-6675-AA$145.46 MSRP: $212.67You Save: $67.21 (32%)Ships in 1-3 Business Days


Ford Mustang Engine Oil Pan Assembly
Part Number: FR3Z-6675-B$141.36 MSRP: $206.67You Save: $65.31 (32%)Ships in 1-3 Business Days
Ford Mustang Engine Oil Pan Assembly
Part Number: FR3Z-6675-A$141.36 MSRP: $206.67You Save: $65.31 (32%)Ships in 1-3 Business Days


Ford Mustang Engine Oil Pan Assembly
Part Number: JR3Z-6675-B$213.93 MSRP: $278.33You Save: $64.40 (24%)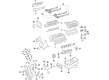
Ford Mustang Engine Oil Pan Assembly
Part Number: JR3Z-6675-E$213.93 MSRP: $278.33You Save: $64.40 (24%)
Ford Mustang Engine Oil Pan Assembly
Part Number: KR3Z-6675-C$884.80 MSRP: $1316.67You Save: $431.87 (33%)
Ford Mustang Engine Oil Pan Assembly
Part Number: PR3Z-6675-A$161.88 MSRP: $236.67You Save: $74.79 (32%)
Ford Mustang Engine Oil Pan Assembly
Part Number: PR3Z-6675-B$92.94 MSRP: $193.33You Save: $100.39 (52%)Ships in 1-2 Business Days
Ford Mustang Pan Assembly Engine Oil
Part Number: 1U2Z6675KA$40.19 MSRP: $55.83You Save: $15.64 (29%)Ships in 1-2 Business Days
Ford Mustang Engine Oil Pan Assembly
Part Number: PR3Z-6675-C$132.24 MSRP: $193.33You Save: $61.09 (32%)Ships in 1-2 Business Days

Ford Mustang Engine Oil Pan Assembly
Part Number: 5R3Z-6675-AA$45.67 MSRP: $65.62You Save: $19.95 (31%)


Ford Mustang Engine Oil Pan Assembly
Part Number: GR3Z-6675-E$320.92 MSRP: $473.33You Save: $152.41 (33%)


Ford Mustang Engine Oil Pan Assembly
Part Number: GR3Z-6675-C$320.92 MSRP: $473.33You Save: $152.41 (33%)


| Page 1 of 2 |Next >
1-20 of 37 Results
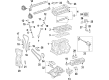
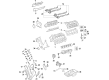
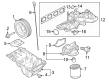
Ford Mustang Oil Pan
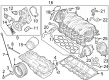
The Oil Pan in the Ford Mustang automobiles play the role of lubrication system in automobiles, specifically, it retains the oil that is required to lubricate the engine. A common system that is found in most of the Mustangs is the wet sump system where the oil pan is located beneath the engine whereby through the pickup tube, the oil is sucked by the oil pump, is circulated in order to lubricate and cool the parts of the engine before it is sumped back into the oil pan. Traditionally, Ford Mustang Oil Pans were fabricated using stamped steel, however, today's designs are inclined to use cast aluminum with premier performance in mind. The wet sump system is common while the dry sump system is added to high performance models in order to prevent oil supply shortage on demanding driving conditions. This change in the design of Oil Pan is in line with the flexibility if the Mustang model to drive based on various models and situations, while providing reliable lubrication for the engine.
We provide a wide range of Ford Mustang Oil Pan at the optimal prices. If you need Ford Mustang Oil Pan, you can shop with confidence on our website. All our OEM parts come with a manufacturer's warranty and are delivered to your doorstep with a fast delivery service.
Ford Mustang Oil Pan Parts Questions & Experts Answers
- Q: How to remove and install oil pan in V6 engine on Ford Mustang?A:To pull the 3.7L engine out, the vehicle has to be lifted, and supported properly on two jackstands. Remove the engine oil, of which an example is shown in Fig. 7-3, clean the drain plug, and remove the oil filter. Following this, refer to that you have to set up the lower engine splash shield, and then remove the crossmember brace together with the mounting bolts and the strut tower cross brace. Dash out the battery and the battery tray, the oil dip stick, the ground strap, and harness retainers throughout the back of the engine. Loosen the four bolts of oil pan-to-timing chain cover and the two nuts at the Engine Mount. Remove radiator upper cover and support brackets and support the engine from above by fixing a fixture to the cylinder head with legs set correctly so as not cause body damage. Rmve the transnssion-to-oil pan bolts, disconnect the connectors from the power electronic assist steering and unbolt the steering shaft from steering gear. Place to floor jacks under the subframe, take off the subframe bolts, and drop the subframe. Remove the upper transmission-to-engine bolts and commence to turn them clockwise, while using a screwdriver to prise the engine and the transmission apart at the bell housing. The oil pan fasteners have to be detached, along with the oil pan, and this is best done with notches to help you push them out. Scrub the oil pan in order and get ready for it to be fitted by applying RTV sealant at certain points after and then fit the oil pan while tightening the bolts in a certain manner. The backward involves refastening of the fasteners with tightens nuts to standard torque values, replacing of self-locking nuts, refilling of the engine oil and the addition of new oil filter before restarting the engine in order to detect leaks. In the 4.0L engine the oil pan assembly has the lower sheet metal pan as well as the upper aluminum one. To remove the oil pan, the engine must be pulled out and the lower oil pan fasteners and the oil pump screen cover must be removed. Remove the reinforcement section by the needed bolts while being cautious not to apply pressure on the gasket surfaces. For installation, first clean all the surface then apply RTV sealant if requires and then place new gaskets and put the reinforcement section of the drive and ensure that there must be proper clearance to avoid any kind of damage. Lastly, all the bolts should again be tightened up to the required torque and then the oil pump pickup tube and the oil pan should also be fitted efficiently on to the places that they belong to.

Related Ford Mustang Parts
 Ford Mustang Oil Filter
 Ford Mustang Rod Bearing
 Ford Mustang Drain Plug
 Ford Mustang Crankshaft Thrust Washer Set
 Ford Mustang Piston Ring Set
 Ford Mustang Drain Plug Washer
 Ford Mustang Oil Cooler
 Ford Mustang Oil Pump
 Ford Mustang Crankshaft Pulley
 Ford Mustang Oil Pressure Switch
 Ford Mustang Dipstick Tube
 Ford Mustang Dipstick
Browse by Year
2025 Oil Pan 2024 Oil Pan 2023 Oil Pan 2022 Oil Pan 2021 Oil Pan 2020 Oil Pan 2019 Oil Pan 2018 Oil Pan 2017 Oil Pan 2016 Oil Pan 2015 Oil Pan 2014 Oil Pan 2013 Oil Pan 2012 Oil Pan 2011 Oil Pan 2010 Oil Pan 2009 Oil Pan 2008 Oil Pan 2007 Oil Pan 2006 Oil Pan 2005 Oil Pan 2004 Oil Pan 2003 Oil Pan 2002 Oil Pan 2001 Oil Pan 2000 Oil Pan 1999 Oil Pan 1998 Oil Pan 1997 Oil Pan 1996 Oil Pan 1995 Oil Pan 1994 Oil Pan 1993 Oil Pan 1992 Oil Pan 1991 Oil Pan 1990 Oil Pan 1989 Oil Pan 1988 Oil Pan 1987 Oil Pan 1986 Oil Pan 1985 Oil Pan 1984 Oil Pan 1983 Oil Pan 1982 Oil Pan 1981 Oil Pan 1980 Oil Pan