My Garage
My Account
Cart
Genuine Ford F-150 Piston
Engine Pistons- Select Vehicle by Model
- Select Vehicle by VIN
Select Vehicle by Model
orMake
Model
Year
Select Vehicle by VIN
For the most accurate results, select vehicle by your VIN (Vehicle Identification Number).
130 Pistons found


Ford F-150 Piston
Part Number: AL3Z-6108-M$265.19 MSRP: $415.00You Save: $149.81 (37%)Ships in 1-2 Business Days
Ford F-150 Piston
Part Number: AL3Z-6108-D$265.19 MSRP: $415.00You Save: $149.81 (37%)Ships in 1-2 Business Days


Ford F-150 Piston And Pin Assembly
Part Number: HL3Z-6108-D$111.48 MSRP: $162.98You Save: $51.50 (32%)Ships in 1-2 Business Days


Ford F-150 Piston
Part Number: HL3Z-6108-C$111.48 MSRP: $162.98You Save: $51.50 (32%)Ships in 1-2 Business Days

Ford F-150 Piston
Part Number: BA5Z-6108-L$78.88 MSRP: $115.32You Save: $36.44 (32%)Ships in 1-2 Business Days

Ford F-150 Piston
Part Number: 3L3Z-6108-CC$54.49 MSRP: $78.28You Save: $23.79 (31%)Ships in 1-3 Business Days


Ford F-150 Piston And Pin Assembly
Part Number: XL3Z-6108-KA$118.63 MSRP: $173.43You Save: $54.80 (32%)

Ford F-150 Piston And Pin Assembly
Part Number: HL7Z-6108-H$133.62 MSRP: $207.17You Save: $73.55 (36%)Ships in 1-3 Business DaysFord F-150 Piston
Part Number: 3L3Z-6108-EB$118.22 MSRP: $182.78You Save: $64.56 (36%)Ships in 1-2 Business Days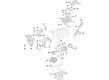
Ford F-150 Piston
Part Number: ML3Z-6108-A$171.00 MSRP: $250.00You Save: $79.00 (32%)Ships in 1-2 Business Days
Ford F-150 Piston
Part Number: 3L3Z-6108-DB$120.64 MSRP: $182.78You Save: $62.14 (34%)Ships in 1-2 Business Days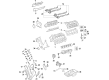
Ford F-150 Piston
Part Number: KR3Z-6108-B$223.01 MSRP: $341.00You Save: $117.99 (35%)Ships in 1-3 Business Days


Ford F-150 Piston And Pin Assembly
Part Number: 8L2Z-6108-E$40.83 MSRP: $58.67You Save: $17.84 (31%)
| Page 1 of 7 |Next >
1-20 of 130 Results
Ford F-150 Piston
The Piston in Ford F-150 vehicles is among the critical aspects of internal combustion engine since it is responsible for translation of forces developed through combustion into the energy that is required to drive the car. Through transferring force resulting from expanding gases to crankshaft, the Piston contributes immensely about the total performance of any given engine. Commonly made out of aluminium alloys due to strength and light weight characteristics of Fords F-150 Pistons may incorporate forging or billets in race cars. Some of the Piston used in Ford F-150's through the years include the trunk pistons that apply side forces for two types of engines: petrol and diesel and has an oil ring for lubrications. Other uses include the use of slipper pistons in high speed petrol engines as balance and increased efficiency mechanisms. These Pistons undergone deep study in the design and choice of materials with a high pressure and temperature risk resistance to provide durability and functionalism for Fords F-150.
We provide a wide range of Ford F-150 Piston at the optimal prices. If you need Ford F-150 Piston, you can shop with confidence on our website. All our OEM parts come with a manufacturer's warranty and are delivered to your doorstep with a fast delivery service.
Ford F-150 Piston Parts Questions & Experts Answers
- Q: How to properly install piston and connecting rod assemblies on Ford F-150?A:Feel for a ridge at the top limit of ring travel with your fingernail, 1/4 inch down from the top of each cylinder; if you feel ridges due to carbon build-up or cylinder wear, those must be relieved with a specific tool to avoid piston failure. When you do away with the ridges, position the engine in such a way that the Crankshaft is on the upper end. Always measure the connection rod bearing cap endplay with feeler gauges before unplugging the main bearing cap and the connecting rods bearing cap to ensure that the end play is within the standard service limit of 0.005- 0.015 inch. To prevent confusion, mark the connecting rods and caps appropriately and then, remove the connecting rod cap bolts in equal intervals to come out with the number one connecting cap and bearing insert; do this carefully in order not to drop the insert. Extract the connecting rod/piston assembly through the top of the engine and, if required, knock it out using a wooden or plastic hammer handle for the decision on the next cylinders. Return the connecting rod caps and bearing inserts back to its position with the old inserts to guard the surfaces. Examine the pistons and the connecting rods; follow/verify the ring end gaps so that the piston ring side clearance is appropriate. Lean the piston/connecting rod assemblies and the new ring sets in a way that will allow matching when assembling the engine. Place the top ring into the first cylinder, align it with the walls, and check the end play with a feeler gauge, the variation must be within the range. When the gap is too small, the ring ends should be slowly filed down to increase the gap size; the gaps that are too large need to be assessed for the correctness of the ring type. This is done for all rings and the rings are then fitted to the pistons in their correct positions starting with the oil control ring and other rings in the middle and on top. Before the assemblies are fitted, it is recommended that cylinder walls are cleaned and edges chamfered, and the crank-shaft fitted. Remove the carbon build up from the bearing surfaces, replace bearing inserts without any form of lubrication and ensure that the gap is correctly sited for the piston rings. coat the piston and rings, place a ring compressor and then placing the piston into the cylinder tracking on the piston should be done correctly. Inspect the connecting rod bearing oil clearance using Plastigage, if the marks overlap, the clearance should be in range. If not, ascertain cleanliness then the diameter of the journal to warrant new bearing inserts. Scrape of the remains of Plastigage, lubricate the faces of the bearing, and screw the rod cap with new bolts to the tightened measure. The same should be done for all assemblies with attention to cleanliness and proper orientations then rotate the crankshaft so as to check for bind then checking the endplay of the connecting rod end and in the event that there is a need for resizing then do so.

Related Ford F-150 Parts
 Ford F-150 Piston Ring Set
 Ford F-150 Power Steering Pump
 Ford F-150 PCV Hose
 Ford F-150 Power Steering Hose
 Ford F-150 PCV Valve
 Ford F-150 Pilot Bearing
 Ford F-150 Pinion Washer
 Ford F-150 PCV Valve Elbow
 Ford F-150 PCV Valve Hose
 Ford F-150 Pinion Bearing
 Ford F-150 Pushrod
 Ford F-150 Pressure Plate
Browse by Year
2025 Piston 2024 Piston 2023 Piston 2022 Piston 2021 Piston 2020 Piston 2019 Piston 2018 Piston 2017 Piston 2016 Piston 2015 Piston 2014 Piston 2013 Piston 2012 Piston 2011 Piston 2010 Piston 2009 Piston 2008 Piston 2007 Piston 2006 Piston 2005 Piston 2004 Piston 2003 Piston 2002 Piston 2001 Piston 2000 Piston 1999 Piston 1998 Piston 1997 Piston 1996 Piston 1995 Piston 1994 Piston 1993 Piston 1992 Piston 1989 Piston 1988 Piston 1987 Piston 1986 Piston 1985 Piston 1984 Piston 1983 Piston 1982 Piston 1981 Piston 1980 Piston