My Garage
My Account
Cart
Genuine Ford F-150 Hood
Engine Hood- Select Vehicle by Model
- Select Vehicle by VIN
Select Vehicle by Model
orMake
Model
Year
Select Vehicle by VIN
For the most accurate results, select vehicle by your VIN (Vehicle Identification Number).
12 Hoods found


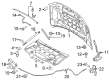
Ford F-150 Hood Assembly
Part Number: 4L3Z-16612-AA$675.74 MSRP: $1077.73You Save: $401.99 (38%)Ships in 1-3 Business Days


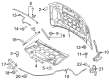
Ford F-150 Hood Assembly
Part Number: 9L3Z-16612-A$912.83 MSRP: $1358.38You Save: $445.55 (33%)Ships in 1-3 Business Days

Ford F-150 Hood Assembly
Part Number: CL3Z-16612-A$754.01 MSRP: $1122.03You Save: $368.02 (33%)Ships in 1-3 Business Days


Ford F-150 Hood Assembly
Part Number: ML3Z-16612-E$1268.67 MSRP: $1887.90You Save: $619.23 (33%)Ships in 1-2 Business DaysFord F-150 Hood Assembly
Part Number: AL3Z-16612-A$754.01 MSRP: $1122.03You Save: $368.02 (33%)Ships in 1-3 Business Days


Ford F-150 Hood
The Ford F-150 Hood is the first line of defense for the truck as it protects the engine from the weather and debris on the road. For many decades, Ford has refined the Hood on successive F-150 versions, but all F-150s fulfill two core functions: protecting important power-train parts and swinging upward for easy service on tough hinges with a strong latch. Previous versions had a plain, slablike profile, but later iterations sported sculpted creases and a raised center section that boosts airflow over the cab while giving this Ford pickup its signature stance. Regardless of the style, though, each Hood maintains its place at the vulnerable front where crashes or flying gravel can dent or deform it. When impact damage compromises alignment or strength, swapping in a fresh Hood restores protection. Ford's sheet-metal contours are model-specific. Therefore, the right F-150 year provides proper fit and returns the truck's look. The engine's safety as well as curb appeal on any F-150 can be affected without a Hood.
We provide a wide range of Ford F-150 Hood at the optimal prices. If you need Ford F-150 Hood, you can shop with confidence on our website. All our OEM parts come with a manufacturer's warranty and are delivered to your doorstep with a fast delivery service.
Ford F-150 Hood Parts Questions & Experts Answers
- Q: How should the hood be removed and installed, and what adjustments are necessary for proper alignment on Ford F-150?A:The hood is rather massive and requires certain skills to put on and take off; it is better to rope in at least two people for the process. Start by weighting up the cowl region or the body together with fenders by means of applying blankets or pads in order to prevent scratching of the paint surface when the hood is being removed. But if it has cords or wires connected, remove them in order not to hinder the process. Place marks or draw a line around the hood hinge so that it will act as your guide when you replace the hinge of the hood. First hand, an assistant should be supporting one part of the hood while you support the other, and with your shoulder use the leverage to remove the bolts holding the hinge to the hood. After the hood is removed, installation is done in a manner that is reverse to the removal process. For adjustment, the fore-and-aft and the side-to-side condition can be attained after loosening the bolts and nuts of the hinge plate slot. Write a pencil line around the hinge plate to monitor the movement and then remove the bolts or nuts and move the hood slowly while tightening the hinge bolts before exercising the position again. If fine tuning is required, the whole Hood Latch assembly can be slid up and down as well as forward and backward on the radiator support to get the desired hood closing position against the fenders. Tape around the above mounting bolts to identify them, loosen them and offer any required adjustability before tightening. Last, the hood bumpers of the radiator support need to be aligned to get the hood perfectly aligned to the fenders when closed and also to have the support of the under Grilles from the lower bumpers. Apply white lithium-base grease to the hood latch assembly and hinges from time to time to reduce wear and the tendency for them to bind.

Related Ford F-150 Parts
 Ford F-150 Emblem
 Ford F-150 Air Deflector
 Ford F-150 Grille
 Ford F-150 Hood Hinge
 Ford F-150 Hood Cable
 Ford F-150 Hood Latch
Browse by Year
2025 Hood 2024 Hood 2023 Hood 2022 Hood 2021 Hood 2020 Hood 2019 Hood 2018 Hood 2017 Hood 2016 Hood 2015 Hood 2014 Hood 2013 Hood 2012 Hood 2011 Hood 2010 Hood 2009 Hood 2008 Hood 2007 Hood 2006 Hood 2005 Hood 2004 Hood 2003 Hood 2002 Hood 2001 Hood 2000 Hood 1999 Hood 1998 Hood 1997 Hood 1996 Hood 1995 Hood 1994 Hood 1993 Hood 1992 Hood