My Garage
My Account
Cart
Genuine Ford F-150 A/C Compressor
Air Conditioning Compressor- Select Vehicle by Model
- Select Vehicle by VIN
Select Vehicle by Model
orMake
Model
Year
Select Vehicle by VIN
For the most accurate results, select vehicle by your VIN (Vehicle Identification Number).
45 A/C Compressors found


Ford F-150 Compressor Assembly
Part Number: BL3Z-19703-D$400.75 MSRP: $654.55You Save: $253.80 (39%)Ships in 1-2 Business Days


Ford F-150 Compressor Assembly
Part Number: BL3Z-19703-C$375.15 MSRP: $612.73You Save: $237.58 (39%)Ships in 1-2 Business Days

Ford F-150 Compressor Assembly
Part Number: 8C3Z-19703-A$362.90 MSRP: $592.73You Save: $229.83 (39%)Ships in 1-2 Business Days


Ford F-150 Compressor Assembly
Part Number: 9L3Z-19703-C$361.79 MSRP: $590.91You Save: $229.12 (39%)Ships in 1-2 Business Days

Ford F-150 Compressor Assembly
Part Number: 4L3Z-19V703-AB$368.47 MSRP: $601.82You Save: $233.35 (39%)Ships in 1-2 Business Days
Ford F-150 Compressor Assembly
Part Number: 9L3Z-19703-D$361.79 MSRP: $590.91You Save: $229.12 (39%)Ships in 1-2 Business Days


Ford F-150 Compressor Assembly
Part Number: 9U2Z-19V703-ARM$368.47 MSRP: $601.82You Save: $233.35 (39%)Ships in 1-2 Business Days
Ford F-150 Compressor Assembly
Part Number: HL3Z-19703-W$715.83 MSRP: $1245.45You Save: $529.62 (43%)Ships in 1-2 Business Days
Ford F-150 Compressor Assembly
Part Number: HL3Z-19703-C$527.73 MSRP: $918.18You Save: $390.45 (43%)Ships in 1-3 Business DaysFord F-150 Compressor Assembly
Part Number: FL3Z-19703-A$548.69 MSRP: $903.64You Save: $354.95 (40%)Ships in 1-2 Business DaysFord F-150 Compressor Assembly
Part Number: FL3Z-19703-C$492.38 MSRP: $810.91You Save: $318.53 (40%)Ships in 1-2 Business Days
Ford F-150 Compressor Assembly
Part Number: HL3Z-19703-K$578.74 MSRP: $805.45You Save: $226.71 (29%)Ships in 1-3 Business DaysFord F-150 Compressor Assembly
Part Number: BL3Z-19703-B$400.75 MSRP: $654.55You Save: $253.80 (39%)Ships in 1-2 Business DaysFord F-150 Compressor Assembly
Part Number: EL3Z-19703-C$431.92 MSRP: $705.45You Save: $273.53 (39%)Ships in 1-2 Business DaysFord F-150 Compressor Assembly
Part Number: AL3Z-19703-A$375.15 MSRP: $612.73You Save: $237.58 (39%)Ships in 1-2 Business Days
Ford F-150 Compressor Assembly
Part Number: ML3Z-19703-J$634.80 MSRP: $1045.45You Save: $410.65 (40%)
Ford F-150 Compressor Assembly
Part Number: ML3Z-19703-G$1204.46 MSRP: $1983.64You Save: $779.18 (40%)Ships in 1-2 Business Days
Ford F-150 Compressor Assembly
Part Number: ML3Z-19703-L$1097.38 MSRP: $1807.27You Save: $709.89 (40%)Ships in 1-2 Business DaysFord F-150 Compressor Assembly
Part Number: HL3Z-19703-Y$666.82 MSRP: $1098.18You Save: $431.36 (40%)Ships in 1-3 Business Days
| Page 1 of 3 |Next >
1-20 of 45 Results
Ford F-150 A/C Compressor
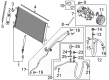
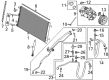
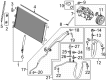
The Ford F-150 A/C Compressor helps provide a comfortable environment for you and your passengers by pressurizing refrigerant so it cycles from gas to liquid and back again. It blows a constant stream of cool air on hotter days. Located inside its housing, the A/C Compressor sucks in low-pressure vapor from the inlet. It presses that vapor down into high-pressure high-temperature gas. After that, the hot flow from the A/C Compressor goes to a condenser. There, it releases heat. Then the liquid is sent to the evaporator to chill the cabin air. The closed-loop process is repeated by the A/C Compressor, leading to precise car interior control. The earlier generations of this truck use refrigerant R12, while those from the early 1990s on use R134a, so matching the fluids to model year is critical. The core principle has remained the same throughout decades of production of the Ford F-150. Each model year, each Ford uses a belt-driven clutch to spin the A/C Compressor only when cooling is needed, a design that keeps the Ford F-150 performing and efficient. A Ford F-150 loses its cooling efficiency rapidly if an A/C Compressor stops pumping.
We provide a wide range of Ford F-150 A/C Compressor at the optimal prices. If you need Ford F-150 A/C Compressor, you can shop with confidence on our website. All our OEM parts come with a manufacturer's warranty and are delivered to your doorstep with a fast delivery service.
Ford F-150 A/C Compressor Parts Questions & Experts Answers
- Q: How to remove and install the A/C Compressor in the air conditioning system on a Ford F-150?A:If you are replacing the compressor due to internal damage, you must also replace the accumulator and the evaporator orifice tube. Begin by having the air conditioning system discharged by a dealer service department or an automotive air conditioning shop before proceeding. Remove the drive belt. For V6 models, take out the air duct between the air cleaner housing and the throttle body, and on 3.5L V6 models, remove the right-hand turbocharger bypass hose and the right-hand turbocharger-to-charge air cooler. Disconnect the electrical connector from the compressor clutch field coil, then disconnect the compressor inlet and outlet line manifold from the compressor, discarding the old O-rings. Remove the power steering bracket fasteners and move the bracket and reservoir aside. Next, remove the compressor mounting bolts and carefully take out the compressor. For VB models, loosen the right front wheel lug nuts, raise the vehicle, and support it securely on jack stands. On 4WD models, remove the engine cooling fan and the skid plate under the engine if equipped. Remove the right front wheel and inner fender splash shield. Disconnect the electrical connector from the compressor clutch field coil, then disconnect the Crankshaft Position (CKP) sensor connector and position the harness aside. Disconnect the compressor inlet and outlet line manifold from the compressor, discarding the old O-rings, and remove the compressor mounting bolts to take out the compressor. If a new compressor is being installed, follow the directions regarding the draining of excess oil prior to installation. The clutch may need to be transferred from the original compressor to the replacement. Before reconnecting the inlet and outlet lines to the compressor, replace all manifold O-rings and lubricate them with the appropriate refrigerant oil. Installation is otherwise the reverse of removal. Replace the accumulator and the orifice tube if necessary, and have the system evacuated, recharged, and leak tested by the shop that discharged it.

Related Ford F-150 Parts
 Ford F-150 Blower Motor Resistor
 Ford F-150 Blend Door Actuator
 Ford F-150 A/C Switch
 Ford F-150 A/C Idler Pulley
 Ford F-150 Blower Motor
 Ford F-150 A/C Clutch
 Ford F-150 A/C Hose
 Ford F-150 A/C Accumulator
 Ford F-150 Evaporator
 Ford F-150 A/C Expansion Valve
Browse by Year
2025 A/C Compressor 2024 A/C Compressor 2023 A/C Compressor 2022 A/C Compressor 2021 A/C Compressor 2020 A/C Compressor 2019 A/C Compressor 2018 A/C Compressor 2017 A/C Compressor 2016 A/C Compressor 2015 A/C Compressor 2014 A/C Compressor 2013 A/C Compressor 2012 A/C Compressor 2011 A/C Compressor 2010 A/C Compressor 2009 A/C Compressor 2008 A/C Compressor 2007 A/C Compressor 2006 A/C Compressor 2005 A/C Compressor 2004 A/C Compressor 2002 A/C Compressor 2001 A/C Compressor 2000 A/C Compressor 1999 A/C Compressor 1998 A/C Compressor 1997 A/C Compressor 1996 A/C Compressor 1995 A/C Compressor 1994 A/C Compressor 1989 A/C Compressor