Make sure this part fits

Ford BT4Z-6019-B Front Cylinder Cover

2011-2020 Ford BT4Z6019B

Customer Questions & Expert Answers (4)
BT4Z-6019-B Ford Front Cylinder Cover Product Photo 1 of 3
  • Part Description
    Cover - Cylinder Front
  • Base No.
    6019
  • Position
    Front
  • Manufacturer
    Ford
Make sure this part fits
$121.64 MSRP: $177.83
You Save: $56.19 (32%)
1
ADD TO CART
  • Related Parts
  • Product Specifications
  • Vehicle Fitment
  • Customer Questions & Expert Answers
  • Product Specifications

    BrandGenuine Ford
    Base No.6019
    Manufacturer Part NumberBT4Z-6019-B, BT4Z6019B
    Part DescriptionCover - Cylinder Front
    Other NamesFront Cover, Timing Cover
    Manufacturer NoteUse RTV Silicone Sealer In Place Of Gasket For This Application. Refer To Workshop Manual For Specification
    Item Dimensions26.8 x 24.2 x 6.1 inches
    Item Weight14.10 Pounds
    PositionFront
    ConditionNew
    Fitment TypeDirect Replacement
    ManufacturerFord
    SKUBT4Z-6019-B
    WarrantyThis genuine Ford part is guaranteed by Ford's factory warranty.
    Shipping & ReturnShipping Policy Return Policy
    Warning: California's Proposition 65
  • Vehicle Fitment

    Year Make Model Engine Important vehicle option details
    2011-2019 Ford Edge6 Cyl 3.5L Cyclone Petrol TIVCT, 6 Cyl 3.5L DOHC VCT SMPI, 6 Cyl 3.7L DOHC6-Speed Automatic Transmission 6DCT450 - MPS6, 6-Speed Automatic Transmission 6F Mid-Range, 6-Speed Automatic Transmission 6F50, 6-Speed Automatic Transmission 6F55, 6-Speed Manual Transaxle - MMT6, 8-Speed Automatic Transmission 8F57, Four-Wheel Drive (Full Time) (Left Hand Drive), Four-Wheel Drive (Part Time) (Left Hand Drive), Front-Wheel Drive (Left Hand Drive), Front-Wheel Drive (Right Hand Drive), Left Hand Drive, RHD 4WD (FTD)
    2011-2019 Ford Explorer6 Cyl 3.5L Cyclone Petrol TIVCT, 6 Cyl 3.7L DOHC6-Speed Automatic Transmission 6F Mid-Range, 6-Speed Automatic Transmission 6F50, 6-Speed Automatic Transmission 6F55, Four-Wheel Drive (Full Time) (Left Hand Drive), Front-Wheel Drive (Left Hand Drive), Left Hand Drive
    2013-2019 Ford Flex6 Cyl 3.5L Cyclone Petrol TIVCT6-Speed Automatic Transmission 6F50, 6-Speed Automatic Transmission 6F55, Four-Wheel Drive (Full Time) (Left Hand Drive), Front-Wheel Drive (Left Hand Drive), Left Hand Drive
    2019 Ford Police Interceptor Sedan6 Cyl 3.5 L FLEX, 6 Cyl 3.5 L GAS, 6 Cyl 3.7 L FLEX
    2019 Ford Police Interceptor Utility6 Cyl 3.5 L GAS, 6 Cyl 3.7 L FLEX
    2013-2019 Ford Taurus6 Cyl 3.5L Cyclone Petrol TIVCT, 6 Cyl 3.7L DOHC6-Speed Automatic Transmission 6F Mid-Range, 6-Speed Automatic Transmission 6F50, 6-Speed Automatic Transmission 6F55, Four-Wheel Drive (Full Time) (Left Hand Drive), Four-Wheel Drive (Part Time) (Left Hand Drive), Front-Wheel Drive (Left Hand Drive), Left Hand Drive
    2017-2020 Lincoln Continental6 Cyl 3.7L DOHC6-Speed Automatic Transmission 6F Mid-Range, 6-Speed Automatic Transmission 6F50, 6-Speed Automatic Transmission 6F55, Four-Wheel Drive (Full Time) (Left Hand Drive), Front-Wheel Drive (Left Hand Drive), Left Hand Drive
    2013-2016 Lincoln MKS6 Cyl 3.7L DOHC, 6 Cyl 3.7L PFI NA6-Speed Automatic Transmission 6F50, 6-Speed Automatic Transmission 6F55, Four-Wheel Drive (Full Time) (Left Hand Drive), Four-Wheel Drive (Part Time) (Left Hand Drive), Front-Wheel Drive (Left Hand Drive), Left Hand Drive
    2013-2019 Lincoln MKT6 Cyl 3.7L DOHC, 6 Cyl 3.7L PFI NA6-Speed Automatic Transmission 6F Mid-Range, 6-Speed Automatic Transmission 6F50, 6-Speed Automatic Transmission 6F55, Four-Wheel Drive (Full Time) (Left Hand Drive), Front-Wheel Drive (Left Hand Drive), Left Hand Drive
    2011-2018 Lincoln MKX6 Cyl 3.5L DOHC VCT SMPI, 6 Cyl 3.7L DOHC6-Speed Automatic Transmission 6F Mid-Range, 6-Speed Automatic Transmission 6F50, 6-Speed Automatic Transmission 6F55, 8-Speed Automatic Transmission 8F35, 8-Speed Automatic Transmission 8F57, Four-Wheel Drive (Full Time) (Left Hand Drive), Four-Wheel Drive (Part Time) (Left Hand Drive), Front-Wheel Drive (Left Hand Drive), Left Hand Drive
    View More
  • Customer Questions & Expert Answers

    Q:
    Can you tell me if this part is correct for my car? Posted by FordPartsGiant Specialist
    A:
    You can Select Your Vehicle to check if BT4Z-6019-B fits your vehicle.
    Posted by FordPartsGiant Specialist
    Q:
    How can the timing cover be removed from the V6 engine on the Ford Edge? Posted by Customer
    A:
    The timing cover can be removed with the engine in the vehicle, but it is very difficult, so it is recommended to remove the engine for this procedure. Begin by having the air conditioning system discharged by a professional. For 2.7L engines, the air conditioning compressor can be unbolted and moved aside without discharging the system, while for 3.5L and 3.7L engines, the system must be discharged and the compressor removed. Relieve the fuel system pressure, disconnect the negative battery terminal, loosen the right front wheel lug nuts, raise the vehicle securely on jackstands, and remove the wheel. Remove the engine cover pushpins and the cover if equipped, then take off the drivebelt and the drivebelt tensioner along with two idler pulleys from the timing cover. For 2.7L engines, drain the engine oil and remove the oil filter, then remove the coolant expansion tank. Next, remove the oil pressure control solenoid and the air conditioning compressor along with its mounting bracket, keeping track of the bolts. Remove the alternator and the crankshaft pulley, then for 2015 and later models, remove the radiator guide pins and support the cooling module with plastic cable ties. For 2.7L models, remove the oil pan, ensuring the front subframe and suspension are lowered and supported before reinstalling the subframe. Remove the water pump for 2.7L models and the power steering pump and reservoir for 2014 and earlier models, followed by the roll restrictor heat shield fasteners and shield. Disconnect any remaining wires, hoses, clamps, or brackets that may interfere with the timing cover removal, and for 2.7L models, remove the insulator mounting bolts and insulator from the timing cover. Gradually and evenly loosen the 21 timing cover bolts and remove the cover, using prying spots along the sides. Disconnect the Powertrain Control Module electrical connector and move the harness aside, then disconnect the Crankshaft Position sensor and remove the Camshaft Position sensors from the front of each cylinder head. Support the engine from above with a hoist or engine support fixture. For 3.5L and 3.7L models, place a floor jack with a block of wood under the oil pan and raise it slightly to support the engine. Remove the transaxle mount through bolt, the mount support brace, and the front engine mount. With the floor jack supporting the engine, lower it until the lower timing cover bolt above the crankshaft seal can be removed, then raise the engine approximately 4 inches to remove the two upper timing cover bolts. Loosen the remaining timing cover bolts gradually and evenly, starting with the oil pan-to-cover bolts, and remove the cover. Inspect and clean all sealing surfaces of the timing cover and the block, being careful not to gouge aluminum parts. Replace the crankshaft oil seal and any other necessary seals and O-rings before applying RTV sealant to the mating surfaces. Install the timing cover, ensuring it is positioned correctly, and reinstall the fasteners in their original locations, tightening them until the cover contacts the block and cylinder heads. Install the remaining bolts and tighten them in sequence to the specified torque, then reinstall the drivebelt and tensioner, followed by the crankshaft pulley. Connect the wiring harness connectors to the CMP and CKP sensors, reinstall the power steering pump and hoses, and finally, reinstall all remaining parts in reverse order of removal. Have the air conditioning system evacuated, recharged, and leak tested by the shop that discharged it.
    Posted by FordPartsGiant Specialist
    Q:
    How to remove and install the timing cover in the V6 engine on a Ford Taurus? Posted by Customer
    A:
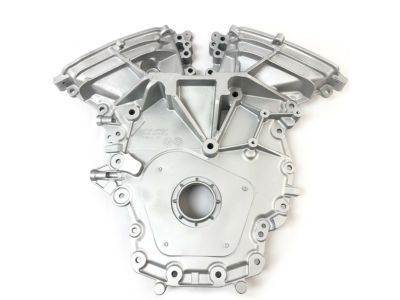
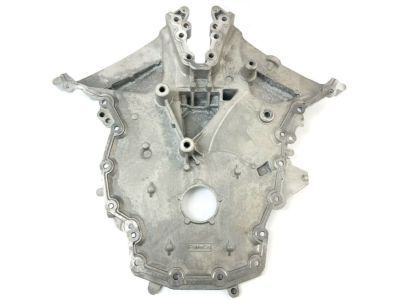
    On 3.5L engines, have the air conditioning system discharged by an automotive air conditioning technician. Relieve the fuel system pressure. Disconnect the cable from the negative battery terminal. Loosen the right front wheel lug nuts, raise the front of the vehicle, support it securely on jackstands, and then remove the wheel. For 2013 and later models, remove the engine lower splash shield and skid plate, if equipped. Remove the air filter housing inlet hose. Remove the drivebelt and drivebelt tensioner, and take off the two idler pulleys from the front cover. On 3.5L engines, remove the EVAP canister purge valve and disconnect, then cap or plug, the air conditioning lines to and from the receiver-drier and evaporator. Remove the valve covers and the alternator along with the alternator mounting bracket; for 2013 and later models, also remove the alternator mounting stud from the timing cover. Remove the crankshaft pulley and the front crankshaft oil seal, ensuring the seal is removed to create enough clearance for the cover. Remove the power steering pump and fluid lines, including the mounting brackets, if equipped. Disconnect the Crankshaft Position (CKP) sensor and remove the Camshaft Position (CMP) sensors in front of each cylinder head. Support the engine from above with a hoist or engine support fixture, using chains fastened to the engine lift brackets. Disconnect the electrical connectors at the air conditioning compressor, loosen the compressor mounting bolts, and move the compressor aside for access to the engine cover. Remove the compressor bracket from the front cover, then take off the right side engine mount and disconnect any remaining wires, hoses, clamps, or brackets that will interfere with engine cover removal. For 2013 and later models, lower the engine to remove bolt #23 without letting the compressor hit the subframe, then raise it to remove bolts #24 and #25. For 3.0L engines, loosen the timing cover fasteners gradually and evenly, starting with the oil pan-to-cover bolts, then remove the fasteners and the timing cover. For 3.5L engines, remove the cover bolts, install six of them into the threaded holes in the cover, and tighten them evenly to push the cover from the engine without damage, ensuring all timing cover bolts are removed before attempting to take off the cover. Remove and discard the cover-to-cylinder block gaskets. Inspect and clean all sealing surfaces of the timing cover and the block, being careful when scraping on aluminum engine parts. Replace the crankshaft seal, using Motorcraft High Performance Engine RTV Silicone to prevent engine oil from foaming. Apply a bead of RTV sealant around the sealing edges of the timing cover and to the areas where the oil pan and cylinder heads meet at the engine block. Install new front cover gaskets into the grooves on the cover, and for 3.5L engines, install two dowel pins into the engine block. The manufacturer requires that specific bolts be installed within a set time after the timing has contacted the engine block, followed by the installation of the remaining bolts. Install the timing cover and cover fasteners, ensuring they are in their original locations, and tighten them by hand until the cover contacts the block and cylinder heads. For the 3.0L engine, tighten the cover bolts in sequence to the specified torque, and for the 3.5L engine, install bolts 17 through 20, remove the locating pins, and install the rest of the bolts in sequence to the specified torque before installing the engine mount. Install the drivebelt and tensioner, tightening the tensioner pulley bolt to the specified torque. Install the crankshaft pulley, connect the wiring harness connectors to the CMP and CKP sensors, and install the power steering pump and hoses if equipped. The remainder of the installation is the reverse of removal. Reconnect the battery, then start the engine and check for leaks.
    Posted by FordPartsGiant Specialist
    Q:
    How can the timing cover be removed from the V6 engine on Lincoln MKX? Posted by Customer
    A:
    The timing cover can be removed with the engine in the vehicle, but it is very difficult, so it is recommended to remove the engine for this procedure. Begin by having the air conditioning system discharged by a professional. For 2.7L engines, the air conditioning compressor can be unbolted and moved aside without discharging the system, while for 3.5L and 3.7L engines, the system must be discharged and the compressor removed. Relieve the fuel system pressure, disconnect the negative battery terminal, loosen the right front wheel lug nuts, raise the vehicle securely on jackstands, and remove the wheel. Remove the engine cover pushpins and the cover if equipped, then take off the drivebelt and the drivebelt tensioner along with two idler pulleys from the timing cover. For 2.7L engines, drain the engine oil and remove the oil filter, then remove the coolant expansion tank. Next, remove the oil pressure control solenoid and the air conditioning compressor along with its mounting bracket, keeping track of the bolts. Remove the alternator and the crankshaft pulley, then for 2015 and later models, remove the radiator guide pins and support the cooling module with plastic cable ties. For 2.7L models, remove the oil pan, ensuring the front subframe and suspension are lowered and supported before reinstalling the subframe. Remove the water pump for 2.7L models and the power steering pump and reservoir for 2014 and earlier models, followed by the roll restrictor heat shield fasteners and shield. Disconnect any remaining wires, hoses, clamps, or brackets that may interfere with the timing cover removal, and for 2.7L models, remove the insulator mounting bolts and insulator from the timing cover. Gradually and evenly loosen the 21 timing cover bolts and remove the cover, using prying spots along the sides. Disconnect the Powertrain Control Module electrical connector and move the harness aside, then disconnect the Crankshaft Position sensor and remove the Camshaft Position sensors from the front of each cylinder head. Support the engine from above with a hoist or engine support fixture. For 3.5L and 3.7L models, place a floor jack with a block of wood under the oil pan and raise it slightly to support the engine. Remove the transaxle mount through bolt, the mount support brace, and the front engine mount. With the floor jack supporting the engine, lower it until the lower timing cover bolt above the crankshaft seal can be removed, then raise the engine approximately 4 inches to remove the two upper timing cover bolts. Loosen the remaining timing cover bolts gradually and evenly, starting with the oil pan-to-cover bolts, and remove the cover. Inspect and clean all sealing surfaces of the timing cover and the block, being careful not to gouge aluminum parts. Replace the crankshaft oil seal and any other necessary seals and O-rings before applying RTV sealant to the mating surfaces. Install the timing cover, ensuring it is positioned correctly, and reinstall the fasteners in their original locations, tightening them until the cover contacts the block and cylinder heads. Install the remaining bolts and tighten them in sequence to the specified torque, then reinstall the drivebelt and tensioner, followed by the crankshaft pulley. Connect the wiring harness connectors to the CMP and CKP sensors, reinstall the power steering pump and hoses, and finally, reinstall all remaining parts in reverse order of removal. Have the air conditioning system evacuated, recharged, and leak tested by the shop that discharged it.
    Posted by FordPartsGiant Specialist
    If you have any questions about this product, please don't hesitate to ask us. We will be happy to help you!

Genuine Ford Part BT4Z-6019-B, the Right Choice

To ensure reliability, purchase part # BT4Z-6019-B Front Cylinder Cover. It is also called Timing Cover. OEM parts are of high quality and known for their longevity. This is because they are built to the Ford standards which are relatively high and undergo rigorous quality control testing. This part fits specific Ford Explorer, Flex, Police Interceptor Utility models. It fits Lincoln Continental, MKS, MKX.

FordPartsGiant.com is a leading supplier of genuine components and accessories such as BT4Z6019B Front Cylinder Cover. Looking to purchase quality low-cost OEM Ford parts? You have just found the right place. For detailed Ford parts information, click here.

Why choose Ford Parts Giant

  • Dedicated Service

    Your complete satisfaction is our #1 goal

  • Lowest Prices

    Best deals on genuine OE parts from dealerships

  • Fast Delivery

    Orders are processed and delivered promptly