Make sure this part fits

Mercury 5W1Z-19V703-AA Compressor Assembly

2002-2005 Mercury 5W1Z19V703AA

Customer Questions & Expert Answers (4)
5W1Z-19V703-AA Ford Compressor Assembly Product Photo 1 of 1
  • Part Description
    Compressor Assy
  • Base No.
    19703
  • Replaces
    1L2Z-19703-DA, 2C2Z-19V703-BC, 2C2Z-19V703-BB, 3L2Z-19V703-AB, 1L2Z-19703-AA, 3L2Z-19V703-AC, 3L2Z-19V703-AA, YCC-222, 2C2Z-19V703-BA, YCC-168, YC-2510, YC-2493, YCC-234
  • Manufacturer
    Ford
  • Manufacturer's Notes
    This part is discontinued.
Make sure this part fits
  • Related Parts
  • Specifications
  • Fitment
  • Q&A
  • Product Specifications

    BrandGenuine Mercury
    Base No.19703
    Manufacturer Part Number5W1Z-19V703-AA, 5W1Z19V703AA
    Part DescriptionCompressor Assy
    Other NamesCompressor
    Item Dimensions15.9 x 9.7 x 8.2 inches
    Item Weight16.30 Pounds
    ConditionNew
    Fitment TypeDirect Replacement
    Replaces1L2Z-19703-DA, 2C2Z-19V703-BC, 2C2Z-19V703-BB, 3L2Z-19V703-AB, 1L2Z-19703-AA, 3L2Z-19V703-AC, 3L2Z-19V703-AA, YCC-222, 2C2Z-19V703-BA, YCC-168, YC-2510, YC-2493, YCC-234
    ManufacturerFord
    SKU5W1Z-19V703-AA
    WarrantyThis genuine Ford part is guaranteed by Ford's factory warranty.
    Shipping & ReturnShipping Policy Return Policy
    Warning: California's Proposition 65
  • Vehicle Fitment

    Year Make Model Engine Important vehicle option details
    2003-2005 Mercury Grand Marquis8 Cyl 4.6L4AT 4R70W
    2002-2005 Mercury Mountaineer8 Cyl 4.6L Romeo SOHC EFI5-Speed Automatic Transmission 5R55S, 5-Speed Automatic Transmission 5R55W, 5-Speed Manual Transmission (M5R4), 6-Speed Automatic Transmission (6R80), 6-Speed Automatic Transmission 6R60, Four-Wheel Drive (Full Time) (Left Hand Drive), Four-Wheel Drive (Part Time) (Left Hand Drive), Four-Wheel Drive (Part Time) (Right Hand Drive), Left Hand Drive, Rear-Wheel Drive (Left Hand Drive)
  • Customer Questions & Expert Answers

    Q:
    Will these fit my car and if not which part will? Thank you. Posted by FordPartsGiant Specialist
    A:
    You can Select Your Vehicle to check if 5W1Z-19V703-AA fits your vehicle.
    Posted by FordPartsGiant Specialist
    Q:
    How to remove and replace the A/C Compressor on the Ford Crown Victoria? Posted by Customer
    A:
    Special spring lock coupling tools are required to release the connectors used on the refrigerant lines throughout the air conditioning system. There are different tools for each line size. These tools can usually be found at local auto parts stores. Many times the necessary coupling tool may be included in the kit used for parts replacement. To remove the compressor, first have the system discharged by a dealer service department or an automotive air conditioning repair facility. Then, remove the accessory drive belt(s). Remove the refrigerant line fitting block (coupled hose assembly) connected to the rear of the compressor. Disconnect the electrical connection at the compressor clutch. Remove the compressor mounting bolts. Remove the compressor from the mounting location. Drain and measure the refrigerant oil from the compressor. If the compressor is being replaced, add the appropriate amount of refrigerant oil to maintain the correct level. Add refrigerant oil to the component being replaced based on the following guidelines: If the amount removed was between three and five ounces, add the same amount of clean refrigerant oil to the new compressor. If the amount of oil removed was greater than five ounces, add only five ounces to the component before installation. If the amount of oil removed was less than three ounces, add three ounces to the component before reinstallation. This will maintain the correct oil level in the system after the repairs are completed. When replacing the compressor, transfer the clutch assembly to the new compressor. A universal spanner wrench, snap ring pliers, and a two jaw puller will be needed to remove the clutch from the old compressor. The compressor shaft seal should also be replaced at this time. Installation procedures are the reverse of those for removal. When installing the fitting block, use new O-rings and lubricate them with clean refrigerant oil. After the compressor is installed, have the system evacuated, recharged, and leak tested by a dealer service department or an air conditioning repair facility.
    Posted by FordPartsGiant Specialist
    Q:
    How to remove and replace the A/C Compressor on the Mercury Grand Marquis? Posted by Customer
    A:
    Special spring lock coupling tools are required to release the connectors used on the refrigerant lines throughout the air conditioning system. There are different tools for each line size. These tools can usually be found at local auto parts stores. Many times the necessary coupling tool may be included in the kit used for parts replacement. To remove the compressor, first have the system discharged by a dealer service department or an automotive air conditioning repair facility. Then, remove the accessory drive belt(s). Remove the refrigerant line fitting block (coupled hose assembly) connected to the rear of the compressor. Disconnect the electrical connection at the compressor clutch. Remove the compressor mounting bolts. Remove the compressor from the mounting location. Drain and measure the refrigerant oil from the compressor. If the compressor is being replaced, add the appropriate amount of refrigerant oil to maintain the correct level. Add refrigerant oil to the component being replaced based on the following guidelines: If the amount removed was between three and five ounces, add the same amount of clean refrigerant oil to the new compressor. If the amount of oil removed was greater than five ounces, add only five ounces to the component before installation. If the amount of oil removed was less than three ounces, add three ounces to the component before reinstallation. This will maintain the correct oil level in the system after the repairs are completed. When replacing the compressor, transfer the clutch assembly to the new compressor. A universal spanner wrench, snap ring pliers, and a two jaw puller will be needed to remove the clutch from the old compressor. The compressor shaft seal should also be replaced at this time. Installation procedures are the reverse of those for removal. When installing the fitting block, use new O-rings and lubricate them with clean refrigerant oil. After the compressor is installed, have the system evacuated, recharged, and leak tested by a dealer service department or an air conditioning repair facility.
    Posted by FordPartsGiant Specialist
    Q:
    How to replace the A/C Compressor in the air conditioning system on Mercury Mountaineer? Posted by Customer
    A:
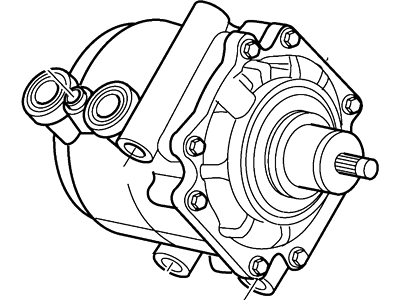
    If you are replacing the compressor, it's imperative to also replace the accumulator and the evaporator orifice tube. Before removing the compressor, have the air conditioning system discharged by a dealer service department or an automotive air conditioning shop. Next, remove the drive belt. For V6 models: Loosen the upper mounting nut, remove the stud, and disconnect the electrical connector from the compressor clutch field coil. Then, disconnect the compressor inlet and outlet line manifold from the compressor, discarding old O-rings. Raise the vehicle and secure it on jack stands. From below the engine compartment, remove the bracket nuts, separate the wiring harness and the air conditioning compressor line from the compressor, and remove the lower compressor mounting nuts and studs to remove the compressor. For V8 models: After raising the vehicle and securing it, remove the right front wheel and inner fender splash shield. Disconnect the electrical connector from the compressor clutch field coil and the crankshaft position sensor connector, positioning it to the side. Remove the compressor clutch wiring harness bracket nut, setting the wiring harness aside. Then, disconnect the compressor inlet and outlet line manifold from the compressor and discard old O-rings. Loosen the compressor mounting nuts and studs to remove the compressor. For installation: If installing a new compressor, follow the directions accompanying it, particularly concerning the draining of excess oil. Transfer the clutch from the original to the new compressor if needed. Before reconnecting the inlet and outlet lines to the compressor, replace all manifold O-rings and lubricate them with refrigerant oil. Installation is otherwise the reverse of removal. Afterward, replace the orifice tube and have the system evacuated, recharged, and leak tested by the shop that discharged it.
    Posted by FordPartsGiant Specialist
    If you have any questions about this product, please don't hesitate to ask us. We will be happy to help you!

Genuine Ford Part 5W1Z-19V703-AA, the Right Choice

To ensure reliability, purchase part # 5W1Z-19V703-AA Compressor Assembly. It is also called A/C Compressor. OEM parts are of high quality and known for their longevity. This is because they are built to the Ford standards which are relatively high and undergo rigorous quality control testing. This part fits specific Mercury Grand Marquis, Mountaineer models.

FordPartsGiant.com is a leading supplier of genuine components and accessories such as 5W1Z19V703AA Compressor Assembly. Looking to purchase quality low-cost OEM Ford parts? You have just found the right place. For detailed Mercury parts information, click here.

Why choose Ford Parts Giant

  • Dedicated Service

    Your complete satisfaction is our #1 goal

  • Lowest Prices

    Best deals on genuine OE parts from dealerships

  • Fast Delivery

    Orders are processed and delivered promptly