Make sure this part fits

Ford F57Z-3A360-B Adjustment Arm

1990-1997 Ford F57Z3A360B

Customer Questions & Expert Answers (5)
F57Z-3A360-B Ford Adjustment Arm Product Photo 1 of 4
  • Part Description
    Arm - Adjustment
  • Base No.
    3A360
  • Position
    Passenger Side & Driver Side
  • Manufacturer
    Ford
  • Manufacturer's Notes
    This part is discontinued.
Make sure this part fits
  • Related Parts
  • Specifications
  • Fitment
  • Q&A
  • Product Specifications

    BrandGenuine Ford
    Base No.3A360
    Manufacturer Part NumberF57Z-3A360-B, F57Z3A360B
    Part DescriptionArm - Adjustment
    Other NamesRadius Arm
    Item Dimensions24.7 x 5.6 x 3.6 inches
    Item Weight9.70 Pounds
    PositionPassenger Side & Driver Side
    ConditionNew
    Fitment TypeDirect Replacement
    ManufacturerFord
    SKUF57Z-3A360-B
    WarrantyThis genuine Ford part is guaranteed by Ford's factory warranty.
    Shipping & ReturnShipping Policy Return Policy
    Warning: California's Proposition 65
  • Vehicle Fitment

    Year Make Model Engine Important vehicle option details
    1990 Ford Bronco II6 Cyl 2.9L4AT A4LD, 4AT AOD, 5MT
    1991-1992 Ford Explorer6 Cyl 4.0L4AT A4LD, 5MT
    1995-1997, 1990-1993 Ford Ranger4 Cyl 2.3L, 6 Cyl 2.9L, 6 Cyl 3.0L, 6 Cyl 4.0L4AT 4R44E, 4AT 4R55E, 4AT A4LD, 5AT 5R55E, 5MT
  • Customer Questions & Expert Answers

    Q:
    Is the the correct part for the attached VIN? Posted by FordPartsGiant Specialist
    A:
    You can Select Your Vehicle to check if F57Z-3A360-B fits your vehicle.
    Posted by FordPartsGiant Specialist
    Q:
    How to remove and install the radius arm on 4WD Ford Bronco II? Posted by Customer
    A:
    To remove and install the radius arm, first raise the front of the vehicle and secure it with jack stands under the frame, placing a jack under the axle. Disconnect the lower end of the shock absorber from the shock lower bracket on 1983-89 vehicles or the lower stud on 1990 vehicles, then remove the front spring. Next, take out the spring lower seat and stud from the radius arm, followed by the bolts that attach the radius arm to the axle and front bracket. Remove the nut, rear washer, and insulator from the rear side of the radius arm rear bracket, then take out the radius arm and remove the inner insulator and retainer from the radius arm stud. For installation, position the front end of the radius arm from the bracket to the axle, installing the retaining bolts and stud in the bracket finger tight. Place the retainer and inner insulator on the radius arm stud, inserting the stud through the radius arm rear bracket. Install the rear washer, insulator, and nut on the arm stud at the rear side of the arm rear bracket, tightening the nut to 80-120 ft. lbs. Tighten the stud to 190-230 ft. lbs., the front bracket to axle bolts to 37-50 ft. lbs., and the lower bolt and washer to 190-230 ft. lbs. Finally, install the spring lower seat and spring insulator on the radius arm, ensuring the hole in the seal aligns with the arm to axle bolt, then tighten the axle pivot bolt to 120-150 ft. lbs. Install the front spring and connect the lower end of the shock absorber to the lower bracket on 1983-89 vehicles or to the stud on 1990 vehicles, torquing the retaining nut to 42-72 ft. lbs.
    Posted by FordPartsGiant Specialist
    Q:
    How to remove and install the radius arm and shock absorber on 2WD Ford Bronco II? Posted by Customer
    A:
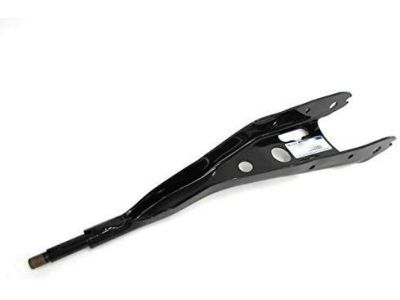
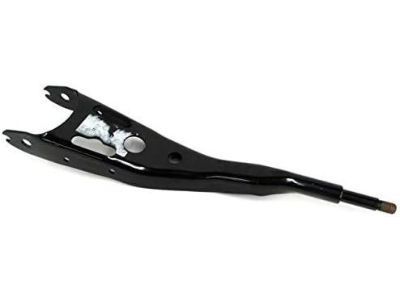
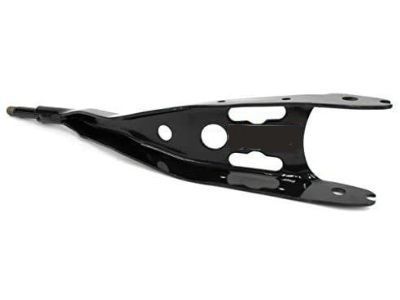
    To remove and install the front suspension components, first raise the front of the vehicle and place jack stands under the frame, then position a jack under the axle. Disconnect the lower end of the shock absorber from the lower bracket by removing the bolt and nut. Next, remove the front spring by loosening the axle pivot bolt, then take off the spring lower seat from the radius arm, followed by removing the bolt and nut that attach the radius arm to the axle and front bracket. Remove the nut, rear washer, and insulator from the rear side of the radius arm rear bracket, and then take the radius arm out of the vehicle, also removing the inner insulator and retainer from the radius arm stud. For installation, position the front end of the radius arm to the axle, install the attaching bolt from underneath, and secure the nut finger tight. Place the retainer and inner insulator on the radius arm stud and insert it through the radius arm rear bracket. Install the rear washer, insulator, and nut on the arm stud at the rear side of the arm rear bracket, tightening the nut to 81-120 ft. lbs. Tighten the nut on the radius arm-to-axle bolt to 160-220 ft. lbs. Next, install the spring lower seat and spring insulator on the radius arm, ensuring the hole in the seat aligns with the arm-to-axle bolt, and then install the front spring. For vehicles from 1983-89, connect the lower end of the shock absorber to the lower bracket on the radius arm using the attaching bolt and nut, with the bolt head facing the tire, and tighten the nut to 48-68 ft. lbs. For 1990 vehicles, connect the lower end of the shock absorber to the stud on the radius arm with the retaining nut, torquing it to 40-63 ft. lbs.
    Posted by FordPartsGiant Specialist
    Q:
    What is the final step in the installation process for the 1992 Ford Explorer? Posted by Customer
    A:
    Install the spring assembly.
    Posted by FordPartsGiant Specialist
    See expert answers on similar Radius Arm
    Q:
    What should be done on the 1993 Ford Ranger after installing the front end of the radius arm onto the front axle? Posted by Customer
    A:
    From underneath the axle, install the attaching bolt and a new nut. Tighten the nut only finger tight at this time.
    Posted by FordPartsGiant Specialist
    See expert answers on similar Radius Arm
    If you have any questions about this product, please don't hesitate to ask us. We will be happy to help you!

Genuine Ford Part F57Z-3A360-B, the Right Choice

To ensure reliability, purchase part # F57Z-3A360-B Adjustment Arm. It is also called Radius Arm. OEM parts are of high quality and known for their longevity. This is because they are built to the Ford standards which are relatively high and undergo rigorous quality control testing. This part fits specific Ford Bronco II, Explorer, Ranger models.

FordPartsGiant.com is a leading supplier of genuine components and accessories such as F57Z3A360B Adjustment Arm. Looking to purchase quality low-cost OEM Ford parts? You have just found the right place. For detailed Ford parts information, click here.

Why choose Ford Parts Giant

  • Dedicated Service

    Your complete satisfaction is our #1 goal

  • Lowest Prices

    Best deals on genuine OE parts from dealerships

  • Fast Delivery

    Orders are processed and delivered promptly