My Garage
My Account
Cart
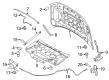
Genuine Lincoln Navigator Hood Latch
Engine Hood Latch- Select Vehicle by Model
- Select Vehicle by VIN
Select Vehicle by Model
orMake
Model
Year
Select Vehicle by VIN
For the most accurate results, select vehicle by your VIN (Vehicle Identification Number).
9 Hood Latches found


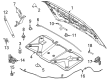
Lincoln Navigator Catch Assembly - Safety
Part Number: JL7Z-16892-A$123.21 MSRP: $180.13You Save: $56.92 (32%)Ships in 1-3 Business Days


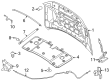
Lincoln Navigator Hood Latch Assembly
Part Number: 7L1Z-16700-A$31.33 MSRP: $44.63You Save: $13.30 (30%)Ships in 1-2 Business Days


Lincoln Navigator Hood Latch Assembly
Part Number: 4L7Z-16700-AA$55.23 MSRP: $79.35You Save: $24.12 (31%)Ships in 1-3 Business Days

Lincoln Navigator Hood Latch Assembly
Part Number: 4L3Z-16700-AB$37.13 MSRP: $54.28You Save: $17.15 (32%)Ships in 1-2 Business Days


Lincoln Navigator Hood Latch Assembly
Part Number: JL7Z-16700-A$127.19 MSRP: $185.95You Save: $58.76 (32%)Ships in 1-2 Business Days

Lincoln Navigator Hood Latch Assembly
Part Number: F85Z-16700-AA$55.23 MSRP: $79.35You Save: $24.12 (31%)Ships in 1-3 Business Days
Lincoln Navigator Hood Latch Assembly
Part Number: JL1Z-16700-D$98.21 MSRP: $127.78You Save: $29.57 (24%)Ships in 1-2 Business Days
Lincoln Navigator Hood Latch Assembly
Part Number: SL1Z-16700-A$105.93 MSRP: $154.87You Save: $48.94 (32%)Ships in 1-2 Business Days
Lincoln Navigator Hood Latch Assembly
Part Number: SL7Z-16700-A$90.37 MSRP: $132.12You Save: $41.75 (32%)Ships in 1-2 Business Days
Lincoln Navigator Hood Latch
Hood Latch is an important feature in the Lincoln Navigator automobiles since it is meant to prevent the hood from opening while the vehicle is in use. This component is specifically installed at the bottom front part of the hood so as to effectively shield components such as the engine, the radiator and the battery during operations. Specifically, walking around the models of Lincoln Navigator released in the course of years, it is possible to encounter several types of the Hood Latch, which should provide extra levels of protection and durability to the car. Although specific differences of these types are not described the primary mechanism stays the same delivering its purpose of protecting the vehicle's vital organs. Hood Latch is a significant component in ensuring that the Lincoln Navigator remains in good condition as well as safe to use.
We provide a wide range of Lincoln Navigator Hood Latch at the optimal prices. If you need Lincoln Navigator Hood Latch, you can shop with confidence on our website. All our OEM parts come with a manufacturer's warranty and are delivered to your doorstep with a fast delivery service.
Lincoln Navigator Hood Latch Parts Questions & Experts Answers
- Q: How to properly handle the Hood Cable and Hood Latch installation and removal process on Lincoln Navigator?A:You must draw a line on the hood latch before you change it, so you can easily realign it when you put it back. Separate the hood latch handle and cable from the latch assembly on Navigator vehicles, and take out the bolts holding the latch to the radiator support while keeping the reference line you drew around the latch as your guide. Turn the latch bolts until they've grown loose, move the latch, then retighten them before ensuring a good fit by shutting the hood. To remove the hood latch cable, disconnect it from the latch assembly, then tie a stiff piece of wire to the cord's end. Detach all cable holder clips and follow the entire cable path all the way back to the engine bay. In the passenger area, open the fuse panel cover, loosen and remove the mounting bolts to disengage the hood release lever from its holders. Reach inside, pull the cable and grommet deeper into the compartment, and make sure you have a new grommet already connected to the cable before you swap the old cable. In the engine compartment, use the pieces you just brought out to pass the wire back through the firewall. To finished installation, run each step in reverse, pushing on the grommet from the passenger compartment to make sure it stays right where it should.

Related Lincoln Navigator Parts
 Lincoln Navigator Grille
 Lincoln Navigator Emblem
 Lincoln Navigator Hood Cable
 Lincoln Navigator Air Deflector
 Lincoln Navigator Hood Hinge
 Lincoln Navigator Hood
Browse by Year
2025 Hood Latch 2024 Hood Latch 2023 Hood Latch 2022 Hood Latch 2021 Hood Latch 2020 Hood Latch 2019 Hood Latch 2018 Hood Latch 2017 Hood Latch 2016 Hood Latch 2015 Hood Latch 2014 Hood Latch 2013 Hood Latch 2012 Hood Latch 2011 Hood Latch 2010 Hood Latch 2009 Hood Latch 2008 Hood Latch 2007 Hood Latch 2006 Hood Latch 2005 Hood Latch 2004 Hood Latch 2003 Hood Latch 2002 Hood Latch 2001 Hood Latch 2000 Hood Latch 1999 Hood Latch 1998 Hood Latch