My Garage
My Account
Cart
Genuine Lincoln Navigator Control Arm
Suspension Arm- Select Vehicle by Model
- Select Vehicle by VIN
Select Vehicle by Model
orMake
Model
Year
Select Vehicle by VIN
For the most accurate results, select vehicle by your VIN (Vehicle Identification Number).
65 Control Arms found


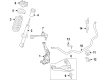
Lincoln Navigator Front Suspension Arm Assembly
Part Number: JL1Z-3085-C$138.06 MSRP: $223.64You Save: $85.58 (39%)Ships in 1-2 Business Days

Lincoln Navigator Front Suspension Arm Assembly
Part Number: JL1Z-3085-A$101.82 MSRP: $223.64You Save: $121.82 (55%)
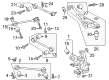
Lincoln Navigator Front Suspension Arm Assembly
Part Number: JL1Z-3084-A$139.08 MSRP: $207.27You Save: $68.19 (33%)

Lincoln Navigator Front Suspension Arm Assembly
Part Number: EL3Z-3085-B$125.71 MSRP: $203.64You Save: $77.93 (39%)Ships in 1 Business Day

Lincoln Navigator Front Suspension Arm Assembly
Part Number: 9L3Z-3078-A$181.83 MSRP: $294.55You Save: $112.72 (39%)Ships in 1-2 Business Days
Lincoln Navigator Front Suspension Arm Assembly
Part Number: 9L3Z-3079-A$175.09 MSRP: $283.64You Save: $108.55 (39%)Ships in 1 Business Day


Lincoln Navigator Front Suspension Arm Assembly
Part Number: EL3Z-3084-B$125.71 MSRP: $203.64You Save: $77.93 (39%)Ships in 1 Business Day


Lincoln Navigator Front Suspension Arm Assembly
Part Number: EL1Z-3078-A$209.28 MSRP: $341.82You Save: $132.54 (39%)Ships in 1-2 Business Days

Lincoln Navigator Front Suspension Arm Assembly
Part Number: EL1Z-3079-A$221.53 MSRP: $361.82You Save: $140.29 (39%)Ships in 1-2 Business Days

Lincoln Navigator Front Suspension Arm Assembly
Part Number: BL3Z-3084-A$125.71 MSRP: $203.64You Save: $77.93 (39%)Ships in 1 Business Day

Lincoln Navigator Front Suspension Arm Assembly
Part Number: EL3Z-3084-A$125.71 MSRP: $203.64You Save: $77.93 (39%)Ships in 1 Business Day
Lincoln Navigator Front Suspension Arm Assembly
Part Number: EL3Z-3085-A$125.71 MSRP: $203.64You Save: $77.93 (39%)Ships in 1 Business Day
Lincoln Navigator Front Suspension Arm Assembly
Part Number: 9L3Z-3085-A$125.71 MSRP: $203.64You Save: $77.93 (39%)Ships in 1 Business Day
Lincoln Navigator Front Suspension Arm Assembly
Part Number: NL3Z-3085-A$266.05 MSRP: $434.55You Save: $168.50 (39%)Ships in 1-2 Business Days
Lincoln Navigator Front Suspension Arm Assembly
Part Number: JL1Z-3084-B$127.95 MSRP: $207.27You Save: $79.32 (39%)Ships in 1-2 Business Days
Lincoln Navigator Front Suspension Arm Assembly
Part Number: NL1Z-3085-A$127.80 MSRP: $254.55You Save: $126.75 (50%)Ships in 1-2 Business Days
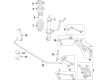
Lincoln Navigator Rear Suspension Arm Assembly
Part Number: JL1Z-5500-F$118.56 MSRP: $173.33You Save: $54.77 (32%)
Lincoln Navigator Rear Suspension Arm Assembly
Part Number: JL1Z-5500-G$104.46 MSRP: $176.18You Save: $71.72 (41%)Ships in 1-2 Business Days


| Page 1 of 4 |Next >
1-20 of 65 Results
Lincoln Navigator Control Arm
Lincoln Navigator's Control Arm is a connecting component of the frame and wheels where other support units such as shocks and springs are present. These arms swivel in relation to the road conditions; they ensure that the wheels can turn both up and down. In the past, control arms are made of stamped steel, but the new Navigator models may incorporate stronger cast iron or aluminum. These are reinforced but may sometimes need some degree of overhaul because of the wear on the bushings and ball joints. To improve handling and aligning, performance control arms are available to accommodate the power as well as forceful command of the car. Also in terms of control arm several models are available for various road conditions; street performance, drag race and off road.
We provide a wide range of Lincoln Navigator Control Arm at the optimal prices. If you need Lincoln Navigator Control Arm, you can shop with confidence on our website. All our OEM parts come with a manufacturer's warranty and are delivered to your doorstep with a fast delivery service.
Lincoln Navigator Control Arm Parts Questions & Experts Answers
- Q: How to remove and install the upper control arm on a Lincoln Navigator with air suspension?A:This procedure applies to both 2WD and 4WD models. If the vehicle is equipped with air suspension, turn off the air suspension system. The switch is located in the area of the right kick panel. Measure the height of the center of the hub to the ground before proceeding. Loosen the wheel lug nuts, raise the front of the vehicle and support it securely on jackstands. Remove the wheel. Position a floor jack, with a wood block on the jack head (to act as a cushion), under the lower control arm in the area between the spring seat and the balljoint. Raise the jack slightly to take the spring pressure off the upper control arm. Mark the position of the upper control arm camber adjustment cam. If the vehicle is equipped with a 4-wheel anti-lock brake system (4WABS), remove the bracket bolt for the wheel speed sensor wire and place the sensor wire out of harm's way. To disconnect the upper control arm from the steering knuckle, remove the cotter pin from the balljoint castle nut, loosen the nut a few turns (don't remove it), install a small puller and break the balljoint loose from the knuckle. Now remove the nut. Remove the upper control arm pivot bolts and nuts. Remove the control arm. Inspect the pivot bolt bushings for wear. If the bushings are worn, you'll have to replace the control arm. Inspect the upper balljoint seal. If it's leaking, replace the control arm. The balljoint is not serviceable. Position the arm in the frame brackets and install new bolts and nuts. They must be installed with their heads facing toward each other. Make sure the marks you made prior to disassembly are aligned, then tighten, but don't torque, the pivot bolt nuts. Attach the balljoint to the steering knuckle and tighten the ballstud nut. Reattach the 4WABS front brake anti-lock sensor wire bracket and tighten the bolt securely. Install the wheel and lug nuts, then lower the vehicle. Tighten the lug nuts. Tighten the upper arm pivot bolt nuts, front nut first. Reactivate the air suspension system, if equipped.

Related Lincoln Navigator Parts
 Lincoln Navigator Shift Cable
 Lincoln Navigator Axle Beam
 Lincoln Navigator Trailing Arm
 Lincoln Navigator Ball Joint
 Lincoln Navigator Trailing Arm Bushing
 Lincoln Navigator Control Arm Bushing
 Lincoln Navigator Radius Arm Bushing
 Lincoln Navigator Torsion Bar
Browse by Year
2025 Control Arm 2024 Control Arm 2023 Control Arm 2022 Control Arm 2021 Control Arm 2020 Control Arm 2019 Control Arm 2018 Control Arm 2017 Control Arm 2016 Control Arm 2015 Control Arm 2014 Control Arm 2013 Control Arm 2012 Control Arm 2011 Control Arm 2010 Control Arm 2009 Control Arm 2008 Control Arm 2007 Control Arm 2006 Control Arm 2005 Control Arm 2004 Control Arm 2003 Control Arm 2002 Control Arm 2001 Control Arm 2000 Control Arm 1999 Control Arm