My Garage
My Account
Cart
Genuine Ford Expedition Exhaust Manifold
Engine Exhaust Manifold- Select Vehicle by Model
- Select Vehicle by VIN
Select Vehicle by Model
orMake
Model
Year
Select Vehicle by VIN
For the most accurate results, select vehicle by your VIN (Vehicle Identification Number).
21 Exhaust Manifolds found


Ford Expedition Exhaust Manifold Assembly
Part Number: 7L1Z-9431-A$105.34 MSRP: $154.00You Save: $48.66 (32%)

Ford Expedition Exhaust Manifold Assembly
Part Number: JL3Z-9431-C$184.68 MSRP: $270.00You Save: $85.32 (32%)Ships in 1-2 Business Days


Ford Expedition Exhaust Manifold Assembly
Part Number: JL3Z-9430-C$184.68 MSRP: $270.00You Save: $85.32 (32%)Ships in 1-3 Business Days


Ford Expedition Exhaust Manifold Assembly
Part Number: BL3Z-9431-B$166.44 MSRP: $243.33You Save: $76.89 (32%)


Ford Expedition Exhaust Manifold Assembly
Part Number: BL3Z-9430-B$167.58 MSRP: $245.00You Save: $77.42 (32%)


Ford Expedition Exhaust Manifold Assembly
Part Number: 9L3Z-9430-D$142.50 MSRP: $208.33You Save: $65.83 (32%)


Ford Expedition Exhaust Manifold Assembly
Part Number: XL3Z-9430-GA$75.35 MSRP: $114.17You Save: $38.82 (34%)


Ford Expedition Exhaust Manifold Assembly
Part Number: 2L1Z-9430-BA$104.31 MSRP: $152.50You Save: $48.19 (32%)Ships in 1-2 Business Days
Ford Expedition Exhaust Manifold Assembly
Part Number: ML3Z-9430-A$401.15 MSRP: $591.67You Save: $190.52 (33%)Ships in 1-2 Business DaysFord Expedition Exhaust Manifold Assembly
Part Number: ML3Z-9431-A$359.34 MSRP: $530.00You Save: $170.66 (33%)Ships in 1-2 Business Days


| Page 1 of 2 |Next >
1-20 of 21 Results
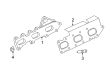
Ford Expedition Exhaust Manifold
The Exhaust Manifold in Ford Expedition vehicles helps drive high temperature exhaust gases away from the engine toward the exhaust system and to deliver optimum performance out of the engine besides reducing hazardous emissions. Located at the end of the exhaust system, a manifold works like a chamber that gathers exhaust gases from a number of cylinders and may feature a unique size as well as made of cast iron or stainless steel. For many years, there are two major types of Exhaust Manifold, and they are the standard manufacturer's Exhaust Manifold, and the custom header Exhaust Manifold. Headers helps to reduce the flow resistance and also increase the velocity of the exhaust gases for better efficiency of the engine. The number of the tubes in the manifold should be equal to the cylinder number of an engine in order to provide proper exhaust scavenging and high performance. The Exhaust Manifold should also be well maintained, otherwise there is a problem with car's performance and exhaust leaks cause health problems.
We provide a wide range of Ford Expedition Exhaust Manifold at the optimal prices. If you need Ford Expedition Exhaust Manifold, you can shop with confidence on our website. All our OEM parts come with a manufacturer's warranty and are delivered to your doorstep with a fast delivery service.
Ford Expedition Exhaust Manifold Parts Questions & Experts Answers
- Q: How to remove and install the exhaust manifold in V8 engine on Ford Expedition?A:To remove the exhaust manifold, first disconnect the cable from the negative battery terminal and, for 4WD models, remove the front driveshaft. Next, remove the nut and move the power brake booster vacuum hose support bracket. Raise the vehicle and support it securely on jackstands. Apply penetrating oil to the exhaust pipe-to-manifold studs and nuts, as they are often corroded or rusty, and also to the EGR pipe fitting on the left exhaust manifold. Remove the nuts retaining the exhaust pipes to the manifolds, and on the left side, remove the nut and bracket securing the oil dipstick tube. For 2005 and later Expedition/Navigator models, lock the steering column in the straight-ahead position and disconnect the lower steering shaft bolt to allow moving the shaft aside for the left exhaust manifold removal. Remove the EGR pipe fitting from the left exhaust manifold and the eight mounting nuts from each manifold, noting that these nuts are difficult to access, requiring a flex-socket and various-length extensions. Before installation, check the exhaust manifolds for cracks and ensure the bolt threads are clean and undamaged, with clean mating surfaces for the exhaust manifold and cylinder head. Position a new gasket and slip the exhaust manifold over the studs, then install the mounting nuts. Tighten the nuts from the rear to the front, alternating between top and bottom rows, in three equal steps to the specified torque. The remaining installation steps follow the reverse order of removal, and when reconnecting the EGR tube to the left manifold, apply a slight amount of anti-seize compound on the threads. Finally, start the engine and check for exhaust leaks.

Related Ford Expedition Parts
 Ford Expedition EGR Valve
 Ford Expedition Headlight
 Ford Expedition Door Handle
 Ford Expedition Emblem
 Ford Expedition Catalytic Converter
 Ford Expedition Seat Belt
 Ford Expedition Window Regulator
 Ford Expedition Lift Support
 Ford Expedition Bumper
 Ford Expedition Door Check
 Ford Expedition Clock Spring
 Ford Expedition Spare Wheel
Browse by Year
2025 Exhaust Manifold 2024 Exhaust Manifold 2023 Exhaust Manifold 2022 Exhaust Manifold 2021 Exhaust Manifold 2020 Exhaust Manifold 2019 Exhaust Manifold 2018 Exhaust Manifold 2017 Exhaust Manifold 2016 Exhaust Manifold 2015 Exhaust Manifold 2014 Exhaust Manifold 2013 Exhaust Manifold 2012 Exhaust Manifold 2011 Exhaust Manifold 2010 Exhaust Manifold 2009 Exhaust Manifold 2008 Exhaust Manifold 2007 Exhaust Manifold 2006 Exhaust Manifold 2005 Exhaust Manifold 2004 Exhaust Manifold 2003 Exhaust Manifold 2002 Exhaust Manifold 2001 Exhaust Manifold 2000 Exhaust Manifold 1999 Exhaust Manifold 1998 Exhaust Manifold 1997 Exhaust Manifold