My Garage
My Account
Cart
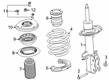
Genuine Ford Escape Shock Absorber
Suspension Shock Absorber- Select Vehicle by Model
- Select Vehicle by VIN
Select Vehicle by Model
orMake
Model
Year
Select Vehicle by VIN
For the most accurate results, select vehicle by your VIN (Vehicle Identification Number).
107 Shock Absorbers found


Ford Escape Front Shock Absorber Assembly
Part Number: 8L8Z-18124-BL$98.53 MSRP: $166.18You Save: $67.65 (41%)Ships in 1-2 Business Days


Ford Escape Shock Absorber Assembly
Part Number: 8L8Z-18124-BR$96.82 MSRP: $167.27You Save: $70.45 (43%)Ships in 1-2 Business Days


Ford Escape Shock Absorber Assembly
Part Number: 6L8Z-18124-BA$96.82 MSRP: $167.27You Save: $70.45 (43%)Ships in 1-2 Business Days

Ford Escape Shock Absorber Assembly
Part Number: 6L8Z-18124-AB$96.82 MSRP: $167.27You Save: $70.45 (43%)Ships in 1-2 Business Days

Ford Escape Shock Absorber Assembly
Part Number: 9L8Z-18124-BR$96.82 MSRP: $167.27You Save: $70.45 (43%)Ships in 1-2 Business Days
Ford Escape Shock Absorber Assembly
Part Number: 9L8Z-18124-AR$96.82 MSRP: $167.27You Save: $70.45 (43%)Ships in 1-2 Business Days
Ford Escape Shock Absorber Assembly
Part Number: 9M6Z-18124-AR$96.82 MSRP: $167.27You Save: $70.45 (43%)Ships in 1-2 Business Days


Ford Escape Front Shock Absorber Assembly
Part Number: 9M6Z-18124-AL$98.53 MSRP: $166.18You Save: $67.65 (41%)Ships in 1-2 Business Days
Ford Escape Shock Absorber Assembly
Part Number: 8L8Z-18124-AR$96.82 MSRP: $167.27You Save: $70.45 (43%)Ships in 1-2 Business Days


Ford Escape Front Shock Absorber Assembly
Part Number: CV6Z-18124-U$110.92 MSRP: $178.78You Save: $67.86 (38%)Ships in 1-2 Business Days
Ford Escape Shock Absorber Assembly
Part Number: CV6Z-18124-BZ$141.09 MSRP: $196.36You Save: $55.27 (29%)Ships in 1 Business Day
Ford Escape Front Shock Absorber Assembly
Part Number: LX6Z-18124-DY$169.70 MSRP: $274.91You Save: $105.21 (39%)Ships in 1-2 Business DaysFord Escape Shock Absorber Assembly
Part Number: LX6Z-18124-EZ$144.56 MSRP: $234.16You Save: $89.60 (39%)Ships in 1-2 Business DaysFord Escape Front Shock Absorber Assembly
Part Number: 3U2Z-18124-XAA$99.50 MSRP: $167.82You Save: $68.32 (41%)Ships in 1-2 Business DaysFord Escape Front Shock Absorber Assembly
Part Number: 3U2Z-18124-TAA$98.53 MSRP: $166.18You Save: $67.65 (41%)Ships in 1-2 Business DaysFord Escape Front Shock Absorber Assembly
Part Number: 3U2Z-18124-UAA$99.50 MSRP: $167.82You Save: $68.32 (41%)Ships in 1-2 Business DaysFord Escape Front Shock Absorber Assembly
Part Number: CV6Z-18124-V$112.11 MSRP: $189.09You Save: $76.98 (41%)Ships in 1-2 Business Days


| Page 1 of 6 |Next >
1-20 of 107 Results
Ford Escape Shock Absorber
Thus, the Shock Absorber in Ford Escape is one of the essentials of the suspension system that work hand in hand with the Struts to offer support. The Shock Absorber is effective in transforming the energy of motion to heat that progressively eliminates bouncing during bumpy rides. For some time, Ford has used the Shock Absorbers that are categorized by the twin-tube and the mono-tube; the both of these systems have different ways through which the hydraulic fluid flow of the absorber is controlled to improve on its performance based on the drive being undertaken. High level class designs like PSD and ASD move the Shock Absorber to a higher level of adapting to driving conditions, whereas electrorheological and magnetorheological dampers pave way for semi active and adaptive as they help to improve comfort and control based on the dynamic needs.
We provide a wide range of Ford Escape Shock Absorber at the optimal prices. If you need Ford Escape Shock Absorber, you can shop with confidence on our website. All our OEM parts come with a manufacturer's warranty and are delivered to your doorstep with a fast delivery service.
Ford Escape Shock Absorber Parts Questions & Experts Answers
- Q: How to replace the Shock Absorber and Coil Springs on Ford Escape?A:Front suspension struts leaking fluid, damping loss, sagging or cracked springs if showed signs of wear should be disassembled and overhauled as needed. The individual replacement of springs and related components is possible. For balance maintainability, both sides' components should be replaced at once. The strut should be cleaned and mounted into a vise; the spring compressor tool will compress the spring. It is necessary to unscrew the retaining nut, remove top mountings, thrust bearing, spring seat, spring itself, boot, and bump stop to lower the vehicle down until its wheels touch the ground. Examine all components for wear and damage: replace parts if necessary. Check for fluid leakage on piston rod pitting and strut body damage. If there are issues with the operation-test it out; otherwise replace it anyway.
- Q: How to remove and install a front shock absorber on a Ford Escape?A:Loosen the wheel lug nuts, raise the vehicle and support it securely on jackstands. Remove the wheel. Unbolt the brake hose bracket from the strut. If the vehicle is equipped with ABS, detach the speed sensor wiring harness from the strut by removing the clamp bracket bolt. Detach the stabilizer bar link from the bracket on the strut. On later models, remove the brake jounce hose clip, then move the hose out of the way. Remove the strut to the knuckle nuts and knock the bolts out with a hammer and punch. Separate the strut from the Steering Knuckle. Be careful not to overextend the inner CV joint. Also, don't let the steering knuckle fall outward and strain the brake hose. Mark the relationship of the outer studs to the bearing plate. Support the strut and spring assembly with one hand and remove the four struts to body nuts. Remove the assembly out from the fender well. Check the strut body for leaking fluid, dents, cracks and other obvious damage which would warrant repair or replacement. Check the coil spring for chips or cracks in the spring coating. Inspect the spring seat for cuts, hardness and general deterioration. If any undesirable conditions exist, proceed to the strut disassembly procedure. Guide the strut assembly up into the fender well, align the previously made matchmarks and insert the upper mounting studs through the holes in the body. Once the studs protrude, install the nuts so the strut won't fall back through. This is most easily accomplished with the help of an assistant, as the strut is quite heavy and awkward. Slide the steering knuckle into the strut flange and insert the two bolts. Install the nuts, align the previously made matchmarks and tighten them to the torque. Connect the brake hose bracket to the strut and tighten the bolt securely. If the vehicle is equipped with ABS, install the speed sensor wiring harness bracket. Connect the stabilizer bar link to the strut bracket. Tighten the nut to the torque. Install the wheel and lug nuts, then lower the vehicle and tighten the lug nuts to the torque. Tighten the upper mounting nuts to the torque. Drive the vehicle to an alignment shop to have the front end alignment checked, and if necessary, adjusted.
- Q: How to remove and install a rear shock absorber on Ford Escape?A:Loosen the wheel lug nuts, raise the vehicle and support it securely on jackstands. Block the front wheels to prevent the vehicle from rolling. Remove the wheel. Support the rear end of the Trailing Arm with a floor jack. Raise the jack slightly to take the spring pressure off the shock absorber lower mount. Working inside the vehicle, remove the rear quarter trim panel for access to the shock absorber upper mounting nut. Remove the nuts, upper retainer, bushing and lower retainer. Unscrew the shock absorber lower mounting nut, then pull the shock off the mounting pin. Note how the retainers are positioned. Installation is the reverse of the removal procedure. Tighten the mounting fasteners to the torque.


Related Ford Escape Parts
 Ford Escape Coil Springs
 Ford Escape Tie Rod
 Ford Escape Tie Rod End
 Ford Escape Steering Knuckle
 Ford Escape Fender
 Ford Escape Wheelhouse
Browse by Year
2025 Shock Absorber 2024 Shock Absorber 2023 Shock Absorber 2022 Shock Absorber 2021 Shock Absorber 2020 Shock Absorber 2019 Shock Absorber 2018 Shock Absorber 2017 Shock Absorber 2016 Shock Absorber 2015 Shock Absorber 2014 Shock Absorber 2013 Shock Absorber 2012 Shock Absorber 2011 Shock Absorber 2010 Shock Absorber 2009 Shock Absorber 2008 Shock Absorber 2007 Shock Absorber 2006 Shock Absorber 2005 Shock Absorber 2004 Shock Absorber 2003 Shock Absorber 2002 Shock Absorber 2001 Shock Absorber