This part fits the vehicle you selected:
My Vehicle: 1FAHP2KT4AG154534 2010 Ford Taurus 6 Cyl 3.5L DOHC T/C; 6-Speed Automatic Transmission 6F55; Four-Wheel Drive (Part Time) (Left Hand Drive); SHO
Change VehicleThe vehicle options this part fits:
- Fit Note: With Suspension D
- Production Date: From 06/2009
Ford AG1Z-5310-B Spring - Front
2010-2012 Ford Taurus AG1Z5310B
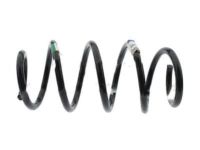


- Part DescriptionSpring - Front
- Base No.5310
- PositionFront
- ManufacturerFord
- Require Quantity2
- Package Quantity1
This part fits the vehicle you selected:
1FAHP2KT4AG154534 2010 Ford Taurus 6 Cyl 3.5L DOHC T/C; 6-Speed Automatic Transmission 6F55; Four-Wheel Drive (Part Time) (Left Hand Drive); SHO
The vehicle options this part fits:
- Fit Note: With Suspension D
- Production Date: From 06/2009
$73.78 MSRP: $102.49 1
You Save: $28.71 (29%)
Ships in 1-2 Business Days
Product Specifications
| Brand | Genuine Ford |
| Base No. | 5310 |
| Manufacturer Part Number | AG1Z-5310-B, AG1Z5310B |
| Part Description | Spring - Front |
| Other Names | Coil Spring, Spring |
| Item Weight | 7.10 Pounds |
| Position | Front |
| Condition | New |
| Fitment Type | Direct Replacement |
| Manufacturer | Ford |
| SKU | AG1Z-5310-B |
| Shipping & Return | Shipping Policy Return Policy |
Warning: California’s Proposition 65
Customer Questions & Answers
- Q:Will these fit my car and if not which part will? Thank you. Posted by FordPartsGiant Specialist
- A:You can Select Your Vehicle to check if AG1Z-5310-B fits your vehicle.Posted by FordPartsGiant Specialist
- Q:How to remove and install the rear coil spring in Ford Taurus? Posted by Customer
- A:For 2009 and earlier models, the removal and installation of the coil spring is included in the rear shock absorber removal and installation procedure. For 2010 and later models, the coil spring removal and installation are part of the lower arm removal and installation procedure. In the case of 2010 and later models, it is not necessary to detach the lower arm from the subframe; only loosening the fastener is required.Posted by FordPartsGiant Specialist
- Q:How to remove and install a strut and Coil Springs on a Ford Taurus? Posted by Customer
- A:For 2012 and earlier models, ensure the steering is unlocked before starting the removal process. In the engine compartment, loosen the strut upper mounting nuts but do not remove them. Loosen the wheel lug nuts, raise the vehicle and support it securely on jackstands, then remove the wheel. Have an assistant depress the brake pedal, then remove the driveaxle/hub nut, but obtain a new one without discarding the old one yet. Remove the brake disc, separate the tie-rod end from the steering knuckle, and detach the stabilizer bar link from the strut. Detach the wheel speed sensor harness from the strut, remove the bolt, and pull the wheel speed sensor from the steering knuckle. Separate the control arm balljoint from the steering knuckle. Using a front wheel hub remover, press the driveaxle from the hub splines, but do not allow the driveaxle to move outward. Remove the upper mounting nuts and remove the strut and steering knuckle as an assembly. Remove the nut and pinch bolt securing the steering knuckle to the strut, then slide the knuckle off the strut.Inspect the shock body for leaking fluid, dents, cracks, and other damage which would warrant replacement. Check the coil spring for chips or cracks in the spring coating and the spring seat for cuts, hardness, and general deterioration. If any undesirable conditions exist, proceed to the shock absorber/coil spring disassembly procedure.To install, position the steering knuckle onto the strut and install a new strut to steering knuckle nut and pinch bolt, tightening the nut to the correct torque. Guide the assembly up into the fender well, align the previously made matchmarks, and insert the upper mounting studs through the holes in the body. With the driveaxle supported in the level position, guide the shaft into the wheel hub/bearing assembly. Connect the control arm balljoint to the steering knuckle, tightening the balljoint nut to the correct torque. Install the wheel speed sensor and attach the sensor harness to the strut. Connect the stabilizer bar link to the strut, tightening the nut to the correct torque. Connect the tie-rod end to the steering knuckle and tighten the nut to the correct torque. Install the brake discs. Install the old hub nut onto the driveaxle and tighten to the correct torque. Remove the driveaxle/hub nut and install the new one, tightening the nut to the correct torque. Install the wheel and lug nuts, lower the vehicle and tighten the lug nuts to the correct torque. Tighten the strut upper mounting nuts to the correct torque. Have the front end alignment checked, and if necessary, adjusted.For 2013 and later models, in the engine compartment, mark the relationship of one of the mounting studs to the body, then loosen the four upper mounting nuts. Loosen the wheel lug nuts, raise the vehicle, and support it securely on jackstands. Remove the wheel. Detach the ABS wheel speed sensor harness from the strut. Support the outer end of the lower control arm with a floor jack. Unscrew the nuts securing the strut to the steering knuckle, then tap the bolts out with a hammer. Use the floor jack to lower the knuckle to allow room to remove the shock absorber/coil spring assembly, but be careful not to overextend the inner CV joint.The inspection procedures are the same as for the 2012 and earlier models.To install, guide the assembly up into the fender well, align the previously made matchmarks, and insert the upper mounting studs through the holes in the body. Use the jack to position the steering knuckle and install the two lower mounting bolts and nuts, then tighten the nuts to the correct torque. Connect the wheel speed sensor harness to the strut. Install the wheel and lug nuts, lower the vehicle and tighten the lug nuts to the correct torque. Tighten the upper mounting nuts to the correct torque. Have the front end alignment checked, and if necessary, adjusted.Posted by FordPartsGiant Specialist
- Q:How to disassemble and overhaul the front suspension shock absorber/coil springs? Posted by Customer
- A:If the front suspension shock absorber/coil springs show signs of wear such as leaking fluid, loss of damping capability, sagging or cracked coil springs, they should be disassembled and overhauled as needed. The shock absorbers cannot be serviced and should be replaced if faulty, while the springs and related components can be replaced individually. It is important to replace components on both sides of the vehicle simultaneously to maintain balanced characteristics. Once the assembly is removed from the vehicle, clean off any external dirt without damaging the protective coating on the spring. Install the coil spring compressor tools securely and compress the spring until all tension is relieved from the upper mount. Hold the shock absorber piston rod with a wrench and unscrew the nut, avoiding the use of an impact wrench to prevent damage. Remove the upper mount, spring, boot, bump stop, and lower spring seat. If a new spring is being installed, carefully release the original spring from the compressor. Examine all components for wear and damage, replacing as necessary. Check the shock for fluid leakage, pitting on the piston rod, and damage to the shock body. Test the shock's operation by moving the piston through full and short strokes, ensuring smooth and continuous resistance. Reassemble by installing the lower spring seat, bump stop, and dust boot onto the shock absorber. Then, install the spring and upper mount/upper seat, aligning the arrow or notch on the upper mount with the lower mount. With the spring compressed, install the rod nut and position the ends of the spring within 0.39-inch of the step on both mounts. Tighten the nut to the specified torque while maintaining the position at both ends. Release the tension on the spring and reinstall the spring assembly in the vehicle.Posted by FordPartsGiant Specialist
If you have any questions about this product, please don't hesitate to ask us. We will be happy to help you!
Why choose Ford Parts Giant
- Dedicated Service
Your complete satisfaction is our #1 goal
- Lowest Prices
Best deals on genuine OE parts from dealerships
- Fast Delivery
Orders are processed and delivered promptly