×
- Live Chat
- 1-888-788-9341
My Garage
My Account
Cart
Additional information needed to check if this part fits
2017 Ford Fusion
Check another vehicle- Fitting Vehicle Options: 6 Cyl 2.7L
- Production Date: From 05/2016
Ford G3GZ-8005-A Radiator Assembly
2017-2019 Ford G3GZ8005A
Customer Questions & Expert Answers (2)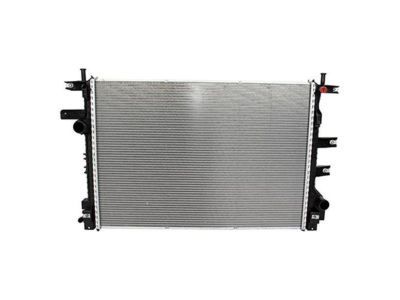
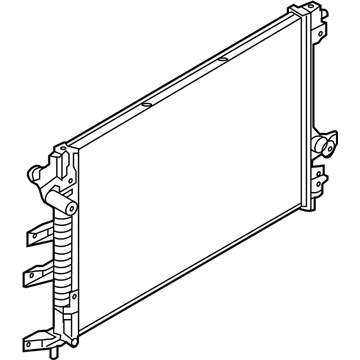
- Part DescriptionRadiator Assy
- Replaced By
- ManufacturerFord
- Manufacturer's NotesThis part is discontinued.
Additional information needed to check if this part fits
2017 Ford Fusion
Check another vehicle- Fitting Vehicle Options: 6 Cyl 2.7L
- Production Date: From 05/2016
- Related Parts
- Product Specifications
- Customer Questions & Expert Answers
Product Specifications
Brand Genuine Ford Manufacturer Part Number G3GZ-8005-A, G3GZ8005A Part Description Radiator Assy Item Dimensions 40.2 x 28.8 x 8.2 inches Item Weight 16.10 Pounds Condition New Fitment Type Direct Replacement Manufacturer Ford SKU G3GZ-8005-A Warranty This genuine Ford part is guaranteed by Ford's factory warranty. Shipping & Return Shipping Policy Return Policy Warning: California’s Proposition 65Customer Questions & Expert Answers
- Q:Will these fit my car and if not which part will? Thank you. Posted by FordPartsGiant Specialist
- A:You can Select Your Vehicle to check if G3GZ-8005-A fits your vehicle.Posted by FordPartsGiant Specialist
- Q:What is the removal and installation process for the radiator on Ford Fusion? Posted by Customer
- A:For all models except 2.7L V6, the removal process begins with disconnecting the negative battery cable, raising the vehicle on jackstands, and removing the lower splash shield. The cooling system is then drained, and the radiator hose is detached from the radiator. On 1.5L and 1.6L engines, the Charge Air Cooler (CAC) is removed, followed by the cooling fan/shroud assembly. For 2012 and earlier models, the radiator is released from the condenser, while on 2013 and later models, the condenser is removed by taking out the mounting bolts and lifting it from the U-mounts on the radiator. On vehicles with automatic transaxles, the transaxle cooler lines are disconnected from the radiator. The radiator is carefully lifted out, ensuring the rubber radiator insulators are in place. After removing any bugs and dirt from the radiator, it should be inspected for leaks and damage. Installation involves inspecting and ensuring the rubber insulators in the lower crossmember are in good condition. The radiator is seated correctly on the insulators before securing the top brackets, and the cooling system is filled with the appropriate coolant mixture and bled. The engine is started, checked for leaks, and allowed to reach normal operating temperature. On automatic transaxle-equipped vehicles, the transmission fluid level is also checked. For 2.7L V6 models, the cooling module, consisting of various components like the radiator, air conditioning condenser, cooling fan shroud assembly, Charge Air Cooler (CAC), and transaxle cooler, can be removed as a unit for certain procedures requiring better access to the engine compartment. Before removal, the air conditioning system must be discharged, and the cooling system drained. The front bumper cover, active shutter grille, and engine cover are removed. The upper radiator hose is disconnected, and the electrical connector to the cooling fans is detached. The transaxle cooler line bracket is removed, along with the radiator upper cover and guide pins. On turbocharged models, the Charge Air Cooler (CAC) inlet and outlet pipes are loosened and removed. The coolant expansion tank line is disconnected, and the lower radiator hose is detached using quick-release tabs. The cooling module mounting bolts are removed, and with assistance, the module is taken out from the front of the vehicle. Installation involves reversing the removal steps, ensuring the cooling module mounting bolts are tightened, and filling the system with the correct antifreeze mixture. The automatic transaxle fluid level is checked, and the engine is started and checked for leaks. Finally, the air conditioning system is recharged by the shop that discharged it. For the radiator on 2.7L V6 models, it is removed after taking out the cooling module. The cooling fan shroud assembly mounting bolts are removed, and the assembly is detached. The transaxle cooler lines to the condenser are disconnected, and the cooler tube bracket bolts are removed. The condenser side seal fasteners are disengaged, allowing the removal of the condenser assembly by taking out the mounting bolts and sliding it up and off the radiator. On turbocharged models, the Charge Air Cooler (CAC) is lifted off the radiator after removing its mounting bolts. Finally, the radiator lower support bolts are removed, and the lower support is taken off from the bottom of the radiator. Installation follows the reverse order of removal.Posted by FordPartsGiant Specialist
If you have any questions about this product, please don't hesitate to ask us. We will be happy to help you!- Q:
Why choose Ford Parts Giant
- Dedicated Service
Your complete satisfaction is our #1 goal
- Lowest Prices
Best deals on genuine OE parts from dealerships
- Fast Delivery
Orders are processed and delivered promptly