Additional information needed to verify part fitment
My Vehicle: 2013 Ford Taurus
Change VehicleThe vehicle options this part fits:
- Fitting Vehicle Options: 6 Cyl 3.5L Cyclone Petrol TIVCT, 6 Cyl 3.5L DOHC T/C
- Fit Note: With Non Painted Brake Calipers
- Production Date: From 02/2012
Ford BB5Z-5A772-A Bar - Stabilizer
2009-2019 Ford BB5Z5A772A
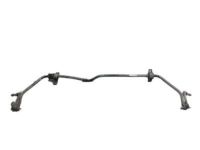


- Part DescriptionBar - Stabilizer
- Base No.5A772
- Replaces8A8Z-5A772-B
- ManufacturerFord
2013 Ford Taurus
The vehicle options this part fits:
- Fitting Vehicle Options: 6 Cyl 3.5L Cyclone Petrol TIVCT, 6 Cyl 3.5L DOHC T/C
- Fit Note: With Non Painted Brake Calipers
- Production Date: From 02/2012
$90.17 MSRP: $131.83 1
You Save: $41.66 (32%)
Ships in 1-2 Business Days
Product Specifications
| Brand | Genuine Ford |
| Base No. | 5A772 |
| Manufacturer Part Number | BB5Z-5A772-A, BB5Z5A772A |
| Part Description | Bar - Stabilizer |
| Other Names | Stabilizer Bar |
| Item Dimensions | 53.4 x 15.4 x 8.2 inches |
| Item Weight | 13.50 Pounds |
| Condition | New |
| Fitment Type | Direct Replacement |
| Replaces | 8A8Z-5A772-B |
| Manufacturer | Ford |
| SKU | BB5Z-5A772-A |
| Warranty | This genuine Ford part is guaranteed by Ford's factory warranty. |
| Shipping & Return | Shipping Policy Return Policy |
Warning: California’s Proposition 65
Customer Questions & Answers
- Q:Can you tell me if this part is correct for my car? Posted by FordPartsGiant Specialist
- A:You can Select Your Vehicle to check if BB5Z-5A772-A fits your vehicle.Posted by FordPartsGiant Specialist
- Q:How to remove and install the front stabilizer bar and stabilizer bar bushing on a Ford Taurus? Posted by Customer
- A:The sway bar bushings and brackets are part of the Sway Bar Kit and are not replaceable. Place the shifter in the Neutral position. Detach the oxygen sensor harness from the rear of the subframe, then disconnect the electrical connector. If you're working on an all-wheel drive model, remove the exhaust Y pipe and the front catalytic converter. If you're working on a 2007 or earlier model, remove the rear catalytic converter. Remove the lower nut from the stabilizer link lower nut. Caution: DO NOT use power tools to remove the stabilizer link nuts. Separate the tie-rods ends from the steering knuckle. Detach the control arms from the subframe. Support the rear of the subframe utilizing a floor jack positioned in the center. Remove the power steering bracket bolt from the return line and position the line out of the way. Remove the steering gear nuts and bolts. Support the steering gear from above with a length of rope or wire. Remove and subframe bracket bolts and the subframe rear bolts, then lower the subframe about two inches. Remove the left and right Sway Bar Kit bracket bolts. Remove the Sway Bar Kit by guiding it towards the right side of the vehicle between the subframe and steering gear. Installation is the reverse of the removal procedure. Replace all nuts and bolts with NEW fasteners and tighten them to the torque values.Posted by FordPartsGiant Specialist
- Q:How to remove and install the rear stabilizer bar and stabilizer bar bushing on Ford Taurus? Posted by Customer
- A:For 2009 and earlier front-wheel drive models, start by loosening the rear wheel lug nuts, raising the rear of the vehicle, and supporting it securely on jackstands, then remove the wheels. Lower the exhaust system from the rear of the flex pipe and remove the stabilizer bar link to stabilizer bar nuts on both sides. Proceed to remove the bolts holding the sway bar bushing brackets and the sway bar itself. While the sway bar is off the vehicle, inspect the bushings, and if they are cracked, worn, or deteriorated, the sway bar must be replaced. Installation is the reverse of removal, tightening the fasteners to the specified torque values. Install the wheel and lug nuts, then lower the vehicle and tighten the lug nuts to the torque. For 2007 and earlier all-wheel drive models, measure the distance from the center of the rear wheel hub to the fender lip with the vehicle on level ground and under its own weight. Loosen the rear wheel lug nuts, raise the rear of the vehicle, and support it securely on jackstands, then remove the wheels. Remove the rear section of the exhaust system and have an assistant apply the brake while you unscrew the left-side drive axle/hub nut. Remove the left side brake caliper and caliper mounting bracket as an assembly, supporting the caliper with wire or rope to avoid hanging by the brake hose. Push the drive axle stub shaft into the hub with a drive hub remover, then remove the left side upper arm-to-rear knuckle nut and use a ball joint separator to separate the arm from the knuckle. Support the lower suspension arm with a floor jack and raise it slightly to compress the coil spring. Loosen the left-side trailing arm-to-subframe bolt and detach the trailing arm from the knuckle, then detach the left-side toe link from the knuckle. Loosen the left side shock absorber lower mounting bolt, lower the floor jack until the coil spring is almost fully extended, and then remove the shock absorber lower mounting bolt. Remove the nuts and detach the sway bar links from the sway bar, and remove the bolts holding the sway bar bushing brackets and the sway bar. Guide the bar out from the left side of the vehicle, and while the sway bar is off the vehicle, inspect the bushings, replacing the sway bar if the bushings are cracked, worn, or deteriorated. Installation is the reverse of removal, tightening the fasteners to the specified torque values. Install the wheel and lug nuts, then lower the vehicle and tighten the lug nuts to the torque.Posted by FordPartsGiant Specialist
If you have any questions about this product, please don't hesitate to ask us. We will be happy to help you!
Why choose Ford Parts Giant
- Dedicated Service
Your complete satisfaction is our #1 goal
- Lowest Prices
Best deals on genuine OE parts from dealerships
- Fast Delivery
Orders are processed and delivered promptly