My Garage
My Account
Cart
This part fits
2014 Ford Fusion
Check another vehicle- Fit Note: Less Sync, Sync II, Sync III, With Sync
- Production Date: From 08/2012
Ford DS7Z-18813-A Aerial Without Cable
2013-2020 Ford DS7Z18813A
Customer Questions & Expert Answers (3)

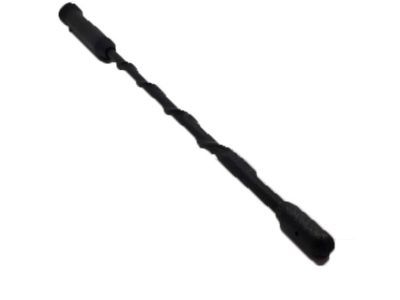
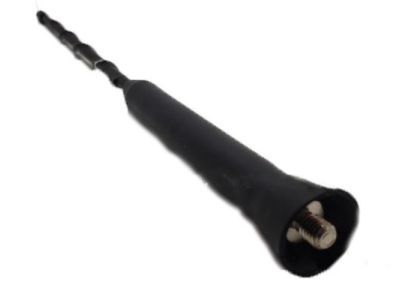
- Part DescriptionAerial Without Cable
- 10" (254 MM)
- Base No.18813
- ManufacturerFord
This part fits
2014 Ford Fusion
Check another vehicle- Fit Note: Less Sync, Sync II, Sync III, With Sync
- Production Date: From 08/2012
$14.95 MSRP: $21.30
You Save: $6.35 (30%)
Ships in 1 Business Day
1
- Related Parts
- Specifications
- Q&A
Product Specifications
Brand Genuine Ford Base No. 18813 Manufacturer Part Number DS7Z-18813-A, DS7Z18813A Part Description Aerial Without Cable Other Names Antenna Mast Manufacturer Note 10" (254 MM) Item Dimensions 6.2 x 20.0 x 0.3 inches Item Weight 0.40 Pounds Condition New Fitment Type Direct Replacement Manufacturer Ford SKU DS7Z-18813-A Warranty This genuine Ford part is guaranteed by Ford's factory warranty. Shipping & Return Shipping Policy Return Policy Warning: California's Proposition 65Customer Questions & Expert Answers
- Q:I am wondering if this is the exact part that fits in Posted by FordPartsGiant Specialist
- A:You can Select Your Vehicle to check if DS7Z-18813-A fits your vehicle.Posted by FordPartsGiant Specialist
Installation and Repair Tips- Q:How to remove and install Antenna Cable and Antenna on Ford Fusion? Posted by Customer
- A:For models without a roof-mounted antenna, the antenna is integrated into the rear window and cannot be serviced separately. For models with a roof-mounted antenna, begin by unscrewing the antenna mast counter-clockwise to remove it. Next, carefully take off the trim around the rear window and lower the headliner enough to access the antenna base; on earlier models, remove the center bolt, while on later models, squeeze the locking tabs and pull the base out, then disconnect the connector. Installation follows the reverse order of removal. To access the antenna module, remove the C-pillar trim, disconnect the electrical connectors, and take out the module mounting bolts. The antenna cable consists of front and rear cables, with the rear cable routed down the right C-pillar and along various components to connect at the right kick panel, while the front cable runs from the right kick panel across the glove box area to the radio. If a cable needs replacement, disconnect it at both ends and leave it in place, installing a new cable instead. To access the rear antenna cable, remove the back seat cushion, right C-pillar, door sills, front passenger seat, carpeting, and right kick panel, then disconnect and replace the cable. For the front antenna cable, remove the right kick panel, glove box, and radio, then disconnect and replace the cable.Posted by FordPartsGiant Specialist
- Additional Installation and Repair Tips by AI Expert
- Removal: 1. Park on a level surface, set the parking brake, remove the key, and wear eye protection and gloves. 2. Protect painted surfaces and interior trim with cloths or fender covers before working near the antenna area. 3. Disconnect the negative battery terminal to prevent shorts; isolate the cable away from the battery. 4. Locate and remove any interior access panels or trim (typically in the trunk, headliner, or under trim) to reach the antenna base hardware. 5. Carefully release and label the antenna electrical connector(s) and coax cable(s); disengage any retaining clips or grommets. 6. Support the antenna assembly from the outside while removing its mounting hardware (nuts, screws, or clips), noting that fastener type and count vary by design. 7. Remove the antenna assembly or mast from the vehicle; if the mast is removable, unscrew or unclip it per its design. 8. Clean the mounting surface of old sealant and debris, and inspect the hole and wiring for corrosion or damage. 9. Set the old hardware, gaskets, and components aside for comparison with the replacement part. Installation: 1. Compare the new antenna assembly to the old unit and transfer any necessary gaskets, seals, or mounting pieces supplied with the replacement. 2. Route the antenna cable through the opening and seat any grommets so the wiring is not pinched; use new grommets or sealant if provided. 3. Apply a light coating of dielectric grease to electrical contacts if appropriate and recommended for the connector type. 4. Position the antenna base and loosely install the mounting hardware to align the assembly before final tightening. 5. Progressively tighten the mounting hardware until the antenna is snug and the gasket is compressed; avoid over-tightening. 6. Reconnect the coax and electrical connectors, securing wiring with clips or ties so it cannot chafe or snag. 7. Reinstall interior access panels and trim, ensuring clips engage without distortion. 8. Reconnect the negative battery terminal and clear any stored codes if required by the vehicle systems. 9. Test antenna function: check AM/FM reception, satellite or data services if applicable, and any related hands-free or navigation features. 10. Inspect the exterior mounting area for a proper seal and, if practical, check for leaks after a light water test or driving in wet conditions. Repair tip: Always replace worn gaskets or weather seals with new parts to ensure a good waterproof seal and reduce chances of corrosion or noise issues.
- Q:
Why choose Ford Parts Giant
- Dedicated Service
Your complete satisfaction is our #1 goal
- Lowest Prices
Best deals on genuine OE parts from dealerships
- Fast Delivery
Orders are processed and delivered promptly