My Garage
My Account
Cart
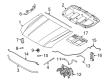
Genuine Ford Ranger Hood
Engine Hood- Select Vehicle by Model
- Select Vehicle by VIN
Select Vehicle by Model
orMake
Model
Year
Select Vehicle by VIN
For the most accurate results, select vehicle by your VIN (Vehicle Identification Number).
11 Hoods found


Ford Ranger HOOD ASY - LESS HINGES
Part Number: KB3Z-16612-A$663.50 MSRP: $987.35You Save: $323.85 (33%)Ships in 1-2 Business Days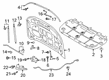
Ford Ranger HOOD ASY - LESS HINGES
Part Number: KB3Z-16612-B$663.50 MSRP: $987.35You Save: $323.85 (33%)Ships in 1-2 Business Days
Ford Ranger HOOD ASY - LESS HINGES
Part Number: N1WZ-16612-L$485.14 MSRP: $715.55You Save: $230.41 (33%)Ships in 1-2 Business Days
Ford Ranger Hood Assembly
Part Number: 4L5Z-16612-BA$612.76 MSRP: $911.85You Save: $299.09 (33%)Ships in 1 Business DayFord Ranger HOOD ASY - LESS HINGES
Part Number: N1WZ-16612-M$496.57 MSRP: $732.40You Save: $235.83 (33%)Ships in 1-2 Business DaysFord Ranger HOOD ASY - LESS HINGES
Part Number: N1WZ-16612-V$740.44 MSRP: $1101.85You Save: $361.41 (33%)Ships in 1-2 Business DaysFord Ranger HOOD ASY - LESS HINGES
Part Number: N1WZ-16612-W$587.93 MSRP: $937.68You Save: $349.75 (38%)Ships in 1-2 Business Days
Ford Ranger Hood
Ford Ranger Hood shields the vehicle's engine from the elements. It bestows the truck's front end with a streamlined surface that assists with airflow for better efficiency. For many years, Ford made this panel from sturdy steel on early models, then added lighter aluminum and fiberglass options so Ranger owners could balance weight and durability. Hood is rear hinged, lifts up from the front, and locks down to seal out the rain and debris but opens wide for easy servicing, whatever the material. The styling also changed, with the smooth original contours of the earlier Rangers being replaced by more pronounced center bulges in the later versions which suggest power and add crash energy absorbing crumple zones. Hood versions made of primer coated steel come ready to paint, while units constructed of gel-coat fiberglass are finished and ready to use off the shelf for modern trucks from Ford. When shopping for a replacement, be sure to check the exact Ford build year to ensure Hood lines will match adjoining panels and the Hood latch will fit properly to keep your Ranger looking sharp and protected.
We provide a wide range of Ford Ranger Hood at the optimal prices. If you need Ford Ranger Hood, you can shop with confidence on our website. All our OEM parts come with a manufacturer's warranty and are delivered to your doorstep with a fast delivery service.
Ford Ranger Hood Parts Questions & Experts Answers
- Q: How to remove and install the hood on Ford Ranger?A:The hood is heavy and somewhat awkward to remove and install, so at least two people should perform this procedure. Begin by opening the hood and supporting it in the open position with a long piece of wood. Protect the paint by covering the Fenders and cowl with blankets or heavy cloths. Scribe or draw alignment marks around the hinge and bolt heads to ensure proper alignment during reinstallation. Disconnect the underhood light connector on the driver's side and the ground strap on the passenger side of the hood if equipped. Have an assistant hold onto one side of the hood while you hold the other side, then remove the hood-to-hinge assembly bolts on your side before your assistant removes the bolts on the other side. Lift the hood off and for installation, align the hood and hinges using the previously made alignment marks, ensuring to tighten the bolts securely. For adjustment, loosen the hood retaining bolts and move the hood from side-to-side or front-to-rear until it is properly aligned with the fenders at the front, then tighten the bolts securely. Loosen the bolts securing the Hood Latch assembly and move the latch until it aligns correctly with the hood latch striker, then tighten the latch bolt securely.


