My Garage
My Account
Cart
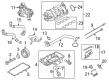
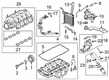
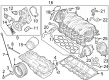
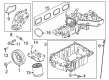
Genuine Ford Mustang Intake Manifold
Engine Intake Manifold- Select Vehicle by Model
- Select Vehicle by VIN
Select Vehicle by Model
orMake
Model
Year
Select Vehicle by VIN
For the most accurate results, select vehicle by your VIN (Vehicle Identification Number).
48 Intake Manifolds found


Ford Mustang Inlet Manifold Assembly
Part Number: 1W7Z-9424-AB$333.35 MSRP: $491.67You Save: $158.32 (33%)


Ford Mustang Inlet Manifold Assembly
Part Number: JR3Z-9424-B$335.61 MSRP: $495.00You Save: $159.39 (33%)Ships in 1-3 Business Days


Ford Mustang Inlet Manifold Assembly
Part Number: FR3Z-9424-D$80.94 MSRP: $118.33You Save: $37.39 (32%)Ships in 1-2 Business Days


Ford Mustang Manifold Hardware Kit
Part Number: 1R3Z-9424-AAA$333.35 MSRP: $491.67You Save: $158.32 (33%)

Ford Mustang Inlet Manifold Assembly
Part Number: FR3Z-9424-F$108.64 MSRP: $158.83You Save: $50.19 (32%)


Ford Mustang Inlet Manifold Assembly
Part Number: FR3Z-9424-P$82.08 MSRP: $120.00You Save: $37.92 (32%)Ships in 1-3 Business Days


Ford Mustang Inlet Manifold Assembly
Part Number: GR3Z-9424-C$1583.68 MSRP: $2356.67You Save: $772.99 (33%)Ships in 1-3 Business Days

Ford Mustang Inlet Manifold Assembly
Part Number: 7R3Z-9424-AA$258.77 MSRP: $381.67You Save: $122.90 (33%)Ships in 1-2 Business Days


Ford Mustang Inlet Manifold Assembly
Part Number: JR3Z-9424-A$335.61 MSRP: $495.00You Save: $159.39 (33%)Ships in 1-3 Business Days


Ford Mustang Inlet Manifold Assembly
Part Number: CR3Z-9424-A$301.71 MSRP: $445.00You Save: $143.29 (33%)

Ford Mustang Inlet Manifold Assembly
Part Number: BR3Z-9424-P$89.38 MSRP: $130.67You Save: $41.29 (32%)Ships in 1-3 Business Days

Ford Mustang Inlet Manifold Assembly
Part Number: CL3Z-9424-C$93.14 MSRP: $136.17You Save: $43.03 (32%)Ships in 1 Business Day


Ford Mustang Inlet Manifold Assembly
Part Number: GR3Z-9424-B$1583.68 MSRP: $2356.67You Save: $772.99 (33%)Ships in 1-3 Business Days
Ford Mustang Inlet Manifold Assembly
Part Number: 1W7Z-9424-AA$333.35 MSRP: $491.67You Save: $158.32 (33%)Ford Mustang Inlet Manifold Assembly
Part Number: FR3Z-9424-G$669.76 MSRP: $996.67You Save: $326.91 (33%)
Ford Mustang Inlet Manifold Assembly
Part Number: PR3Z-9424-A$340.13 MSRP: $501.67You Save: $161.54 (33%)
Ford Mustang Inlet Manifold Assembly
Part Number: PB5Z-9424-A$92.23 MSRP: $134.83You Save: $42.60 (32%)Ships in 1-2 Business Days
Ford Mustang Inlet Manifold Assembly
Part Number: BR3Z-9424-C$89.38 MSRP: $130.67You Save: $41.29 (32%)Ships in 1-3 Business Days
Ford Mustang Inlet Manifold Assembly
Part Number: BR3Z-9424-B$167.58 MSRP: $245.00You Save: $77.42 (32%)Ships in 1-2 Business Days
Ford Mustang Inlet Manifold Assembly
Part Number: 4R3Z-9424-EL$428.27 MSRP: $631.67You Save: $203.40 (33%)
| Page 1 of 3 |Next >
1-20 of 48 Results
Ford Mustang Intake Manifold
The Intake Manifold in Ford Mustang cars particularly concerns with the distribution of air or air and fuel mixture to every cylinder directly affecting power and performance of the vehicle's engine. It works through sucking air from the throttle body or carburector depending on type of the engine in this case. For example carbureted and throttle body injection engines inject fuel within the air inlet manifold while a multi-port fuel injection injects fuel separately with better efficiency. Where in the past, the intake manifolds were made of cast iron and aluminum, new composite plastics are used for the intake manifolds as they are lighter and help improve fuel efficiency by being able to retain cooler air temperatures. Intake manifolds on some models are variable length intake manifolds (VLIM) which increase the take in of air by varying with the engine load. They also keep on enhancing power and efficiency, not only in the V8, but across the Mustang's powertrain options.
We provide a wide range of Ford Mustang Intake Manifold at the optimal prices. If you need Ford Mustang Intake Manifold, you can shop with confidence on our website. All our OEM parts come with a manufacturer's warranty and are delivered to your doorstep with a fast delivery service.
Ford Mustang Intake Manifold Parts Questions & Experts Answers
- Q: How to remove and install the intake manifold in V8 engine on Ford Mustang?A:Before attempting to remove the intake manifold, loosen the fuel system pressure and, disconnect the negative terminal of the battery. Remove the air intake duct from the throttle body, remove the brake booster vacuum line from the intake manifold and disconnect the electrical connectors of the electronic throttle body. Remove the PCV hoses, and loose the quick-connect coupling on the EVAP line at the intake manifold. For 4.6L Sedan, Disconnect the drive belt, no power, disconnected the Fuel Rail Pressure and Temperature sensor connector, no fuel, took off the fuel rail injectors. Remove the electrical connector from the Charge Motion Control Valve, this is located at the rear of the intake manifold, it will be easier to do this if you unbolt and move the manifold forward. For the 5.0L engine, it is necessary to remove, if installed, the strut tower cross brace, to take off the engine cover, to disconnect the fuel line connected to the fuel rail, to pinch the heater hoses from the support brackets and, at last, to remove factors fastened to the support bracket. Raise the fuel rail insulators and remove the electrical connectors to the fuel injectors; however, do not remove the fuel rails, then remove the fuel rail bolts. For all engines, turn out the intake manifold bolts gradually in the reverse sequence to the tightening sequence until they can be turned out by hand. On 4.6L engines, also push the intake manifold assembler ahead and remove the CTsensor jumper harness connector. You can use a small amount of force to lift the intake manifold from the cylinder heads and remove the intake manifold gaskets and ensure dirty and sealant from the sealing surface has been cleaned out. Using some shop rags, or black jogging duct tape, cover the intake ports to avoid the occurrence of debris in the engine. In installation, if you are replacing the manifold, then shift all fixtures to the new manifold, fix new O-rings on the manifold, then fix the manifold gently and neatly such that the O-rings do not get distorted, apply and tighten the manifold bolts in the right sequence. Perform the remaining steps of the installation as those steps were removed, being careful not charger electrical harness is in the way of the Charge Motion Control Valve actuator rods.

Related Ford Mustang Parts

Browse by Year
2025 Intake Manifold 2024 Intake Manifold 2023 Intake Manifold 2022 Intake Manifold 2021 Intake Manifold 2020 Intake Manifold 2019 Intake Manifold 2018 Intake Manifold 2017 Intake Manifold 2016 Intake Manifold 2015 Intake Manifold 2014 Intake Manifold 2013 Intake Manifold 2012 Intake Manifold 2011 Intake Manifold 2010 Intake Manifold 2009 Intake Manifold 2008 Intake Manifold 2007 Intake Manifold 2006 Intake Manifold 2005 Intake Manifold 2004 Intake Manifold 2003 Intake Manifold 2002 Intake Manifold 2001 Intake Manifold 2000 Intake Manifold 1999 Intake Manifold 1998 Intake Manifold 1997 Intake Manifold 1996 Intake Manifold 1995 Intake Manifold 1994 Intake Manifold