My Garage
My Account
Cart
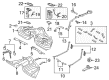
Genuine Ford Mustang Fuel Level Sensor
Gas Gauge Sensor- Select Vehicle by Model
- Select Vehicle by VIN
Select Vehicle by Model
orMake
Model
Year
Select Vehicle by VIN
For the most accurate results, select vehicle by your VIN (Vehicle Identification Number).
31 Fuel Level Sensors found


Ford Mustang Fuel Tank Sender Assembly
Part Number: BR3Z-9275-B$93.05 MSRP: $150.73You Save: $57.68 (39%)Ships in 1-2 Business Days


Ford Mustang Fuel Tank Sender Assembly
Part Number: FR3Z-9275-A$149.28 MSRP: $241.82You Save: $92.54 (39%)Ships in 1-2 Business Days


Ford Mustang Fuel Tank Sender Assembly
Part Number: 7R3Z-9275-C$240.45 MSRP: $392.73You Save: $152.28 (39%)Ships in 1-2 Business Days

Ford Mustang Fuel Tank Sender Assembly
Part Number: 7R3Z-9A299-C$93.05 MSRP: $150.73You Save: $57.68 (39%)Ships in 1-2 Business Days


Ford Mustang Fuel Tank Sender Assembly
Part Number: BR3Z-9A299-B$44.90 MSRP: $72.73You Save: $27.83 (39%)Ships in 1-2 Business Days
Ford Mustang Fuel Tank Sender Assembly
Part Number: 6R3Z-9275-AA$240.45 MSRP: $392.73You Save: $152.28 (39%)Ships in 1-2 Business Days

Ford Mustang Fuel Pump Assembly
Part Number: JR3Z-9350-C$317.26 MSRP: $475.00You Save: $157.74 (34%)Ships in 1-2 Business Days


Ford Mustang Fuel Tank Sender Assembly
Part Number: FR3Z-9A299-A$102.14 MSRP: $165.45You Save: $63.31 (39%)Ships in 1-3 Business Days


Ford Mustang Fuel Tank Sender Assembly
Part Number: 7R3Z-9A299-A$126.83 MSRP: $205.45You Save: $78.62 (39%)Ships in 1-3 Business Days

Ford Mustang Sender Assembly
Part Number: F8ZZ9275AA$139.24 MSRP: $193.42You Save: $54.18 (29%)Ships in 1-2 Business Days
Ford Mustang Fuel Tank Sender Assembly
Part Number: 4R3Z-9275-AA$93.05 MSRP: $150.73You Save: $57.68 (39%)Ships in 1-2 Business DaysFord Mustang Fuel Tank Sender Assembly
Part Number: BR3Z-9A299-A$44.90 MSRP: $72.73You Save: $27.83 (39%)Ships in 1-2 Business DaysFord Mustang Fuel Tank Sender Assembly
Part Number: BR3Z-9275-A$93.05 MSRP: $150.73You Save: $57.68 (39%)Ships in 1-2 Business Days
Ford Mustang Fuel Tank Sender Assembly
Part Number: 6R3Z-9275-A$93.05 MSRP: $150.73You Save: $57.68 (39%)Ships in 1-2 Business Days
Ford Mustang Fuel Tank Sender Assembly
Part Number: JR3Z-9275-B$164.99 MSRP: $267.27You Save: $102.28 (39%)Ships in 1-3 Business Days
Ford Mustang Sender And Pump Assembly
Part Number: FR3Z-9H307-F$536.54 MSRP: $883.64You Save: $347.10 (40%)Ships in 1-3 Business Days

Ford Mustang Sender And Pump Assembly
Part Number: KR3Z-9H307-B$1012.37 MSRP: $1667.27You Save: $654.90 (40%)Ships in 1-3 Business Days
Ford Mustang Fuel Tank Sender Assembly
Part Number: JR3Z-9275-A$164.99 MSRP: $267.27You Save: $102.28 (39%)Ships in 1-3 Business Days


Ford Mustang Fuel Tank Sender Assembly
Part Number: AR3Z-9A299-B$135.66 MSRP: $216.36You Save: $80.70 (38%)
| Page 1 of 2 |Next >
1-20 of 31 Results
Ford Mustang Fuel Level Sensor
The Fuel Level Sensor in Ford Mustang vehicles mainly plays the role of detecting fuel level in the tank to notify to the driver when the car needs to be refueled. This electronic device is optimally designed to function at high temperatures wherein the readings are reliable yet the device's power usage is minimal. Usually placed inside the fuel tank, the Ford Mustang Fuel Level Sensor including the float, the actuating rod, and the resistor, all operate with the aim of sending signals to the fuel gauge. Through the years, different types of Fuel Level Sensors have been fit in Ford Mustang, the improvements in technology improving dependability and calibration. Essentials of the Fuel Level Sensor include: In the case of faults, the Fuel Level Sensor has the potential of providing wrong data regarding levels of fuel making some levels of inconvenience for drivers.
We provide a wide range of Ford Mustang Fuel Level Sensor at the optimal prices. If you need Ford Mustang Fuel Level Sensor, you can shop with confidence on our website. All our OEM parts come with a manufacturer's warranty and are delivered to your doorstep with a fast delivery service.
Ford Mustang Fuel Level Sensor Parts Questions & Experts Answers
- Q: How to remove and install a fuel level sensor on Ford Mustang?A:Relieve the system fuel pressure, then disconnect the cable from the negative battery terminal. Remove the rear seat cushion and take off the fuel level sensor access cover located on the right. Disconnect the fuel level sensor electrical connector. Using a hammer and a brass punch, loosen the fuel level sensor lock ring by turning it counterclockwise, and when it is loose enough, fully unscrew it. Before removing the fuel level sensor from the Fuel Tank, mark its relationship to the tank. Lift the fuel level sensor to access the quick-connect coupling for the crossover tube connected to the underside of the sensor assembly, and disconnect the crossover tube's quick-connect fitting by depressing the release button and pulling the fuel line out. After disconnecting the crossover tube, carefully lift the fuel level sensor out of the fuel tank, angling it as necessary to protect the float and float arm from damage. Remove and discard the old O-ring type seal, then clean the fuel sensor mounting flange and the tank mounting surface, ensuring to use a new O-ring type seal with a thin coat of heavy grease to hold it in place during installation. After installing the fuel sensor in the fuel tank, ensure the alignment arrows on the sensor mounting flange and the top of the fuel tank are aligned, and complete the installation by reversing the removal steps.

Related Ford Mustang Parts

Browse by Year
2025 Fuel Level Sensor 2024 Fuel Level Sensor 2023 Fuel Level Sensor 2022 Fuel Level Sensor 2021 Fuel Level Sensor 2020 Fuel Level Sensor 2019 Fuel Level Sensor 2018 Fuel Level Sensor 2017 Fuel Level Sensor 2016 Fuel Level Sensor 2015 Fuel Level Sensor 2014 Fuel Level Sensor 2013 Fuel Level Sensor 2012 Fuel Level Sensor 2011 Fuel Level Sensor 2010 Fuel Level Sensor 2009 Fuel Level Sensor 2008 Fuel Level Sensor 2007 Fuel Level Sensor 2006 Fuel Level Sensor 2005 Fuel Level Sensor 2004 Fuel Level Sensor 2003 Fuel Level Sensor 2002 Fuel Level Sensor 2001 Fuel Level Sensor 2000 Fuel Level Sensor 1999 Fuel Level Sensor 1998 Fuel Level Sensor 1997 Fuel Level Sensor 1996 Fuel Level Sensor 1995 Fuel Level Sensor 1994 Fuel Level Sensor 1993 Fuel Level Sensor 1992 Fuel Level Sensor 1991 Fuel Level Sensor 1990 Fuel Level Sensor 1989 Fuel Level Sensor 1988 Fuel Level Sensor 1987 Fuel Level Sensor