My Garage
My Account
Cart
Genuine Ford Expedition Wheel Hub
Wheel Axle Hub- Select Vehicle by Model
- Select Vehicle by VIN
Select Vehicle by Model
orMake
Model
Year
Select Vehicle by VIN
For the most accurate results, select vehicle by your VIN (Vehicle Identification Number).
53 Wheel Hubs found


Ford Expedition Wheel Hub Assembly
Part Number: JL1Z-1104-G$334.14 MSRP: $478.18You Save: $144.04 (31%)


Ford Expedition Hub Assembly - Wheel
Part Number: BL3Z-1104-A$252.89 MSRP: $380.00You Save: $127.11 (34%)


Ford Expedition Hub Assembly - Wheel
Part Number: JL1Z-1104-A$334.14 MSRP: $478.18You Save: $144.04 (31%)


Ford Expedition Hub Assembly - Wheel
Part Number: 7L1Z-1104-D$254.92 MSRP: $416.36You Save: $161.44 (39%)Ships in 1-3 Business Days

Ford Expedition Hub Assembly - Wheel
Part Number: CL3Z-1104-E$232.66 MSRP: $380.00You Save: $147.34 (39%)Ships in 1 Business Day

Ford Expedition Hub Assembly - Wheel
Part Number: 9L3Z-1104-B$233.77 MSRP: $381.82You Save: $148.05 (39%)Ships in 1-2 Business Days
Ford Expedition Hub Assembly - Wheel
Part Number: CL3Z-1104-A$232.66 MSRP: $380.00You Save: $147.34 (39%)Ships in 1 Business Day


Ford Expedition Hub Assembly - Wheel
Part Number: 9L3Z-1104-A$276.07 MSRP: $450.91You Save: $174.84 (39%)
Ford Expedition Hub Assembly - Wheel
Part Number: BL3Z-1104-B$248.24 MSRP: $405.45You Save: $157.21 (39%)Ships in 1-2 Business Days
Ford Expedition Hub Assembly - Wheel
Part Number: FL1Z-1104-E$311.70 MSRP: $509.09You Save: $197.39 (39%)Ships in 1 Business Day


Ford Expedition Hub Assembly - Wheel
Part Number: DL1Z-1104-A$229.32 MSRP: $374.55You Save: $145.23 (39%)Ships in 1-2 Business Days
Ford Expedition Hub Assembly - Wheel
Part Number: FL1Z-1104-C$311.70 MSRP: $509.09You Save: $197.39 (39%)Ships in 1 Business Day


Ford Expedition Hub Assembly - Wheel
Part Number: CL3Z-1104-F$248.24 MSRP: $405.45You Save: $157.21 (39%)Ships in 1-2 Business Days
Ford Expedition Hub Assembly - Wheel
Part Number: BL1Z-1104-A$229.32 MSRP: $374.55You Save: $145.23 (39%)Ships in 1-2 Business Days
Ford Expedition Wheel Hub Assembly
Part Number: RL1Z-1109-B$376.65 MSRP: $647.27You Save: $270.62 (42%)Ships in 1-2 Business Days
Ford Expedition Hub Assembly - Wheel
Part Number: 7L1Z-1104-E$212.62 MSRP: $347.27You Save: $134.65 (39%)Ships in 1-2 Business Days
Ford Expedition Knuckle And Hub Assembly
Part Number: JL1Z-5A969-A$343.58 MSRP: $478.18You Save: $134.60 (29%)Ships in 1-3 Business DaysFord Expedition Hub Assembly - Wheel
Part Number: CL3Z-1104-B$248.24 MSRP: $405.45You Save: $157.21 (39%)Ships in 1-2 Business Days


Ford Expedition Knuckle And Hub Assembly
Part Number: 9L1Z-5A969-B$247.47 MSRP: $365.00You Save: $117.53 (33%)


Ford Expedition Knuckle And Hub Assembly
Part Number: 9L1Z-5A968-B$246.34 MSRP: $363.33You Save: $116.99 (33%)
| Page 1 of 3 |Next >
1-20 of 53 Results
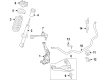
Ford Expedition Wheel Hub
The Ford Expedition Wheel Hub, in general, is a component that is essential in enabling the wheels of the automobile to rotate freely while at the same time fixing them securely on the SUV. There are three designs of hub and bearing assemblies, of which the most prevalent type is the unit assembly incorporating the ABS sensor. When the wheel hub is starting to fail, it is possible to hear some humming noises, have a loose steering wheel as well as amount of wheel movement that is excessive as well. The Expedition is endowed with a powerful engine and a spacious cabin; however, it is critical to change the wheel hub from time to time to increase its performance and safety. The first aspect that most people do not notice in the proper working and functioning of the vehicle is the wheel hub; therefore, the comprehensive check and maintenance of the wheel hub are critical to guarantee proper operation of the vehicle.
We provide a wide range of Ford Expedition Wheel Hub at the optimal prices. If you need Ford Expedition Wheel Hub, you can shop with confidence on our website. All our OEM parts come with a manufacturer's warranty and are delivered to your doorstep with a fast delivery service.
Ford Expedition Wheel Hub Parts Questions & Experts Answers
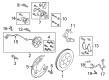
- Q: How to replace the rear Wheel Hub and bearing assembly on Ford Expedition with independent rear suspension?A:The hub and bearing assembly cannot be fixed; you must replace it whenever it's faulty. When changing the rear hub/bearing assembly on Expedition/Navigator models with independent rear suspension, just follow the same steps as for fronts hubs/bearing units. First, activate Drive and apply the parking brake. Loosen the drive-axle/hubnut with a socket and large breaker bar. Turn the air suspension system off if your vehicle has it by using the switch below the right kick panel. Before you start working, free up the wheel lug nuts, lift the car, and place it on stable jackstands. Then remove the wheel, along with the driveaxle/hub nut. Carefully take off the brake caliper and secure its wire to hang on the side. After that, remove the caliper anchor bracket and brake disc. Before removing the driveaxle in models with 4-wheel ABS, take off the splash shield from the steering knuckle, unscrew the sensor bolt from the knuckle, and place the sensor and wires in a safe location. Split the driveaxle ends from the wheel hub on Expedition/Navigator models with independent rear suspension by using a puller tool. Pull the bolt connecting the hub to steering knuckle, then wiggle the hub while holding it side to side to loosen it from the steering knuckle, carefully taking the hub away from the driveaxle. Wrap a rag around the driveaxle's free end to protect it from getting scratched. If the hub won't move off the splines, grab a puller to help get it going. To put it back in, make sure you use multi-purpose grease on the driveaxle splines and tighten all fasteners. Also, replace the O-ring at the hub-to-knuckle joint if your vehicle has one.

Related Ford Expedition Parts
 Ford Expedition Lug Nuts
 Ford Expedition Wheel Seal
 Ford Expedition Wheel Bearing
 Ford Expedition Wheel Stud
 Ford Expedition Spindle
Browse by Year
2025 Wheel Hub 2024 Wheel Hub 2023 Wheel Hub 2022 Wheel Hub 2021 Wheel Hub 2020 Wheel Hub 2019 Wheel Hub 2018 Wheel Hub 2017 Wheel Hub 2016 Wheel Hub 2015 Wheel Hub 2014 Wheel Hub 2013 Wheel Hub 2012 Wheel Hub 2011 Wheel Hub 2010 Wheel Hub 2009 Wheel Hub 2008 Wheel Hub 2007 Wheel Hub 2006 Wheel Hub 2005 Wheel Hub