My Garage
My Account
Cart
Genuine Ford Expedition Heater Core
HVAC Heater Core- Select Vehicle by Model
- Select Vehicle by VIN
Select Vehicle by Model
orMake
Model
Year
Select Vehicle by VIN
For the most accurate results, select vehicle by your VIN (Vehicle Identification Number).
19 Heater Cores found


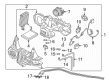
Ford Expedition Heater Core Assembly
Part Number: F65Z-18476-AA$102.10 MSRP: $144.91You Save: $42.81 (30%)

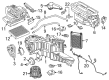
Ford Expedition Heater Core Assembly
Part Number: 9L3Z-18476-A$109.65 MSRP: $155.64You Save: $45.99 (30%)


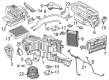
Ford Expedition Heater Core Assembly
Part Number: 7L1Z-18476-A$109.65 MSRP: $155.64You Save: $45.99 (30%)


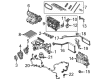
Ford Expedition Heater Core Assembly
Part Number: BL3Z-18476-A$157.14 MSRP: $254.55You Save: $97.41 (39%)Ships in 1-2 Business Days


Ford Expedition HEATER ASY
Part Number: JL1Z-19850-AJ$532.00 MSRP: $784.67You Save: $252.67 (33%)Ships in 1-3 Business Days


Ford Expedition Heater Core Assembly
Part Number: 7L1Z-18476-B$151.52 MSRP: $245.45You Save: $93.93 (39%)Ships in 1-3 Business Days

Ford Expedition Heater Core Assembly
Part Number: 2L1Z-18476-BA$81.82 MSRP: $138.00You Save: $56.18 (41%)
Ford Expedition Heater Radiator And Seal Assembly
Part Number: FL3Z-18476-B$86.53 MSRP: $140.18You Save: $53.65 (39%)Ships in 1-2 Business Days
Ford Expedition Heater Radiator And Seal Assembly
Part Number: FL3Z-18476-A$86.53 MSRP: $140.18You Save: $53.65 (39%)Ships in 1-2 Business Days
Ford Expedition Evaporator Assembly
Part Number: HL3Z-19850-GK$521.09 MSRP: $858.18You Save: $337.09 (40%)Ships in 1-2 Business DaysFord Expedition HEATER ASY
Part Number: JL1Z-19850-AK$551.94 MSRP: $821.33You Save: $269.39 (33%)Ships in 1-3 Business Days
Ford Expedition Evaporator Assembly
Part Number: NL3Z-19850-E$336.74 MSRP: $496.67You Save: $159.93 (33%)Ships in 1-2 Business Days
Ford Expedition Heater Radiator And Seal Assembly
Part Number: JL1Z-18476-AA$74.08 MSRP: $120.00You Save: $45.92 (39%)Ships in 1-3 Business Days
Ford Expedition Heater Core Assembly
Part Number: 7L1Z-18476-C$123.10 MSRP: $199.40You Save: $76.30 (39%)Ships in 1-3 Business DaysFord Expedition Heater Radiator And Seal Assembly
Part Number: ML1Z-18476-A$74.08 MSRP: $120.00You Save: $45.92 (39%)Ships in 1-2 Business Days
Ford Expedition Heater Radiator And Seal Assembly
Part Number: SL1Z-18476-A$205.94 MSRP: $336.36You Save: $130.42 (39%)Ships in 1-2 Business Days


Ford Expedition Heater Core
The Heater Core in Ford Expedition vehicles will also have a significant responsibility of warming the interior of the car with the help of excess engine heat. Looking like an undersize radiator, the core is cooled by a water-antifreeze mix while hot coolant in the system flows through it. Calm air is circulated through the core by the fan which is found in the vehicle to heat the cabin air. There may be different heater cores which have valve or door for regulating the temperature or further pressing may include electromechanical actuators and thermistors. In air-conditioned vehicles, the heater core also plays the function of dehumidifier through reheating the cooled air. Some of the problems are clogging, leakage, and corrosion and usually need a lot of dashboard dismantling during the repair process.
We provide a wide range of Ford Expedition Heater Core at the optimal prices. If you need Ford Expedition Heater Core, you can shop with confidence on our website. All our OEM parts come with a manufacturer's warranty and are delivered to your doorstep with a fast delivery service.
Ford Expedition Heater Core Parts Questions & Experts Answers
- Q: How to remove and install a heater core in a Ford Expedition?A:Ask a dealer service team or air conditioning specialist to empty the coolant system out of your vehicle. To recharge the air conditioning, first disconnect the battery cable from ground. Drain the cooling system. Remove the instrument panel. To get to the heater core, press and move the plastic clips on the heater hoses between the heater core's firewall inlet and outlet tubes. When removing the hoses, just squeeze the two plastic tabs and pull the hoses off the tubes from the heater core. Take off each Evaporator line at the firewall, and plug the heater core tubes to protect from leaking during removal. Place caps on the evaporator lines to keep dirt and moisture from entering. Take off the main vacuum hose, and pull out the tube that parts the air inside the plenum. Loosen the two screws securing a mounting bracket on top of the heater core cage. The placement of screws used to install the heating/cooling module changes among vehicles by year and model, so carefully remove all screws before you can take out the module. Use a screwdriver to take out all screws that hold the heater core cover. Carefully pull out the heater core, and watch out for tearing the foam tape that seals the cover. Reinstall the heater core by placing the original foam sealing material exactly where it was before. The rest of the setup goes back in like it was taken out. Put new attachment retainers and rubber seals on all hoses that lead to the heater core at the firewall. First, put coolant back into the cooling system. Start the engine, and look for where any liquid leaks out. Check if your A/C is working correctly and have your vehicle refilled with coolant. On older models of Navigator/Expedition, a heating and cooling system sits in back. It has a fan, a heater core, and an evaporator installed under the left-sided or right-sided interior trim panel. Getting to and working with the rear heater core is just like handling the mainstream heater core upfront, but this part is much easier to access and work on.

Related Ford Expedition Parts


Browse by Year
2025 Heater Core 2024 Heater Core 2023 Heater Core 2022 Heater Core 2021 Heater Core 2020 Heater Core 2019 Heater Core 2018 Heater Core 2017 Heater Core 2016 Heater Core 2015 Heater Core 2014 Heater Core 2013 Heater Core 2012 Heater Core 2011 Heater Core 2010 Heater Core 2009 Heater Core 2008 Heater Core 2007 Heater Core 2006 Heater Core 2005 Heater Core 2004 Heater Core 2003 Heater Core 2002 Heater Core 2001 Heater Core 2000 Heater Core 1999 Heater Core 1998 Heater Core 1997 Heater Core